Consider the improvement to your home’s value if your garage was more functional offering easy to use storage options from the first day the new buyer moves in. Investing in your garage is like investing in your garden, it is something you can enjoy whilst living at the home but can make a huge impression on any new prospective buyer.
The garage is usually the last room you turn your attention to when you are building a new home or renovating an existing home to live in or even flip. Even so, investing in your garage may be that point of difference you are looking for that could deliver a higher final sale price.
Consider that a higher proportion of customers who call StoreWALL looking for ideas and pricing to improve their garage are women. A tidy and organised garage doesn’t just appeal to the male buyer. It can motivate both parties to see your home as a worthwhile purchase.
New Home Design
Home design in Australia has moved the garage from the back of the property to the front. For many, it is also their main point of entry into the main living quarters of the home. However walk past most new homes and you will notice that their double garage usually only fits one vehicle, with the remaining free space taken up by stuff usually parked on the ground or on shelves against the wall.
Unfortunately it does not make for the prettiest site and confirms that garages still don’t get enough attention and that garage sizing by many home builders is not meeting people’s needs.
If you are prepared to invest in your garden so that it improves the overall look and value of your home, why wouldn’t you also invest in the garage? Consider how you will feel each time you enter and can easily find that tool or that beach chair or piece of sporting equipment. Whilst we don’t build our homes for our neighbours, they too will compliment you on the complete package you now have.
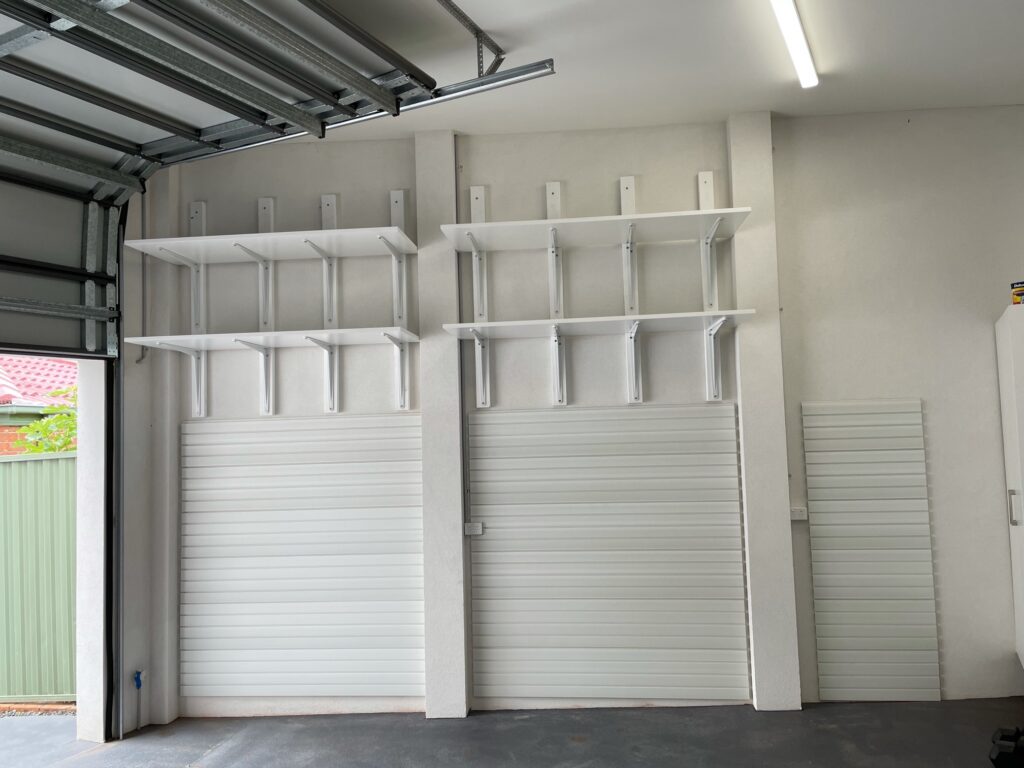
We recently completed some work on a lovely new home (about 18mths old) in a Melbourne beach side suburb which had a combination of brick and plastered garage walls that were not really helping this owner.
Following their investment in StoreWALL, the owners now had a lot more options on how to tidy up their garage (they also did some work on the covering the concrete floor). The owner started hanging items on the wall before we could collect our tools to leave.
Home Renovator’s Missing Piece
If you are in the game of renovating old homes to rent or sell, I doubt the garage would receive any attention outside of a quick sweep prior to inspections or auction day.
If prospective buyers see value in a well designed garden that is easy to maintain, what would they think of a kitted up garage with an easy to use storage solution that is ready and waiting for them?
Investing in Your garage
If you are looking to landscape part of your home including new lawn and plants, a budget of $2000 would be the minimum (that is probably just for the lawn) you would need to start with.
A garage wall area of about 5-6m in width and 2m in height with wall panels and a bunch of accessories like looks and baskets would require an investment of about $2500. With this investment, the garage and storage options offered would be complete and ready to use. To a prospective buyer, your $2500 may be worth a lot more.
A Garage for Life
You might not be planning on staying in the same home for the rest of your life but a garage kitted up with StoreWALL is an investment for the life of the home. It will outlast many generations of owners and they will all be thanking you for it.
A few months ago, I received the below email from Andrew who lives in Sydney “Looking at the StoreWALL system, and am wondering if you’ve come across a Sydney based installer who can install on a rendered brick garage wall? It looks more complex than a standard install, so would rather go to someone who has previously done this”. Shortly after I received a call from him as well and we chatted in more detail about his project.
New Home New Garage
Andrew had done quite a bit of work to his home and he had now turned his attention to his garage. His garage was quite big in terms of height. Both side walls where made from brick and rendered. He also had pillars between sections. Andrew wanted a garage storage system which allowed him to make use of his new garage walls.
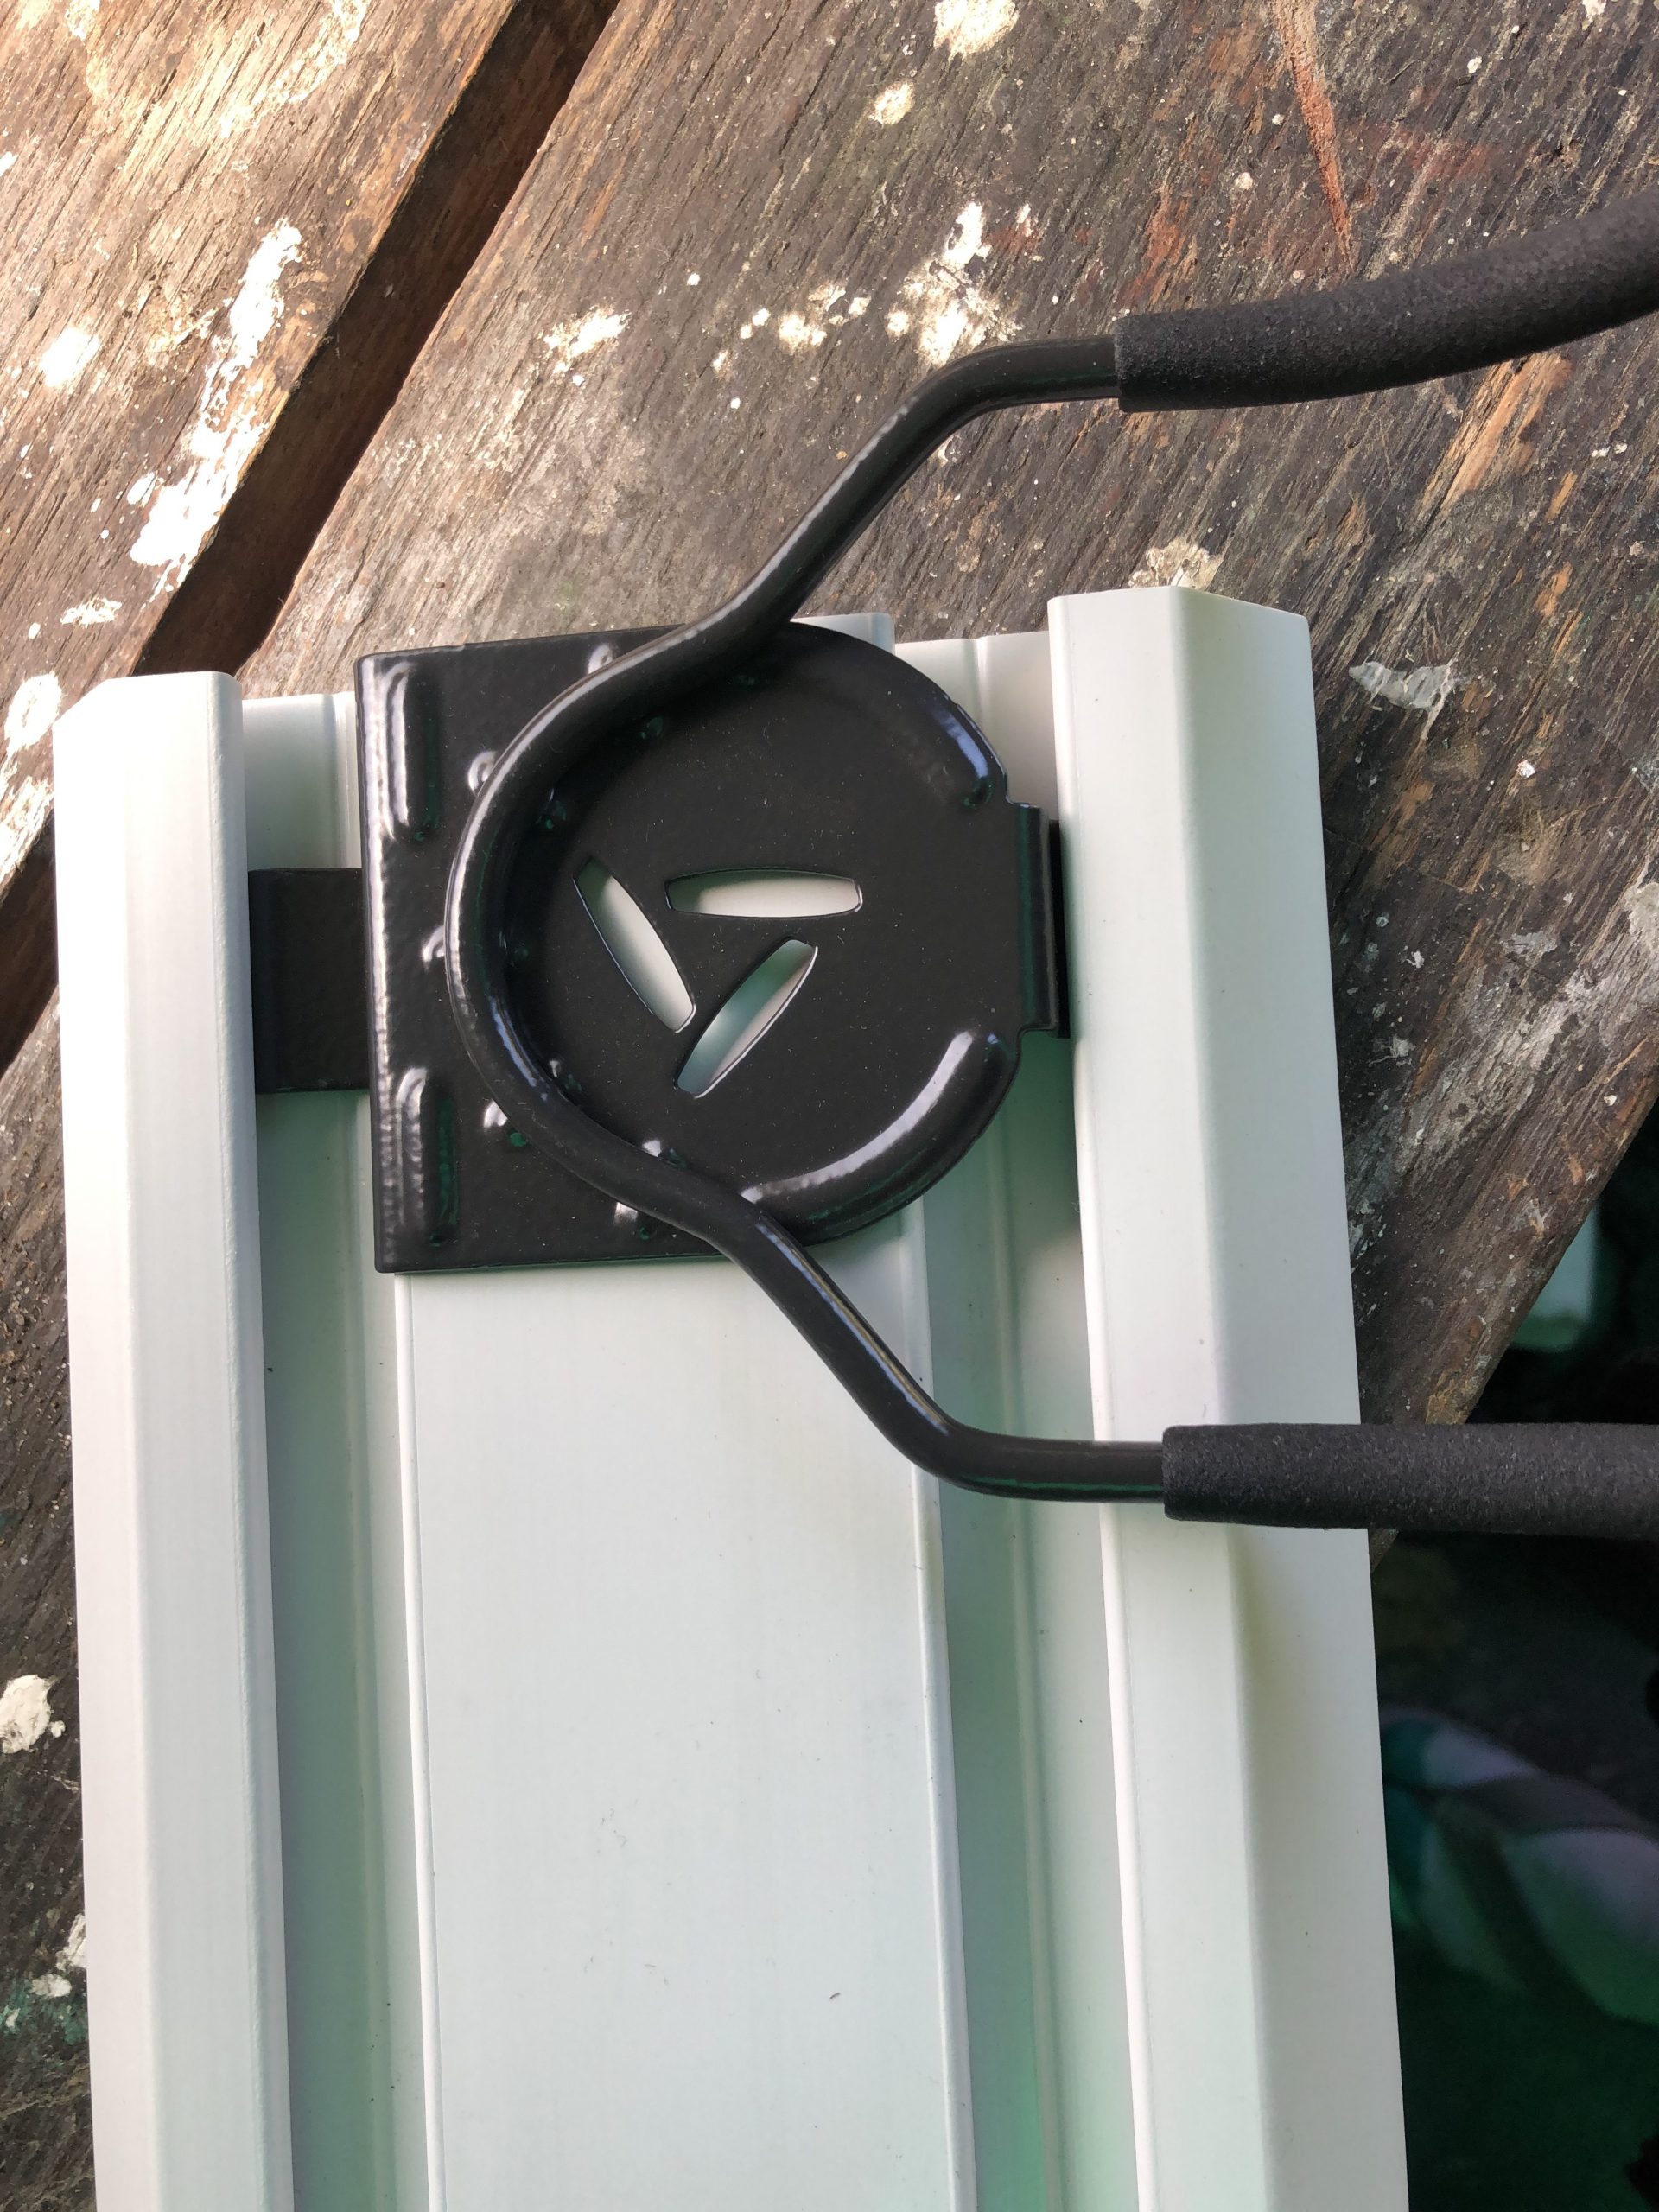
After researching storage wall panels, he came across StoreWALL and discussed the installation process with his carpenter. His carpenter recommended installing battens to the walls first and then installing the StoreWALL InstallStrips to these battens. There was a fear that some screws may not hit mortar and not brick and so the installation would not be as secure as it could be.
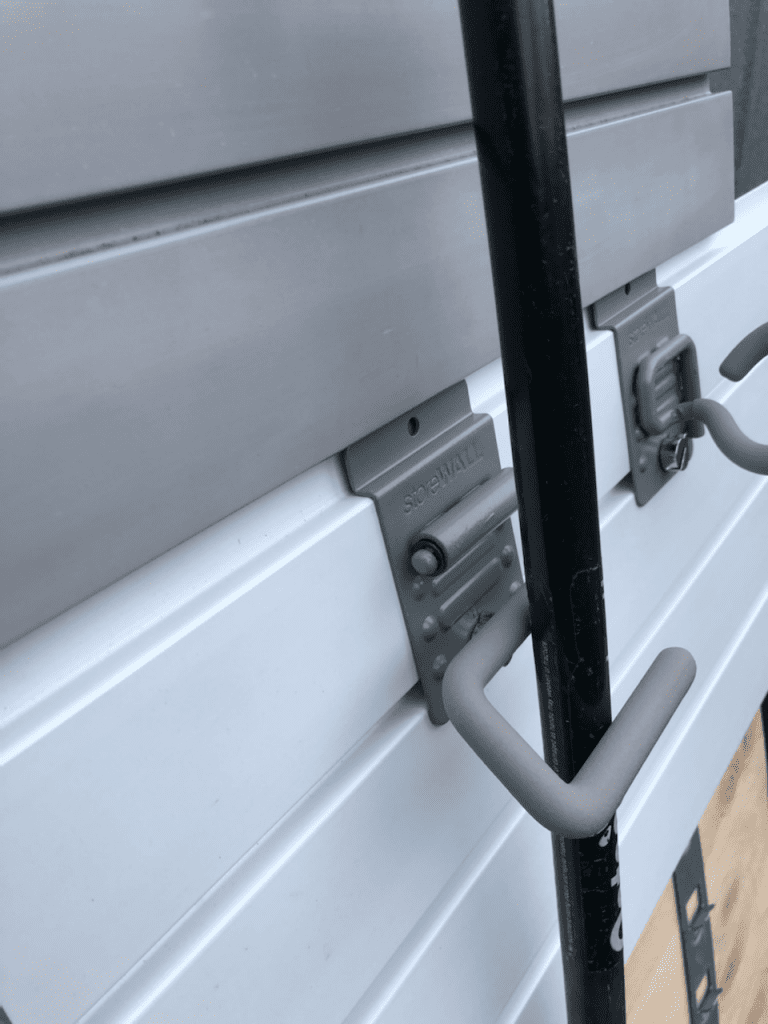
His Carpenter had a valid point, however StoreWALL’s InstallStrips (one 900mm pieces with 3 sections) have 12 screw holes each. Therefore, it was unlikely that if they used all 12 screw holes that they would not secure the wall well enough.
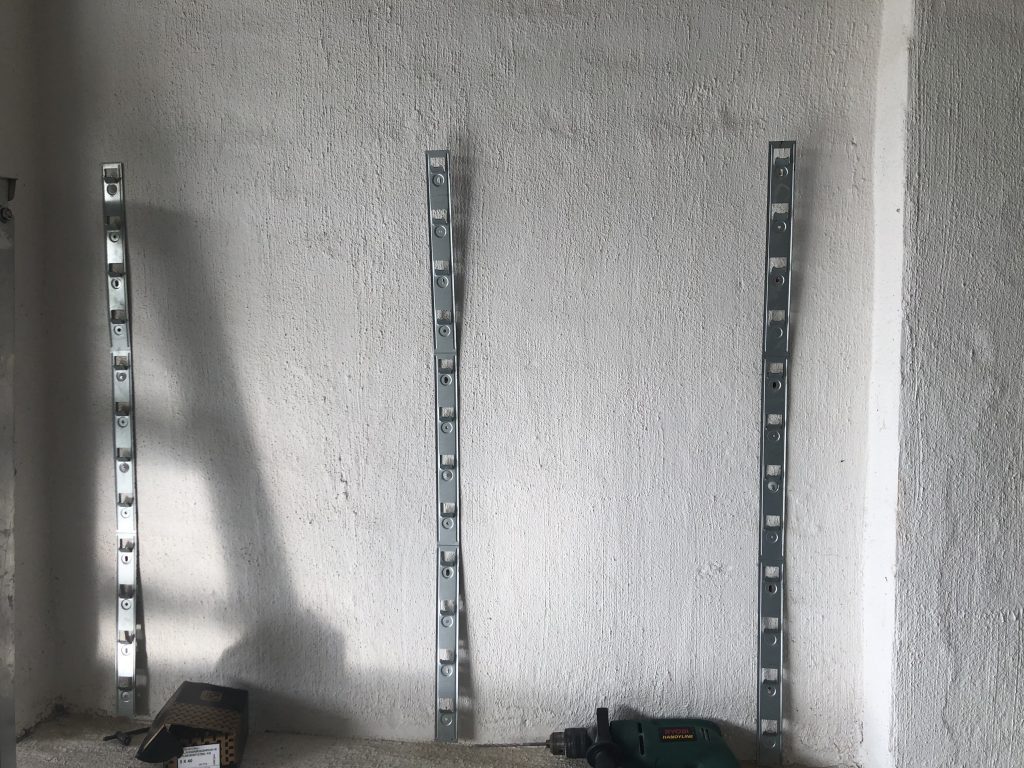
Rendered Brick Garage Wall
Following our phone call, I sent Andrew an email with some photos of a previous installation we had done which was also on a rendered brick garage wall. To assist him I also provided Andrew with contact details of a carpenter I knew in the Sydney area who had installed StoreWALL in the past.
“Thanks for the chat Andrew. This is a picture of what the Installstrips look like on a brick wall. I know this carpenter has done installations on brick walls before, however I am not sure on his rates.
As I explained I don’t think you need the battens.
Please send through your measurements and I can quote the materials for you.”
InstallStrips on a rendered brick garage wall
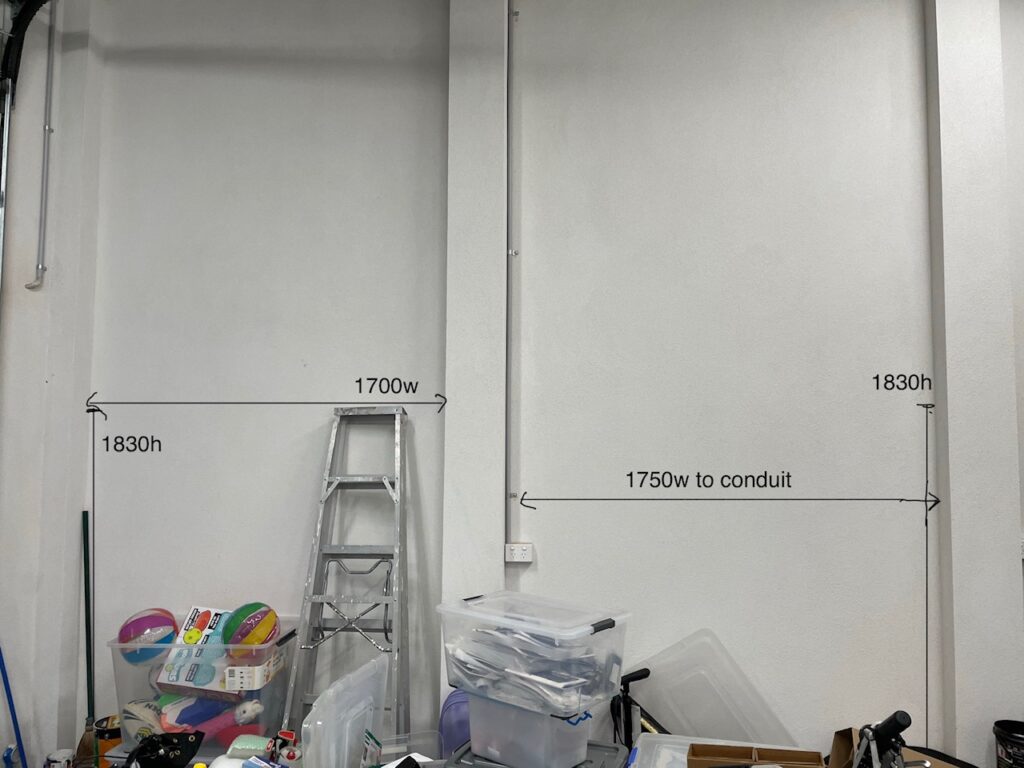
Andrew replied with detailed pictures of how he envisaged his wall looking and the size of panels he would require.
“I have a couple of rows of large shelves going up above (600mm deep), therefore I’m going to use a height of 1830 for StoreWALL which I based on 6 panels.
I’m thinking if I get the 2.4m panels, I can fit some of the leftover cuts in the smaller space under the window that you can see.”
Sydney Brick Wall Installation
Brick walls are challenging for most home owners. This is because screwing into the walls seems harder and most people think that a brick wall gives them less storage options. To be perfectly clear, brackets with shelving is what most people focus on.
My recommendation to Andrew was the following:
Garage Storage Solution Design
Garage Wall 1
6 pieces cut to 1680mm (comes in 10mm on each side)
This will leave you with 6 x 758mm left over. (These can be used under the window).
In terms of Installstrips I would have 4 columns (each 2 installstrips high). Total of 8 Installstrips.
Panels cut to size. No charge.
Garage Wall 2
6 pieces cut to 1730mm (comes in 10mm on each side).
In terms of Installstrips I would have 4 columns (each 2 installstrips high). Total of 8 Installstrips.
You will need to also cut around the power outlet on the left. This needs to be done on site.
You will have 6 x 708mm pieces left over. These can be used elsewhere in your garage.
Panels cut to size. No charge.
Garage Wall 3 (under window)
You can use 4 x 758mm leftovers for this. 4 Panels will give you a height of 1219mm.
You will need 1 column of InstallStrips on either side (4 sections high). Total of 3 InstallStrips.
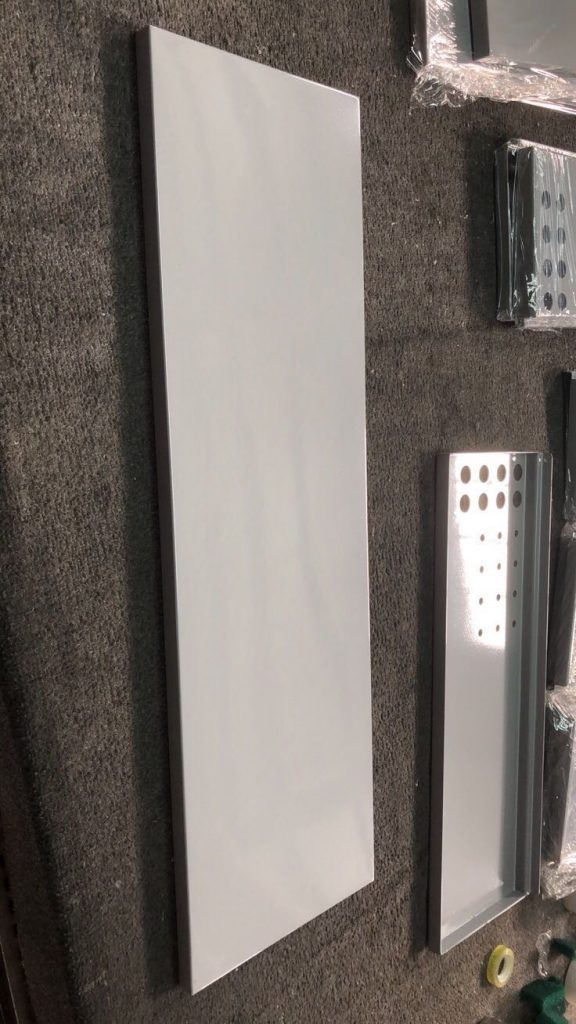
StoreWALL Required Materials
In total you need 12 x 2438 pieces (3 cartons). You also need a minimum of 19 Installstrips. You will still have left over panels and depending on what you do with these you may require additional InstallStrips.
It turns out that Andrew had an additional wall area which could also be covered with the remaining off-cut panels. In the end there was no waste at all and Andrew had covered as much of his wall as was possible.
StoreWALL on Rendered Brick Garage Wall
Once the order was received I got started cutting the panels and packaging them all up for Andrew. They were couriered to Sydney within a few days along with a small accessories list.
If you check out the end result, you will see he also had the shelving installed above the panels which enabled his to make great use of the height of the garage wall. I don’t have the exact measurements, but Andrew’s garage is super tall.
Garage Storage Accessories
In terms of accessories, Andrew started with a small quantity to manage some key items in his garage and once this was ready would re-evaluate.
He had some foldout chairs he wanted hung, some bikes and a ladder. To start with the accessories list looked like this:
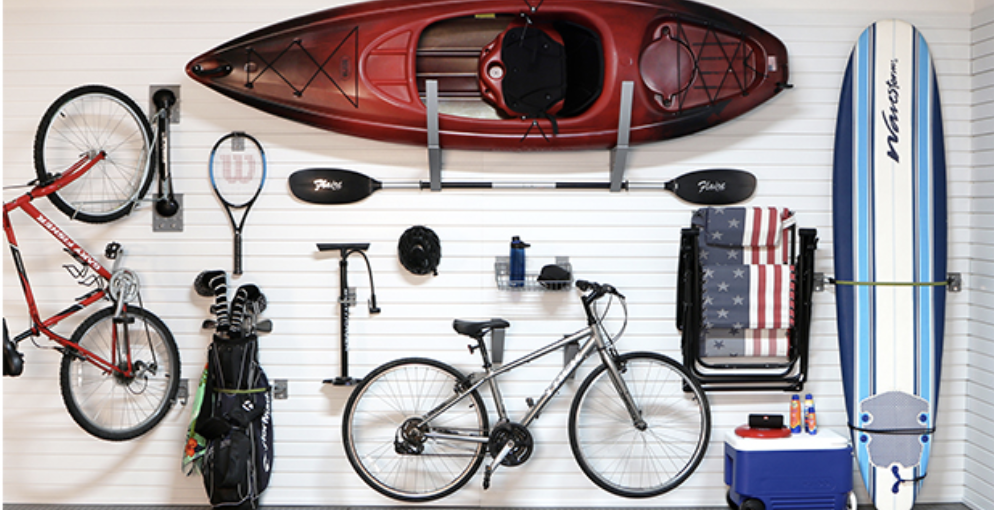
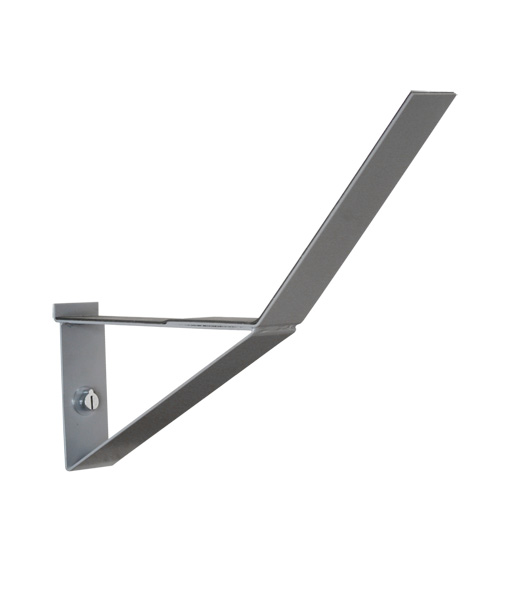
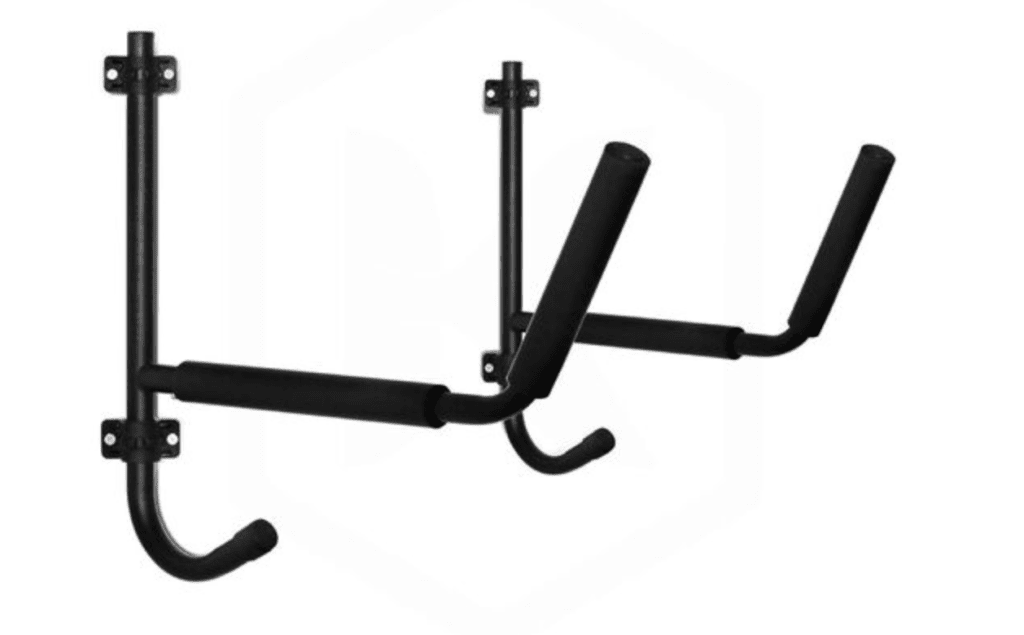
Are you looking for Kayak Storage Racks? Taking a quick look on the internet and Kayak’s come in several sizes and weights. An Adult Kayak can have dimensions of 266cm (length) x 66cm (width) x 25cm (height) and weigh about 17-20kg. There are also smaller “youth” size Kayaks with dimensions of 183cm (length) x 61cm (width) x 26cm (height), weighing at around 8kg. StoreWALL’s Angle Brackets have been specifically design to solve the problem of finding the right size Kayak Storage Rack.
StoreWALL garage storage solutions are an ideal solution for helping you protect your Kayak by keeping it off the garage floor and up high on your wall. Better still, our solutions also provide for easy access when you are ready to load your kayak onto your vehicle for your next excursion.
Custom Kayak Racks
The key challenge in terms of storing a Kayak is managing its bulky size both in terms of length but also depth and height. When you look at the typical size of a Kayak, 66cm width and 25cm in height require a special hook designed specifically for a Kayak.
Over the past 6mths I have helped several customers with a Kayak Storage Racks and we have used a couple of different options.
StoreWALL Angle Brackets
StoreWALL offer two Angle Bracket options which are ideal for solving your Kayak Storage Solution. The available sizes include:
254mm Angle Bracket – This bracket (padded with foam) extends to 430mm (off the wall). Note that the flat part of the brackets extends to 254mm off the wall. Each bracket has a width of 50mm and the height (lowest to highest point) of 300mm.
381mm Angle Bracket – This bracket (padded with foam) extends to 647mm (off the wall). Note that the flat part of the brackets extends to 381mm off the wall. Each bracket has a width of 50mm and the height (lowest to highest point) of 450mm.
If you were going to use an Angle Bracket to store your Kayak, the Kayak could either be laid flat on its bottom or on its side. The 381mm Angle Bracket is the only option which could support lying the kayak on its bottom. With a flat width of 381mm, it will need to sit on an angle. The 647mm total width of the bracket will support this.
The best solution however is to have the Kayak sit on its side. Based on the Kayak measurements above, at about 25-26cm both Angle Brackets would work with the 381mm Angle Bracket being the best option due to its depth.
Using Kayak Storage Racks
One thing to note when using either of the Angle Brackets is that as the name indicates, they are on an angle. Therefore, in order to remove the Kayak, it will need to be lifted slightly over the brackets. When deciding where to place your Kayak on the wall, you will need to take into consideration how high the kayak will need to be lifted and the height of the person lifting it. Note the height of the bracket options: 300mm and 450mm respectively.
Placing the Kayak high on the wall might seem practical until you are actually trying to access it. Most people keep them in the middle of the wall.
Using Standard Brackets
In one instance a client opted for 2 x standard 381mm Brackets over the Angle Brackets because they didn’t have enough room in their garage to support the 647mm Angle Bracket depth. In addition to the standard 381mm brackets they also used a Small Bungee Hook to tie the Kayak to the wall.
I have included some examples of Kayak Storage Solutions using StoreWALL’s accessories throughout the article.
StoreWALL is not the only supplier of Kayak Storage Racks. I have found some alternatives at BCF and on Amazon. The BCF is a solution built for your wall. It retails for under $100. Some of the Kayak specialty stores also sell similar kayak storage rack solutions. Amazon sell a free standing rack by Rad Sportz. This stand will hold 2 Kayak’s and retails for A$500+. Another on Ebay is a “4 Pcs Kayak Holder Canoe Storage Rack Carrier” which is wall mounted and retails for about A$75.
StoreWALL’S Kayak storage solution will require that you invest in StoreWALL’s wall panels first. The Angle Brackets start at $67 each. You will need 2 of them.
I am always keen to explore how StoreWALL compares to other Garage Storage Solutions available in the market. This week, as part of this post Gladiator Vs StoreWALL, I decided to take a look at Gladiator® Garage Storage Solutions. Specifically the Gladiator® Gear Track Channel.
Originally, I wanted to purchase and review the GearWall® Panel which I think is most similar to StoreWALL and which I had featured in a Slatwall comparison I had completed some months ago. However, I found that this panel is no longer available on their website and when I called them, they advised that they didn’t have plans on more coming into Australia (any time soon).
Gladiator Garage Solutions is made by Whirlpool.
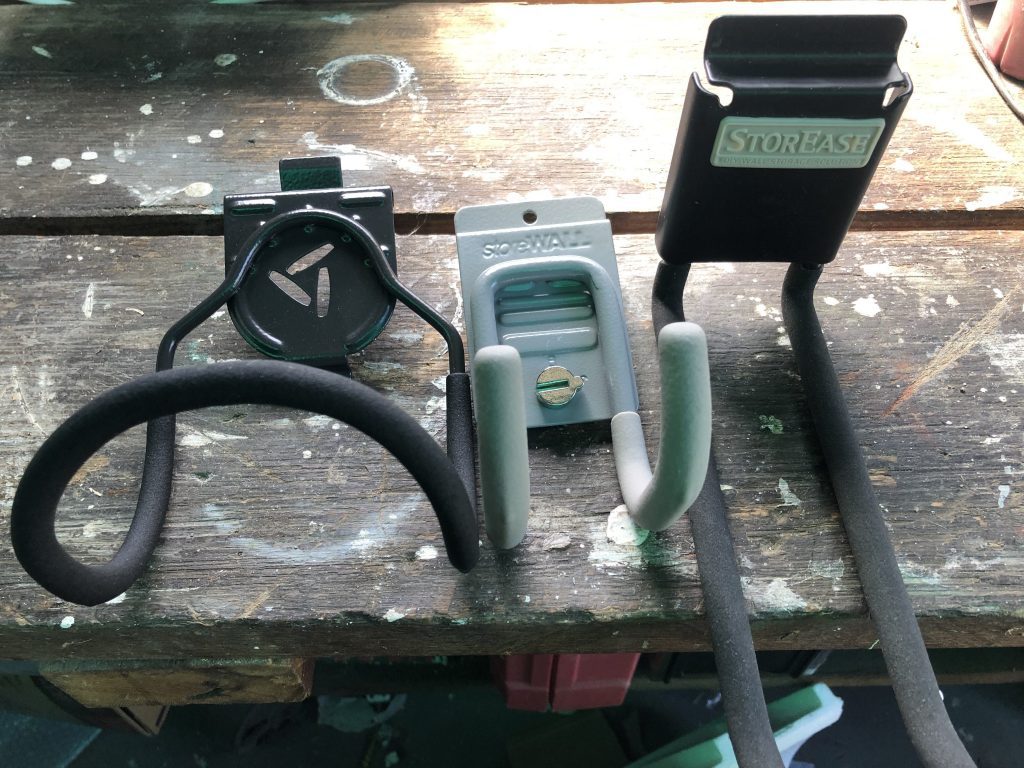
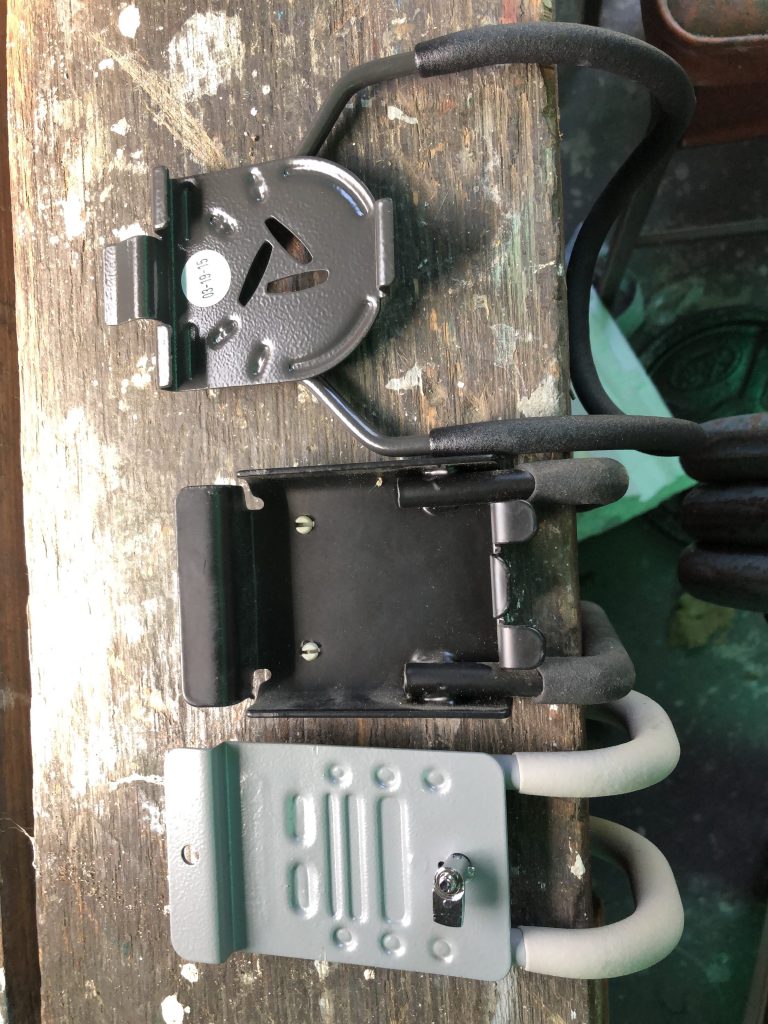
GearTrack® Channels
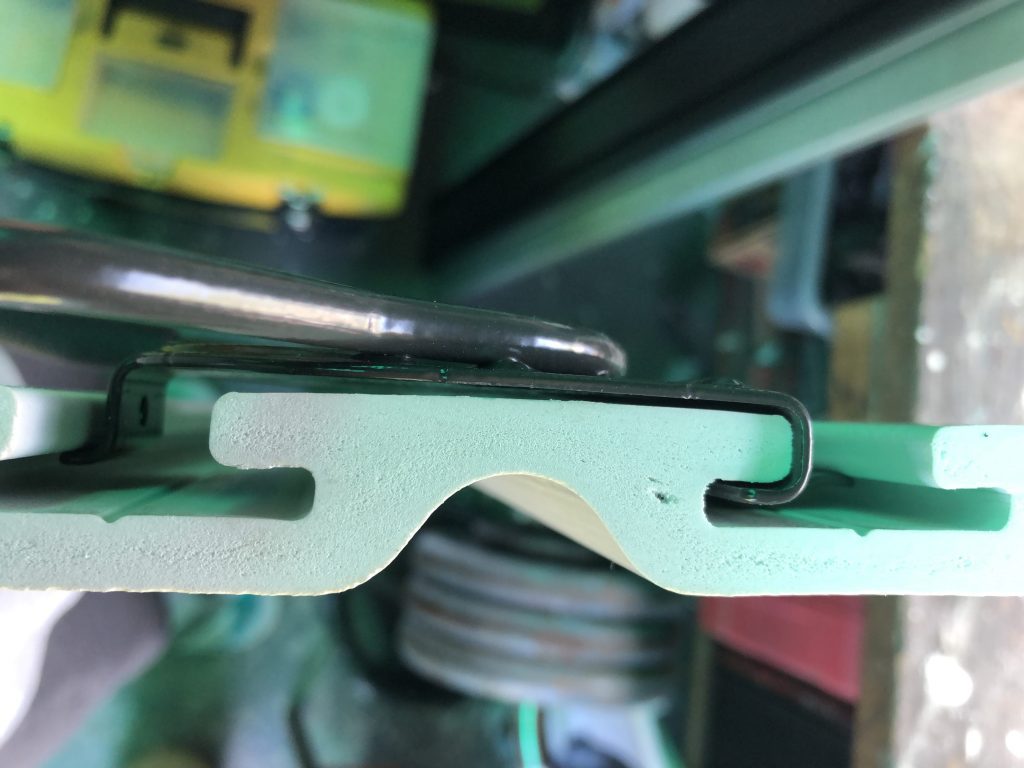
The GearTrack® Channel is made from a thick hardened plastic. The dimensions of each channel are 1212mm(w) x 152mm(h). I purchased the 2 Pack Kit which just came with the Channels. The screws and the end covers are optional extras.
In terms of storage approach, these channels share many similarities with the StorEase Panel and Rail (sold by Bunnings). You have a Track/Channel (152mm) with 2 grooves which fit custom designed accessories. They are designed to be placed along the length of your garage but NOT to actually cover your garage wall. Although you can stack them on top of each (with some spacing in between).
The Channels I received where very thick and sturdy. They each weigh 1.7kg. The thickness of the channel is 18mm. One thing I noted however is that the Channel does not come predrilled with holes. Compared to the StorEase Channels/Rails this is a much stronger and sturdier unit.
Whilst the thickness of the Channel or Panel does not mean it can handle more weight it does mean that it can handle knocks better.
As part of this Gladiator Vs StoreWALL review I had also included a comparison with StorEase.
Below I have included the dimensions of the Gladiator product as well as the two options from StorEase and StoreWALL’s entry level Basic Duty panel.
GearTrack – 1212mm (w) x 152mm (h) x 18mm (d) (1.7kg)
StorEase Rail – 1200mm (w) x 100mm(h) x 10mm (d) (.95kg)
StorEase Panel – 1200mm (w) x 150mm(h) x 10mm (d) (1.05kg)
StoreWALL Panel – 1219mm (w) x 304.8mm(h) x 16.7mm(d) (1.9kg)
GearTrack® Accessories
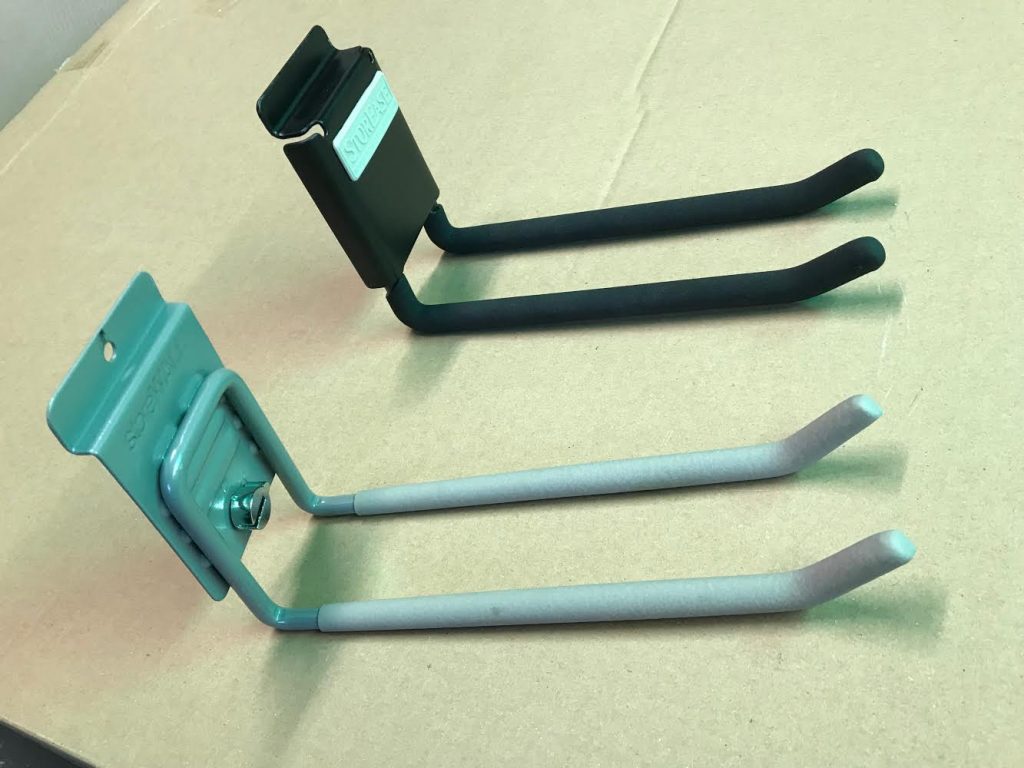
GearTrack® has a huge range of accessories that fit the Channel but also veer into cupboards and many other garage needs. I decided to just purchase one accessory the Cradle Hook.
GearTrack® Hooks have a 3 part locking mechanism. (See picture below) There is lip which fits into the upper groove of the channel, then a shoulder which also fits into the upper groove and finally a lip at the bottom which fits into the lower groove. It seems to fit the track well enough. However, I do find that any a medium to heavy knock upwards does dislodge the accessory from the channel.
To be clear, if the accessory has weight hanging off it, this weight naturally pushes it downwards and makes it harder to move or dislodge.
I am biased in saying that the StoreWALL CamLok system is the best I have seen. It prevents any slight movement of the accessory with or without the weight hanging off it.
The other comment around the accessory is the quality of the accessory itself. I only purchased the one accessory. In this case it’s the Cradle Hook. When you compare the metal/alloy used to make this accessory to that of either StorEase or StoreWALL it looks a lot lighter. Again, you can’t directly correlate thickness to strength but it does feel a lot less sturdier.
All three accessories come with rubber padding to prevent damage to the items you are storing.
I have photos of all three items below so that you can see for yourself.
Gladiator Vs StoreWALL Pricing
The Geartrack Channel 1.2m 2 Pack costs $49.95 but excludes the coloured matched screws and the end caps. Combined they are another $16.90. The accessory I purchased is the Cradle Hook and this costs $9.95.
In terms of pricing this pretty good value.
Compared to StorEase, the StorEase Aluminium Smart Wall Panel is $25.97 for a single panel. If you purchased two of these then the overall difference is a couple of dollars. The equivalent Cradle Hook from StorEase is $9.47.
With StoreWALL you would need just the one panel. As both Gladiator and StorEase are screwed directly onto the wall, you could use the StoreWALL Basic Duty Panel which has the dimensions of 1219mm width and 304.8mm height. This is equivalent to 2 x Gladiator or StorEase channels/panels. A Basic Duty Panel costs $48.99.
A couple of key difference to note. With the StoreWALL Panel you automatically have the two sets of grooves setup one on top of the other. Whereas with both Gladiator and StorEase you can stack them on top of each other or you can have them side by side horizontally. To have them side by side horizontally with StoreWALL, you would need to purchase 2 panels (you would also then have double the grooves).
When it comes to the StoreWALL Cradle Hook, our pricing is triple at $30.99. However, you also get the CamLok locking mechanism and a much heavier duty accessory compared to both Gladiator and StorEase.
Gladiator Vs StoreWALL Accessory Performance
In the below video I have compared all 4 Garage Storage solutions. I show you how each channel or panel and its complimenting accessory work together to delivery a storage option for your shed of garage.
They all seem to work well. Probably the weaker of the four solutions is the StorEase slimline Rail (not the panel). I found that the StorEase accessory fell off this rail really easily as it isn’t given enough to grip onto. The StorEase panel performs a lot better.
I also have a video comparing StoreWALL to StorEase and it also shows how StoreWALL’s accessories will work on the StorEase panel.
StoreWALL’s accessories are the only ones which can be used on an alternative panel. You can’t use the Gladiator accessory on StorEase nor StoreWALL. You can’t use StoreWALL on Gladiator either.
Gladiator Vs StoreWALL Weight Specification
So far, we have talked about the weight of the actual panel. The key weight however that we are all interested in is how much weight the panel and combined accessory can hold on your wall.
With Gladiator, based on its specifications (Maximum weight limit is 75 lbs (34 kg) per linear ft (30.48 cm) it can theoretically hold 120kg of weight. Installation requires 2 screws per stud and a total of 6 per channel.
StorEase states that each 1.2m Panel (wider of the two) can hold 150kg. The Smart Rail on the other hand can hold 100kg. Installation for both of these is 6 screws per panel or rail.
With StoreWALL’s Basic Duty Panels our specified weight capacity is 34kg per panel. Installation is 20 screws per panel. Note that our panel is made up of 2 rows. If you upgraded to the Standard Duty Panel however and installed with InstallStrips, weight capacity is more in line with the Gladiator system. You can read more about this here where we explain the different weight capacity of our range.
My feeling is that 150kg being held by 6 screws is not realistic. I am sure Gladiator has tested this thoroughly, however it is a lot of weight to be hanging over your car and hoping the hook and the channel does not give way. Given the design of these channel systems, two screws per stud is all you can actually do.
Gladiator Vs StoreWALL Summary
As a consumer you are spoilt for choice when it comes to garage storage options. More Australian’s are investing in cleaning up their garages which is great. Just in my own neighbourhood many of my neighbours seem to have a StorEase solution on their wall holding up gardening tools (shows they all shop at the local Bunnings).
If you only need to store a few gardening tools then a Gladiator or StorEase product will work fine for you. It also ends up being a cheaper investment when you account for the accessories. However, when you have a large amount to store and a garage wall which is not really doing much, StoreWALL is a better investment. It will provide you with unlimited options on how to use that entire wall using hooks, baskets, bins or shelves. You can have them all and move them around as you need to. Plus your entire wall is covered so you are using 100% of it.
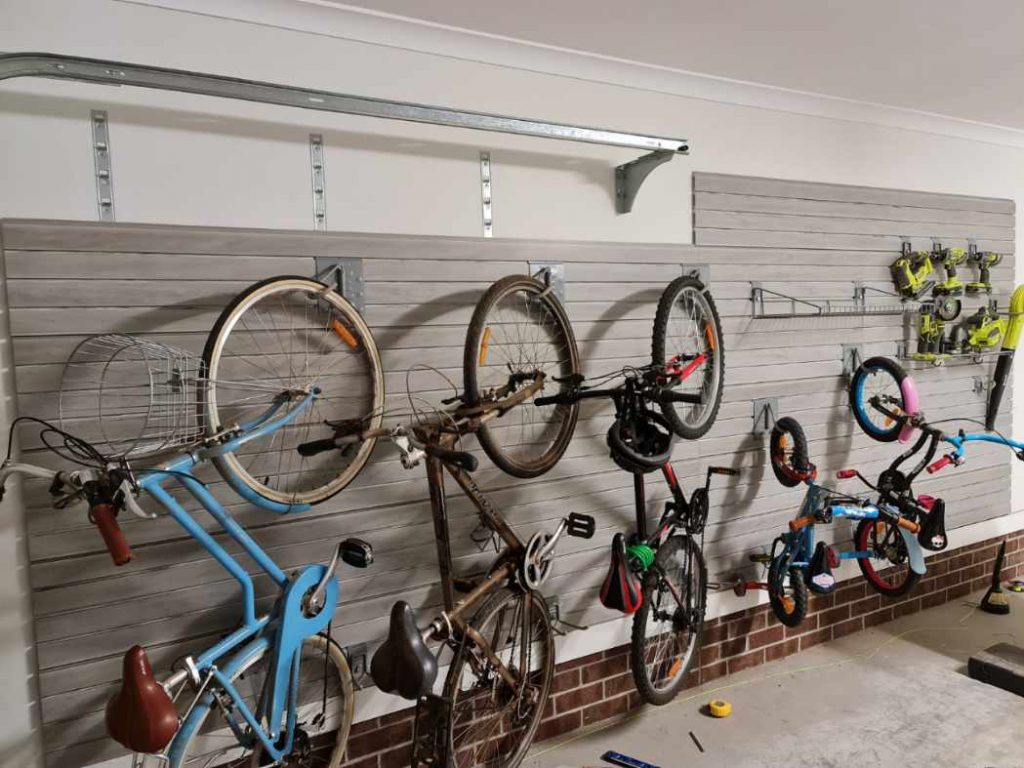
Bike riding has become really popular during the many COVID19 lockdowns we have had to endure. So much so that many bike suppliers have had issues keeping up with demand. Bike Hooks have therefore also become popular as people start to wonder where they will safely store their bike.
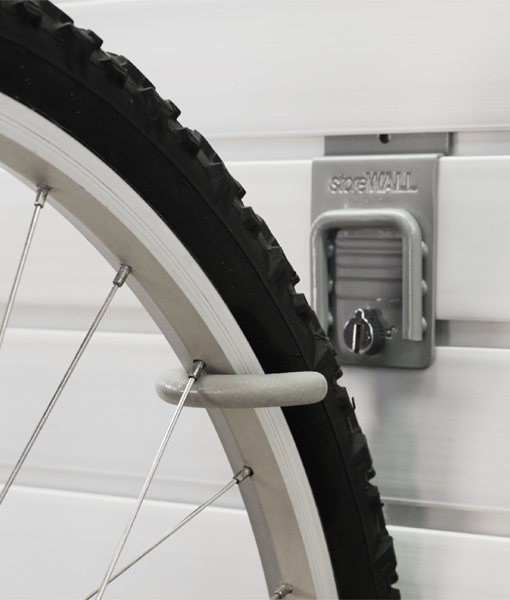
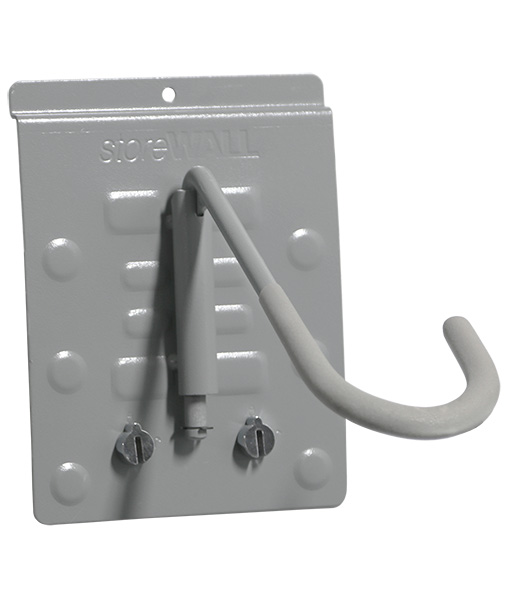
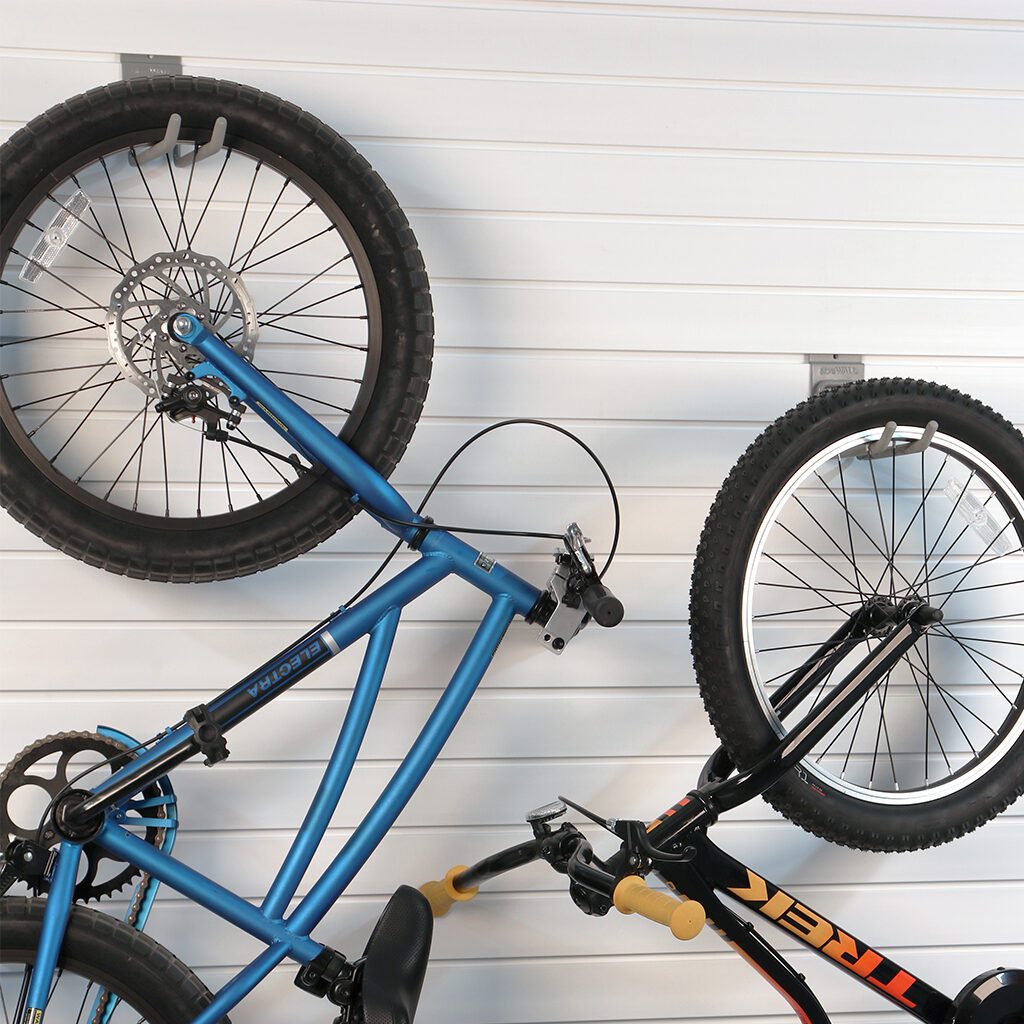
StoreWALL’s slatwall system offers over 20 different types of hooks for managing the many items stored in your garage or shed. One of the more popular hooks is the Bike Hook (see image below)
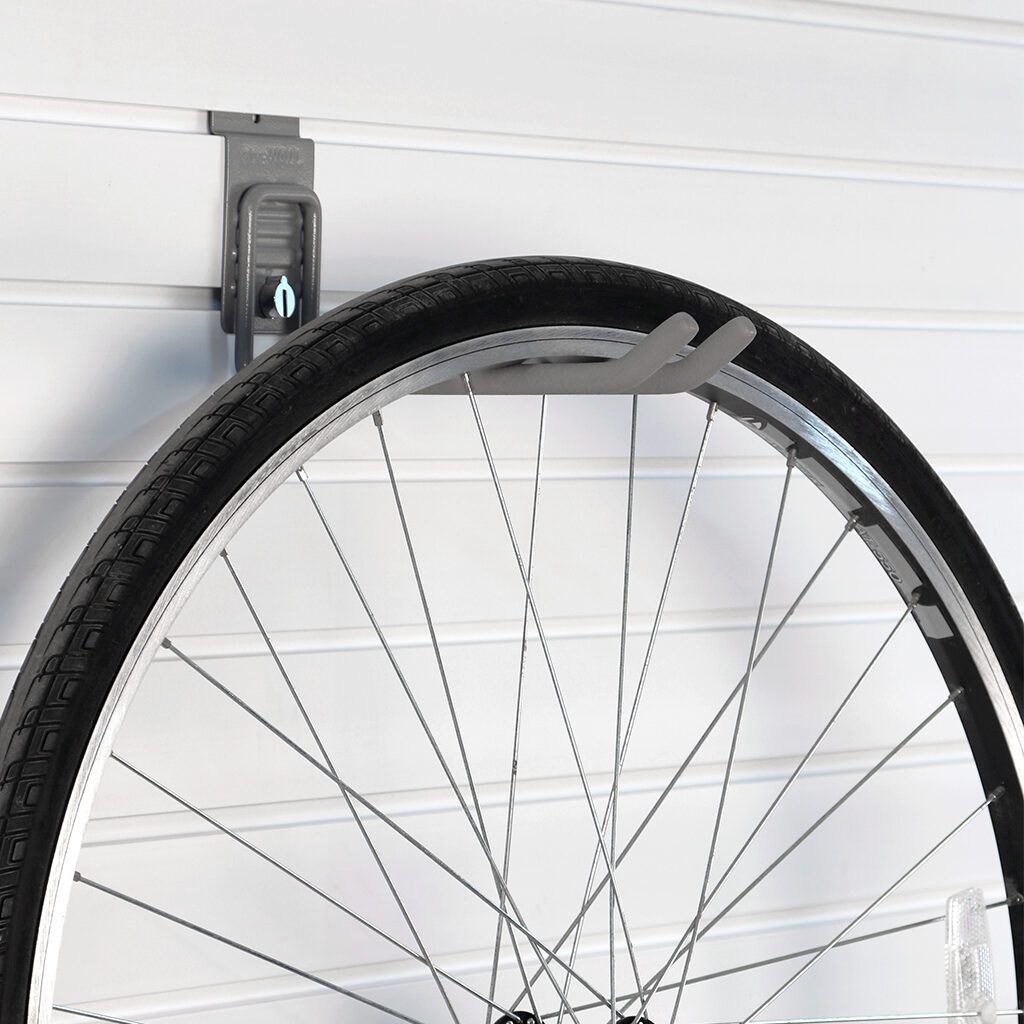
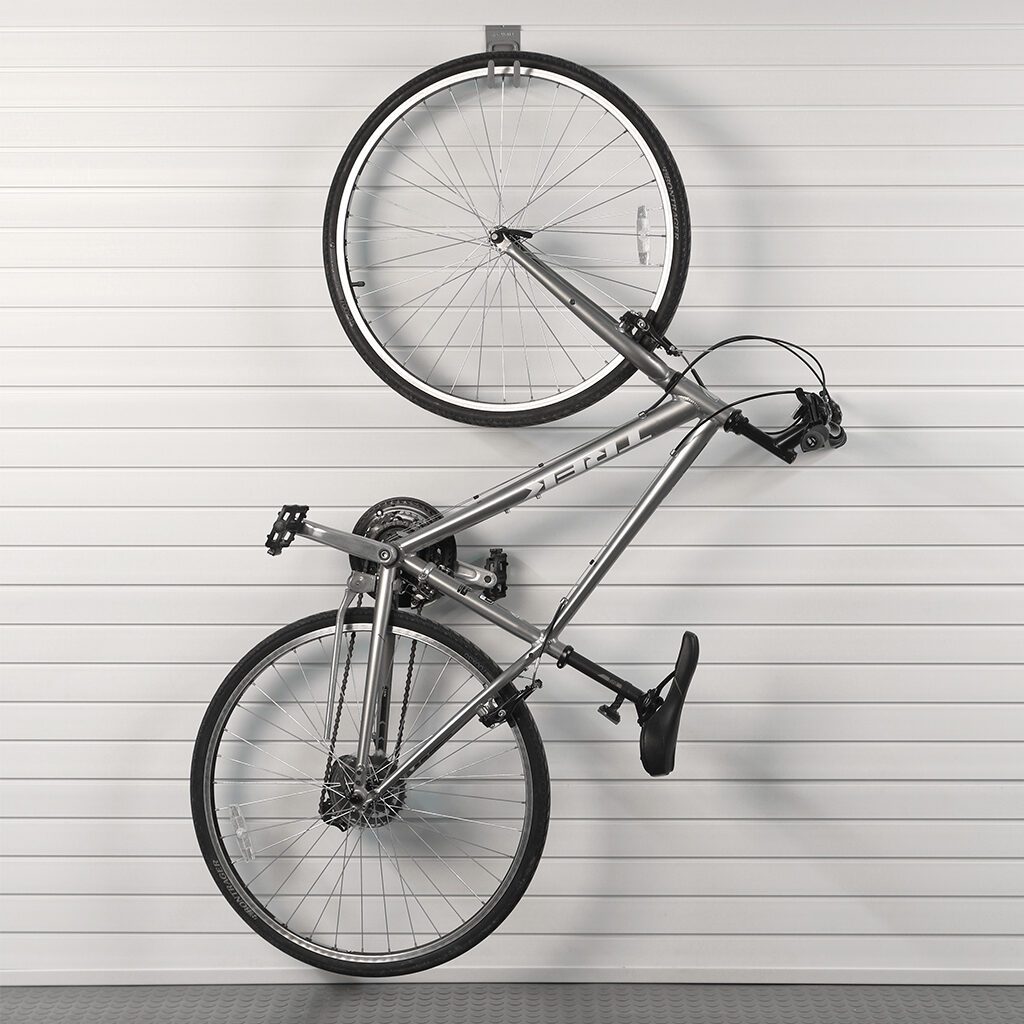
StoreWALL Regular Bike or J Hook
The StoreWALL Bike or J Hook grabs hold of the bike’s front tyre and stores the bike hanging perpendicular to the wall. See image below. There are many similar bike hooks on the market. The key difference with the StoreWALL Bike Hook is the CamLok locking mechanism which is super secure. This locking mechanism also allows for the relocation of the bike anywhere on the slatwall system.
Hanging Bike Challenge
The challenge with hanging a bike perpendicular off the wall is that it takes up a lot of room in the garage or shed. A typical bike is up to 1m tall. When it stands perpendicular tyre to wall, it also takes up a lot of room on the garage floor. For many people this limits how many bikes they can store.
What if you could swing that bike around so that it stood flat up against the wall rather than poking out and taking up so much room? Enter the Rotating Bike Hook.
Rotating Bike Hook
StoreWALL offers not one but two Rotating Bike Hooks. It has enhanced its regular Bike Hook and developed a special bracket for the popular SteadyRack Bike Hook.
The new Rotating Bike Hook or Rotating J-Hook is similar to our original J Hook but with the added flexibility of rotation. This new feature allows you to swivel the bike to store it up against the slatwall rather than wheels-to-the wall perpendicular storage. This option opens up your storage space plus allows for multiple bikes to be stored.
StoreWALL Rotating J Hook
Below image is of an installation in Melbourne. The first customer to order the Rotating Bike Hook.
Steady Rack Rotating Bike Hook
Steadyrack bike racks are easy for anyone to use, save heaps of space, engineered and built to the highest quality standards and get your bikes up and out of the way safely, with no lifting required.
Our unique loading and pivoting design enables you to store your bikes in locations that simply wouldn’t be possible with any other product on the market.
Whether you’re looking to tidy up the garage at home, save space in an apartment or fit out your office or workplace, our patented Steadyracks are the versatile bike parking solution that you’ve been searching for.
Steadyrack Bike Rack
Ok, Steadyrack sounds pretty good too, right. Well, if you have StoreWALL installed at your home, you now can install Steadyrack directly onto your StoreWALL panels. Best of all, you can move it around on your wall like any other StoreWALL accessory.
Rather than having your Steadyrack fixed to your wall (ie screwed into your wall), with StoreWALL you have the flexibility of being able to move it around (left and right, up and down). The StoreWALL Steadyrack bracket is sold in pairs and has two 2 x CamLok’s so that it is ultra secure.
Honestly, it doesn’t really get any better than this at the moment when it comes to storing your bikes to your wall. Rotating bike hooks are secure and they save you lots of space. Hang one bike or many!
Hanging Bike Flat On Wall
Just when you thought your were done, we have one more hanging bike storage solution for you to consider. This uses the HD Universal Hook and allows you to hang your bike flat on your wall, so that it doesn’t stick out at all.
Consider using two HD Universal Hooks to hang your bike particularly when you have a large wall space.
Over the coming month we will be launching a new range of StoreWALL Slatwall Shelving Solutions which have been designed specifically for our local Australian market.
Our New Slatwall Shelving Solutions will be made from metal and will be compatible with all StoreWALL Slatwall Panels. This includes our StoreWALL Basic, Standard and Heavy Duty panel range.
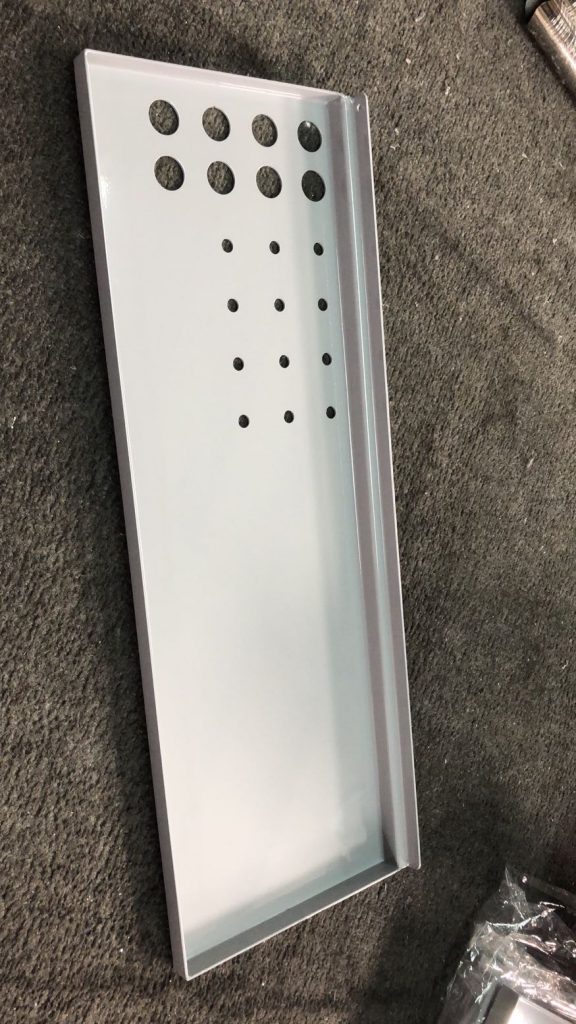
Garage Tool Organiser
Our existing plastic Garage Tool Organiser has been super popular since we introduced it over 18mths ago. We thought we could however make some simple improvements which would make it extra useful for our customers. The latest version of the Garage Tool Organiser will:
be made from metal (2mm thickness).
have the ability to be added and removed easily from your wall panel.
come with pre-cut holes for your tools.
be powder coated.
be quite a bit larger than the existing model at 200mm (depth) x 600mm (length) x 20mm (height).
Additionally, this shelf will be compatible with many other Slatwall panels on the market at the moment including StorEase sold by Bunnings.
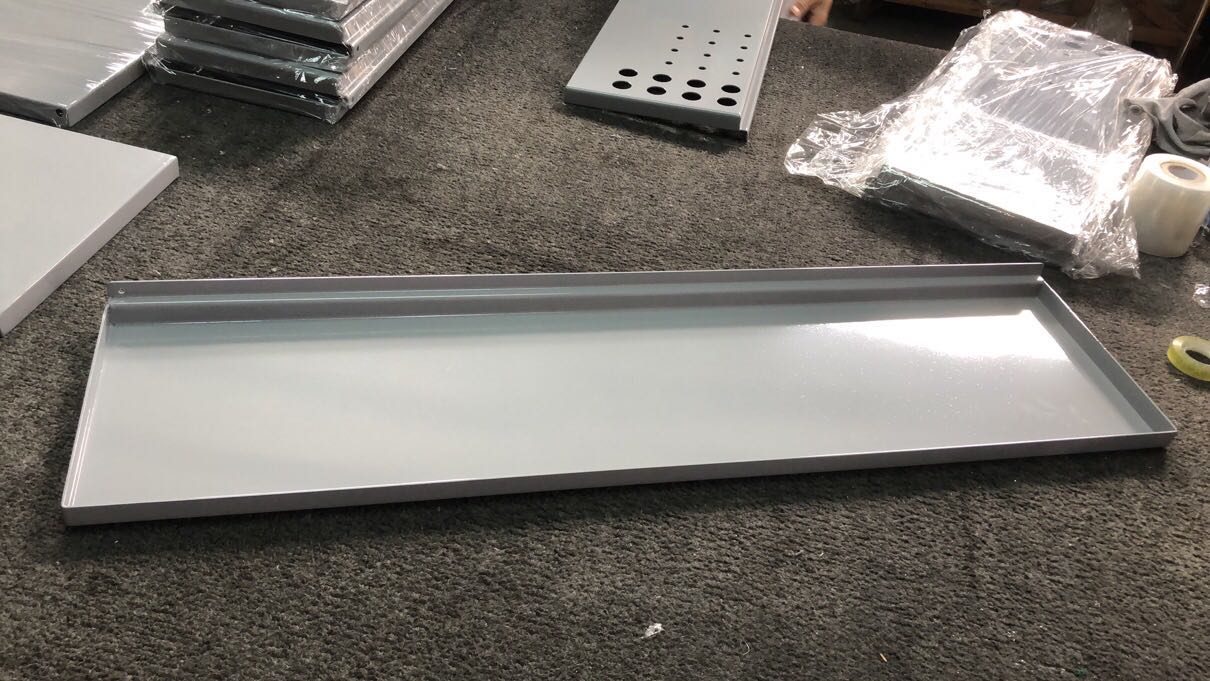
812mm Metal Shelf
We are also introducing a new metal shelf which has a similar design to the Garage Tool Organiser minus the holes. This shelf has been designed so that it can be easily added and removed from your slatwall panel. There will no longer be the need to install it from the exposed side of the panel.
The 812mm Metal Shelf will have a thickness of 2mm making it quite strong and able to carry a reasonable amount of weight. Note however that this shelf does not come with the StoreWALL CamLok locking mechanism. Therefore you will need to be careful with the amount of weight held on it.
The dimensions of this new shelf are: 200mm (depth) x 812mm (length) x 20mm (height).
This shelf will also be compatible with most Slatwall panels on the market.
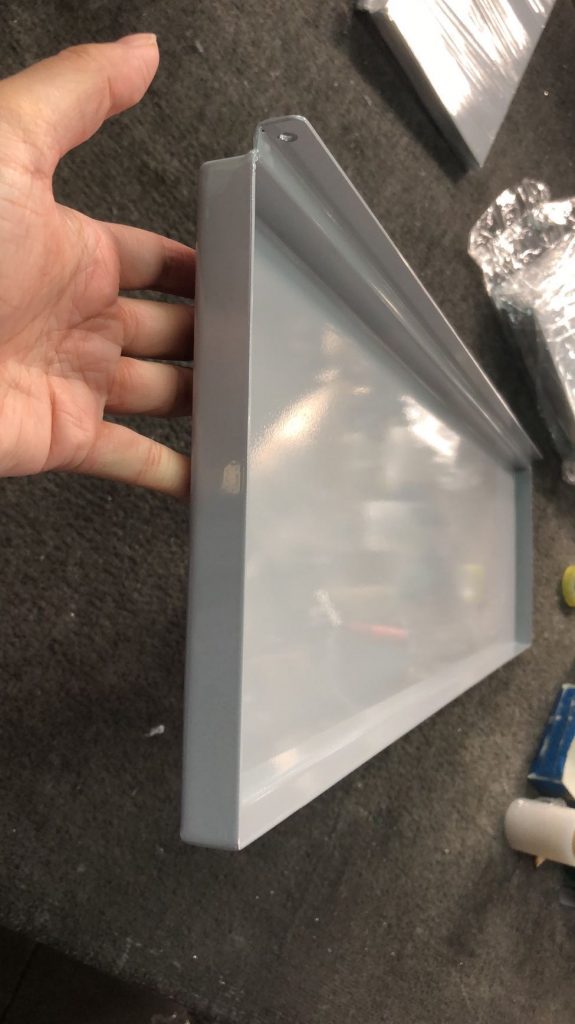
Slatwall Shelving Solutions – Floating Shelf
The last of the three new shelves is a 812mm Floating Shelf which has been designed to work with our range of StoreWALL Brackets (254mm and 381mm).
This new shelf has been designed in line with our existing 1219mm Shelf. It is a fully enclosed shelf which can be added to your existing StoreWALL brackets or any brackets you have purchased from your local hardware store.
The Metal Shelf is also made from metal (1mm thickness). Its dimensions are 254mm (depth) x 812mm (length) x 20mm (height).
These shelves are in the process of making their way to Australia and we hope to have them available over the coming 4 weeks (mid October). We will however let you know when they become available and their pricing via our newsletter once they have arrived.
You can sign up to our newsletter here for all new product news.
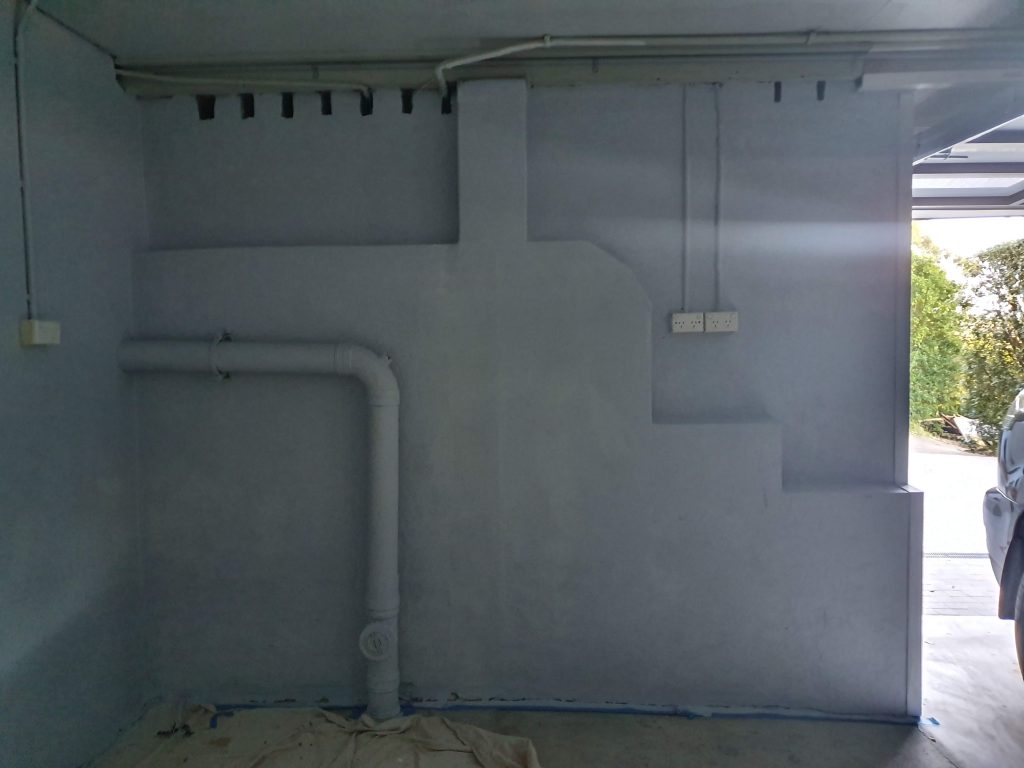
Several months ago, I received a call from a customer (Cindy) who explained they lived in the Sydney area and were looking at a garage wall makeover. Cindy wanted help to understand how our panels would assist with an impractical wall she had in her garage which was also her real only source of storage space.
I have provided a photo of the wall below. The wall is of a decent size but as you can see it also has several dimensions along with a power outlet and a large pipe. You really couldn’t just stick wall panels on this wall to make it practical. It actually needs a makeover.
Having reviewed the photos, I was a little hesitant at getting involved but I thought I would offer my opinion on how I thought Cindy and her partner could fix this wall.
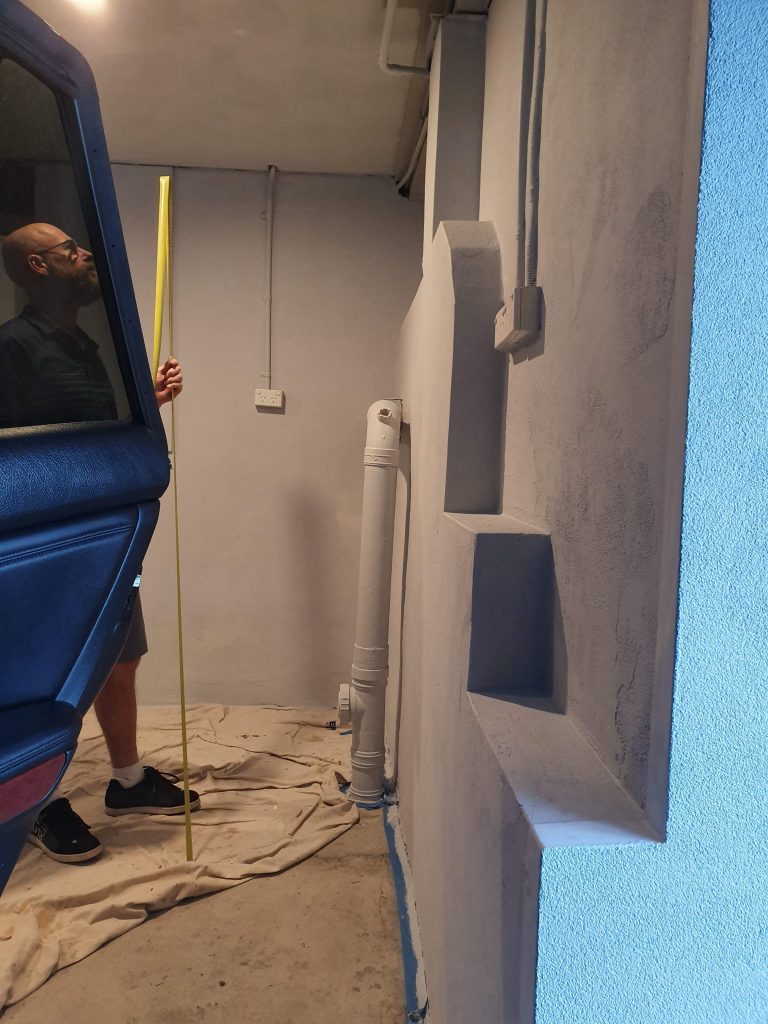
What they needed to do was to build another layer of wall over the existing walls so that they would eventually have a flat surface to work off. This new wall could be framed out by a carpenter, who would add enough frame and at the required spacing in order to also hold the StoreWALL panels.
The client advised that they had access to a local carpenter who could assist them with this work.
Measuring the Wall
Following some email exchanges and a phone call we had measured all of the walls that need to be built out and covered with StoreWALL panels. The project had 2 walls. One main wall facing into the garage and a smaller wall close to the garage door.
The size of the main wall was 2800mm W x 2390mm H. In order to meet their 2390m height requirement, I recommended that they consider 7 full panels to get to a height of 2133mm or 8 panels with the top panel cut to length ways to meet 2390mm.
StoreWALL panels are 2438mm in length. To reach the width of 2800mm, we would use a full length panel plus a smaller panel of say 400mm.
For the main wall, a total of 10 x 2438mm panels was required. This would cater for the full length panels (8 of the these) and the smaller panels to reach the 2800mm width. This section of wall also required 20 Installstrips.
The smaller wall beside the door was approx. 300mm in width and the same height as the main wall at 2800mm. For this I recommended 1 additional full 2438mm panel plus 1 smaller 1219mm panel. Instead of using installstrips on this wall we opted to use colour matched screws.
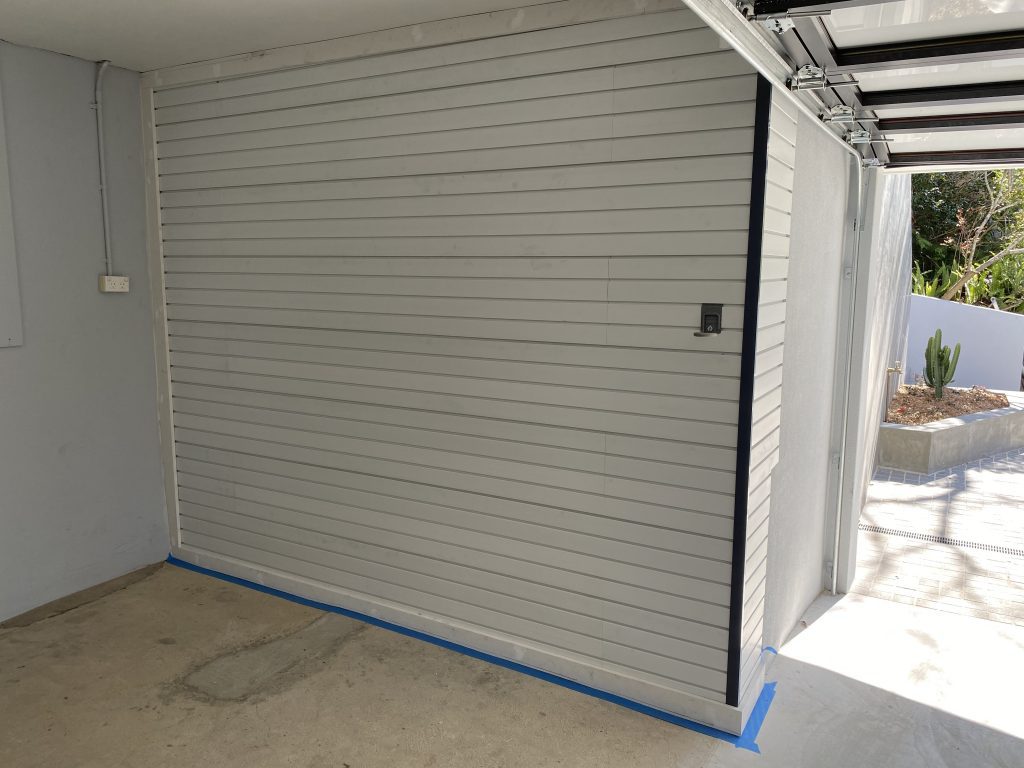
Sydney Garage Wall MakeOver
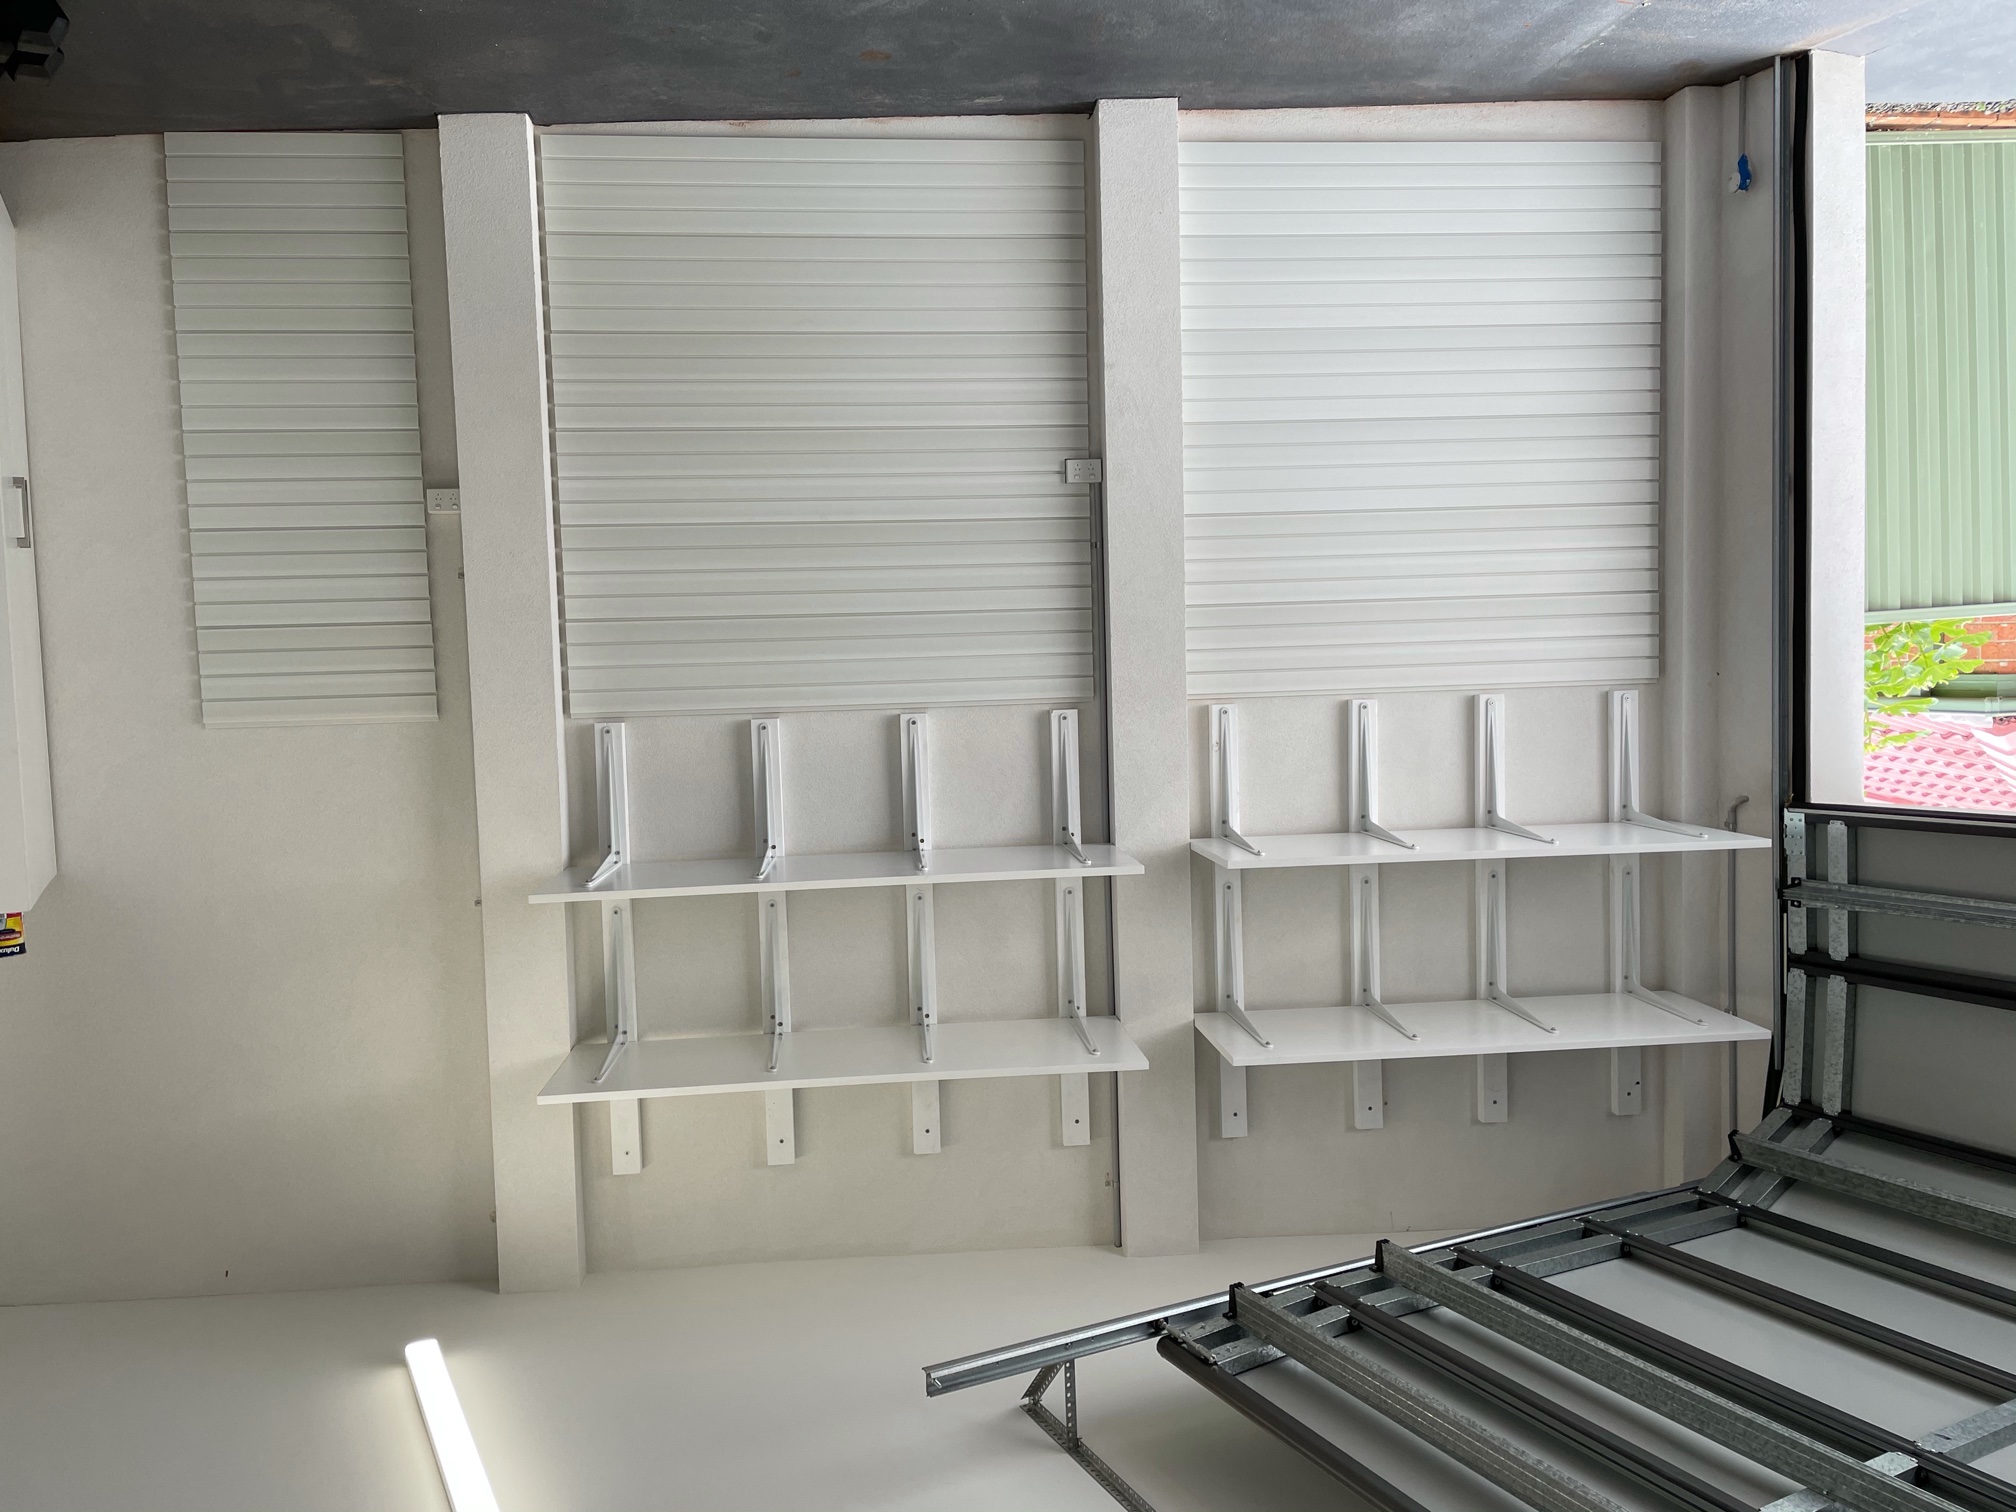
The result of the wall post the frame being built is:
I unfortunately don’t have pictures of the frame but they did build it out as I had recommended. You can also see from the picture that they have added some trim across the top and bottom of the walls framing it nicely. Picture below shows the wall following some touch up paint being added to the trims.
Paddleboards and Surfboards
The purpose of the wall was to support the following garage items.
Paddleboard – horizontally at the top
3 x bikes – vertically on the back wheel
Surfboards, boogie boards – vertically
My initial recommendations were as follows:
Paddle board – for this I suggested a 254mm or 381mm Angle Bracket. The 254mm bracket extends out from the wall by 430mm, the 381mm extends by 647mm.
3 x bikes – this would be accommodated by 3 x J Hooks.
Surfboards, boogie boards – the best option is the Angle Rack Hook. This hook can be used between each of the boards to hold them upright.
After a few conversations we settled on the following accessories:
2 x 381mm Bracket + Padding
1 x Angle Rack Hook
3 x J Hook
1 x Medium Bungee Hook Set
Angle Brackets
The Angle Brackets were replaced with standard brackets as they allowed the Paddleboard to sit lower making it easier to lift off and take away. There was enough width in the standard bracket to hold the paddle board securely. For added protection however, we also added the Medium Bungee Hook which could be used to tie the paddle board to the wall.
For the Surf Boards, the client decided to start with one Angle Rack Hook and have the Surfboards lean on this.
The 3 x J Hooks remained for the bikes.
Ultimately this Garage Wall Makeover delivered a brand new wall which is totally usable. I think their carpenter has done a great job.
They now also have a garage storage solution which holds all of the key items they want to store. Best of all it also offers lots of additional options for storing smaller items around the wall as the family’s needs change over time.
You learn a lot from your customers. This week I was met with several requests via our online chat service with the message “organizing tools in garage, can you help?”. Then came a long list of tools and items. It quickly dawned on me that sending them to the Hook section of our online store was not great service.
When you visit your local hardware store and you are after a hook to hold a ladder upright, you are usually guided to an aisle with 20+ alternative hooks. For some this can the ideal solution, for others its like “so now what, which do I choose”.
Unfortunately, online stores whilst giving customers control of their journey can also be daunting when customers are discovering what it is they want and need form you. Most don’t ask questions like they would in a store, if they can’t work it out, they move on.
Organizing tools in garage
In one instance this week, the customer sent me a long list of what is stored on their garage floor at the moment and said this is what they needed help with. Please recommend the appropriate way to store these items.
The list looked like this:
Something to hang 8 fishing rods together vertically
Hooks for Maxitrax hung horizontally
Something for fishing gear
Need to hang 1 skateboard
We have a wakeboard (think skinny boogie board)
There is a surfboard
Something to hang 4 x tennis racquets and clear plastic small tray for balls
Hooks for 2 electrical cords
Hooks for 2 hoses
There are 2 flat folded chairs
Hooks for 3 fabric foldable chairs in bags
Fitting for 2 shovels
Fitting for 1 pitchfork
There is a medium sized step ladder
We have a fan rake
Fitting for 2 brooms
There are 2 long garden shears/loppers
2 saws
Multi hook on a rail thing for small garden tools
Fitting for bike pump
We need something for 2 wheelie shopping carts (the granny style soft fabric pull along ones)
There are 4 umbrellas (straight not curved ends)
Fitting to hang earmuffs and safety glasses
We have a sledgehammer and 2 axe/tomahawks
There is a spirit level
Basket type shelves for boots
Hook for dustpan/broom
Later on the same day, I received another enquiry and this time, the list was similar although focused on power related garden equipment:
“Want shed wall Rack for my Gardening Tools Brushcutters, Blower, Hedgers, Chainsaw, Rakes, Shovels”
These are all really great questions and probably represent 80% of what our customers are thinking about when they visit our online store and spend a few minutes browsing around.
So I invested a couple of hours preparing a quote for the first client and an email response for the 2nd. In that time, I reviewed all of the pictures we had on our site demonstrating how our accessories work. I also tested several scenarios in our workshop to ensure I was comfortable with what I was going to recommend.
In doing all of this I realised that we needed to be more helpful and given our store is online, this meant providing more information where you are likely to find it quickly.
StoreWALL Hook Options
Below is how I answered the “organizing tools in garage” question. Mind you, this took a few goes and the client helped with plenty of feedback.
This was my response:
Fishing Rods – I thought the best solution would be the S Hook as it would hold the rod up off the ground. The client in the end preferred the Pole Hook with the rod sitting on the ground.
Maxtracks hung horizontally – I preferred the HD Universal Hooks for this but the client went with the a 63mm Single Hook
Storage of Fishing Gear – I had recommended a basket for this but the client determined that they could an existing plastic bin hung on the wall with 2 x 254mm brackets.
For the skateboard, wakeboard and surfboard – I had recommended 2 x 254mm Angle Brackets with each item stacked side by side. These brackets extend 430mm off the wall. I had also provided the option of the Angled Pole Hook which the client preferred.
Tennis racquets – I had provided the option of the Wide Hook but the client went with a 190mm Single Hook.
The tray for balls – best option was one of our Large Bins
Electrical cords – Utility Hook
Hoses – Utility Hook
Flat fold chairs – Heavy Duty Universal Hook
Fabric foldable chairs in bags = I assumed they had a cord to be hung with and went with the Heavy Duty Universal Hook
Shovels and Pitchfork – Tool Hook
Step ladder – Heavy Duty Cradle Hook
Fan rake & Brooms – Tool Hook
Long garden shears/loppers – Box Hook
Hook for 2 saws – Heavy Duty Universal will carry them.
Multi hook – Six Prong Hook
Bike pump – S Hook
Wheelie shopping carts – Cradle Hook
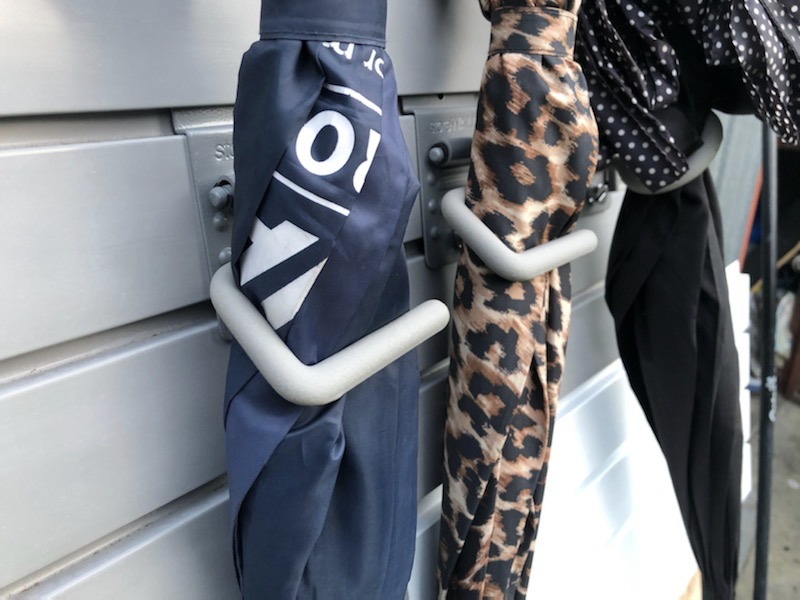
Umbrellas (straight not curved ends) – I tested and have added some photos below. The S Hook was the best option.
Earmuffs and safety glasses – 190mm Single Hook
Sledgehammer – Heavy Duty Universal Hook (depth is 228mm, may also be able to hold both the axe/tomahawk (below) on the same hook)
Fitting for 2 x axe/tomahawk – Heavy Duty Universal Hook
Spirit level – 63mm Single Hook
1 shelves – 812mm Shelf + 2 x 254mm Brackets
Dustpan/broom – 63mm Single Hook
Shelf for boots – Angle shelf
StoreWALL Hook Matrix
Having done all of this work, I have now added a matrix on our Hooks page so that you can see the recommended Hook for common items. Hopefully this is easy to view and read and customers find it useful when working through our store.
Below I have some photos of the umbrellas that were mentioned above. These are your regular umbrellas with a straight handle. At the start, the Angled Pole hook seemed like the appropriate choice but the S Hook proved to be the best choice and I think is a great option for most items that are long.
Organizing tools in garage – S Hook in Action
The S Hook has two arms that wrap around the item, one at the back and one at the front. These arms can be moved up and down but on an angle. Due to this angle, they grip the pole really nicely. You can even move the pole up and down the wall and the grip remains.
If you are wondering about the second “Organizing tools in garage” request that came through, I provided the following response.
Brushcutters – Heavy Duty Cradle Hook, Vertical Tool Hook or the Wide Hook
Blower – Utility Hook or Heavy Duty Cradle Hook (depending on the size)
Hedgers – Heavy Duty Cradle Hook, Vertical Tool Hook or the Wide Hook
Chainsaw – 300mm Power Tool Bracket x 2
Rakes/Shovels – Tool Hook
Note that the Vertical Tool Hook is on its way to Australia. Hoping to have it available in early September.
We receive this question regularly. Can you purchase StoreWALL from your local Bunnings, Mitre 10, Home Hardware, or any other hardware store?
StoreWALL Bunnings?
StoreWALL Australia is a local Melbourne business. We are the exclusive distributor of the StoreWALL range of garage storage solutions which has been sold in the US for over 10 years. Our Garage Storage Solutions are sold online only at the moment via our website. You can also find some of the garage wall panels and accessories on eBay.
Free Delivery
We offer a combination of discounted and even free delivery based on your purchase value, what you purchase, and where you live. We ship Australia-wide.
Free Returns
We also offer free returns, should you order an item and then find it not as useful as you thought. You will need to pay to ship the product back to us.
Bunnings StorEase
Bunnings sell its own garage wall storage system called StorEase. We have reviewed it several times on this website comparing the StorEase panel and rail to StoreWALL.
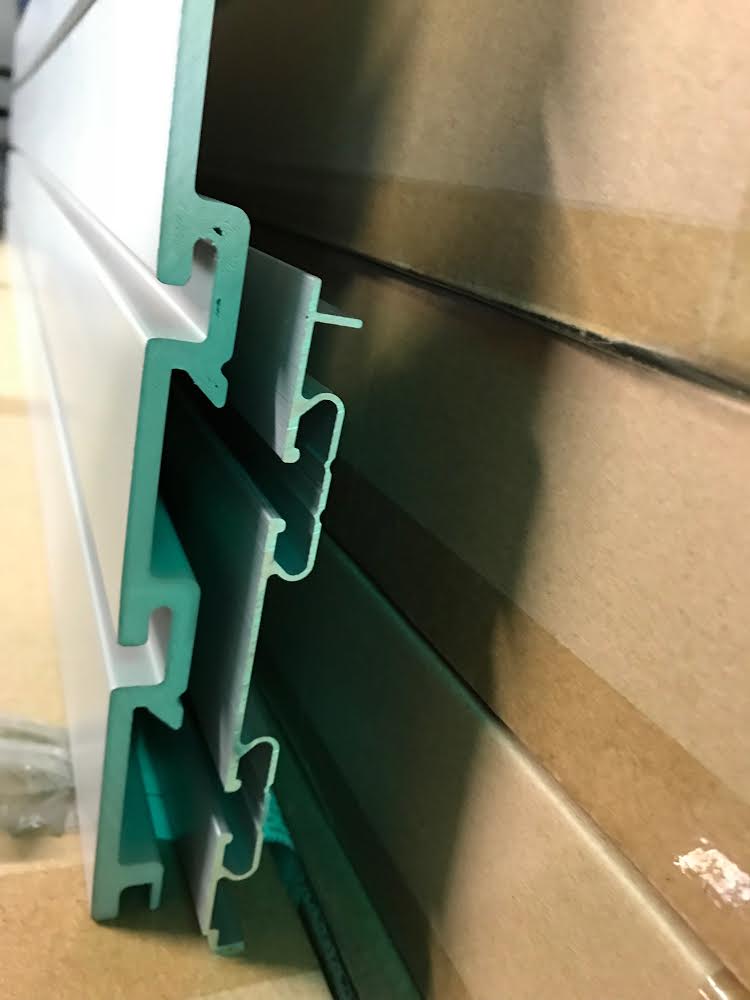
There are several fundamental differences between what StoreWALL offers and that of StorEase. Firstly, we don’t sell a rail, we sell panels that are 304mm in height and either 1219mm or 2438mm in length. Our panels are made from a hardened thermoplastic which is water and mould-resistant. StorEase slat panels are only 150mm in height, 1200mm in length and made from aluminium. These panels are not designed to cover your wall, rather they are placed along your wall at a certain required height.
The second key difference is that our range of accessories is made from steel and then powder coated. They are heavier and more durable than those from StorEase.
StoreWALL CamLok
The locking mechanism used by our accessories is also quite different. StoreWALL uses a unique CamLok system to secure the accessory to the panel. We do not use claws or teeth. This makes StoreWALL significantly more secure when attached to the wall panel. It also makes it easier to remove and then move around. This ensures that your panels are not marked or scratched in the process.
If you like our accessories but already have StorEase rails, then you can actually use our accessories with StorEase. The CamLok system will also secure our accessory to your StorEase rail. THIS DOES NOT APPLY TO THE WALL TRACK SLIMLINE (BLACK RAIL).
StoreWALL Showroom
StoreWALL does not offer a showroom in Melbourne. However, if you are happy to visit our home office we are happy to show you what we offer and how StoreWALL will transform your garage. Call (0411280646) or email us (info@storewall.com.au) to organise a visit.
We can also help you with quotes on how many panels you may need as well as installation.
2020 is a year many of us will never forget. COVID-19 has locked a lot of us in our homes with plenty of time on our hands to look around and want to mend. The organised garage is something that has been talked about in many households when I consider the amount of enquiries we have received since the lockdown began.
We have covered how to organise your garage in several previous articles on our website, but I thought a top 10 (or 11) list of how to start and what to do would be useful.
The Organised Garage
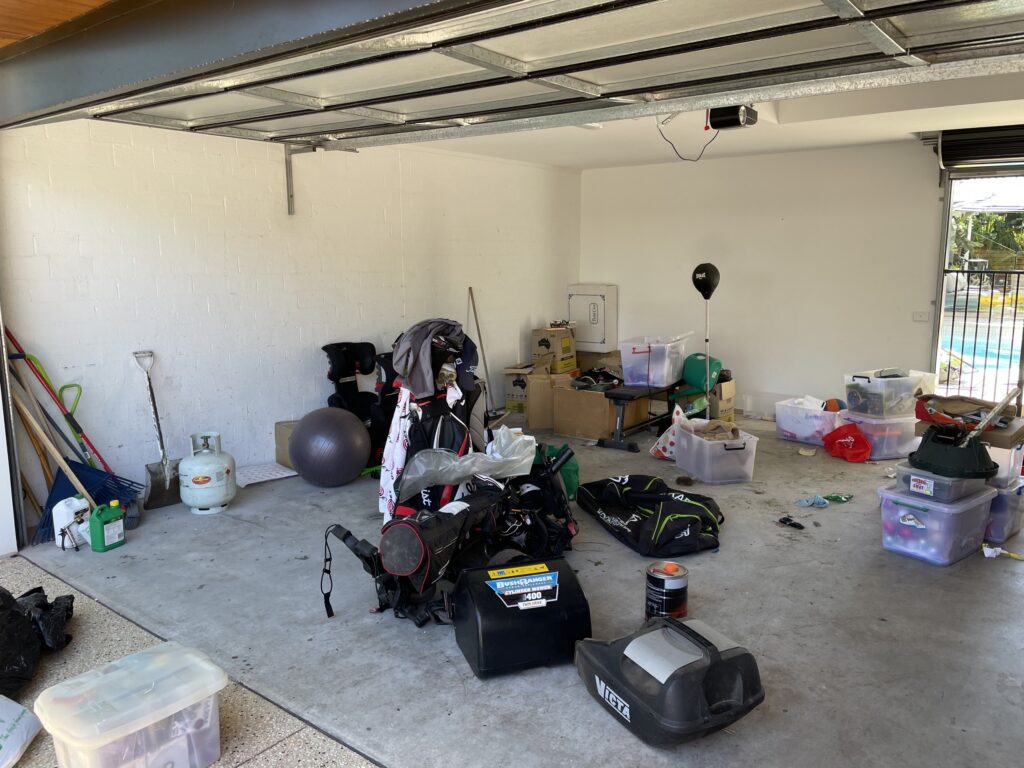
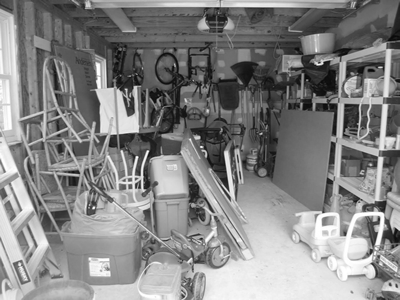
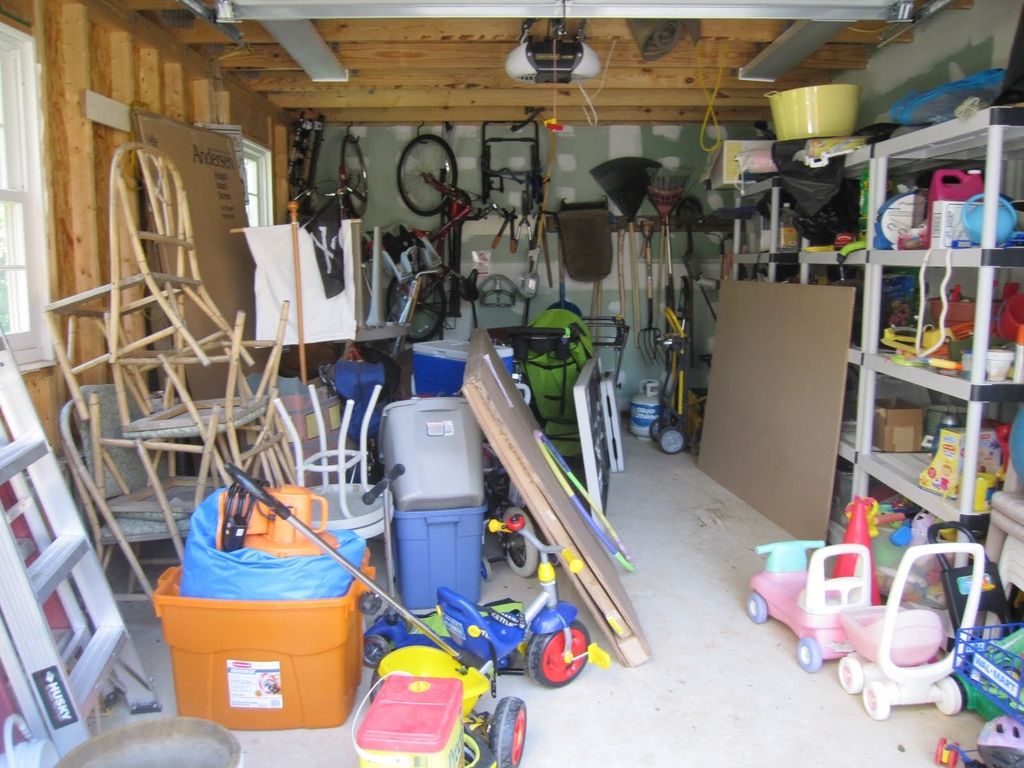
Whilst there are plenty of extreme garage photos out there, your typical garage will have some order about it. However, what then tends to happen is larger items start to take up space, the shelves you purchased fill up or don’t fit larger items (anymore) and things start to accumulate on the floor. Before you know it, you start to use the floor more and more until it’s impossible to move around and find anything quickly or safely.
Step 1 – Empty it out
The best way to start re-organising your garage is to clean it all out. Everything off the walls, the floor and the ceiling needs to come out. Start in the morning so you have the day ahead of you and begin the clean-out.
Step 2 – Group it
When its all out on the garden lawn or driveway, start to group it. One of the keys to attaining the organised garage is the organising bit.
When I look at what is inside my garage I have the following categories:
Tools
Sports Gear
Bikes
Food (cans/packets and excess food I store)
Xmas tree and decorations
Beach gear (boogie boards)
Party gear (decorations, plastic cups and plates)
Old kids furniture
Bins of books
Old clothes
Keep sake items
Step 3 – Sweep it out
Give your garage a good clean out. This includes sweeping and even hosing it down. Get all of the dust and dirt that has accumulated in the corners out. You will need to remove all the furniture to do this.
You should also look at the walls and ceiling and wipe it all down. Either by hand or with a broom. Get all of the cob webs down.
Step 4 – Keep, Dump, Not Sure
Once your sorting is done, you need to go through everything and decide to either keep it because you will use it or it has some sentimental value. Dump it because you will never use it and you know someone else will get better value from it. Or, put it into the “Not sure” list to be decided upon over the coming days.
What you decide to get rid of could go to a Salvation Army store for them to sell (and make a few dollars from). It could also be sold on Ebay or Gumtree if you have the patience. Alternatively, you could give it away to a friend/family. Finally, when hard rubbish comes around you could throw it out then.
The items that you are not sure about, should be put to the side to be looked at over the coming weeks and decided upon. Don’t add them to the Keep list unless you are certain that is where they belong.
Step 5 – Floor Plan
The floor plan is really important because it offers a way to design your layout and use of the space you have. Consider the furniture you have, its size and potential use.
Think about how you use your garage. Is it just for storage or do you do work in there. As an example, I exercise in my garage, so a certain area needs to be dedicated to my training equipment.
What about your car? Do you need to park your car in the garage? If you have bikes, think about where they can be parked or hung.
If you use the space as a workshop, consider what you will use as your bench or table.
You don’t need special software for this, a few pieces of paper will do it. However spend time thinking about the space, the objects and how you want to use it all. Think about your doorways and how you access the garage (main garage door, side door, back door).
Consider the location of the items you will keep but only use a year and those that you want to access regularly. If you have little ones accessing bikes or sporting gear, think about how they can safely move in and out of the garage.
Step 5 – Group it (part 2)
The second part of grouping relates to organising your items in tune with the garage floor plan you have designed. If you read through the many blogs on organising and watch the videos, there are tons of tips on the best approach.
With any space you are working on within your home you need to prioritise based on what you want to use the space for. If part of the space is for working, then making enough room to work is key, so is using the right furniture like a desk or bench.
Bikes, if you are regularly in and out of the garage to get a bike(s), then having these placed in an easy access area even when the car is in the garage is important. You don’t want to have to move the car to get the bikes each time.
Tools, if you are using tools or a regular basis then having your tools visible and accessible is key. This can include your smaller hand tools and all types of power tools.
Items which are regularly used should be easy to access. For you and the rest of your family members. Items which are used once a year (xmas tree) should be out of the way. These items can be stored high and in a harder place to access.
Remember that this step is not a once-off. Organising and re-organising happens all of the time within the house. It should be the same in the garage. The organised garage is not born overnight.
Step 6 – Using Walls
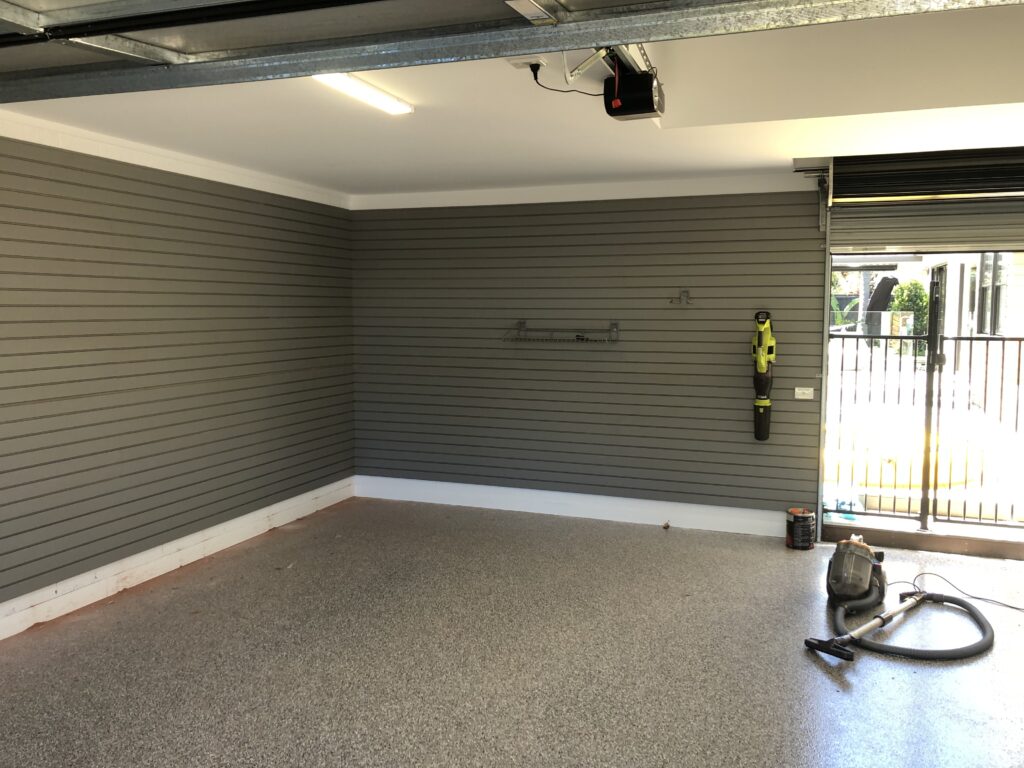
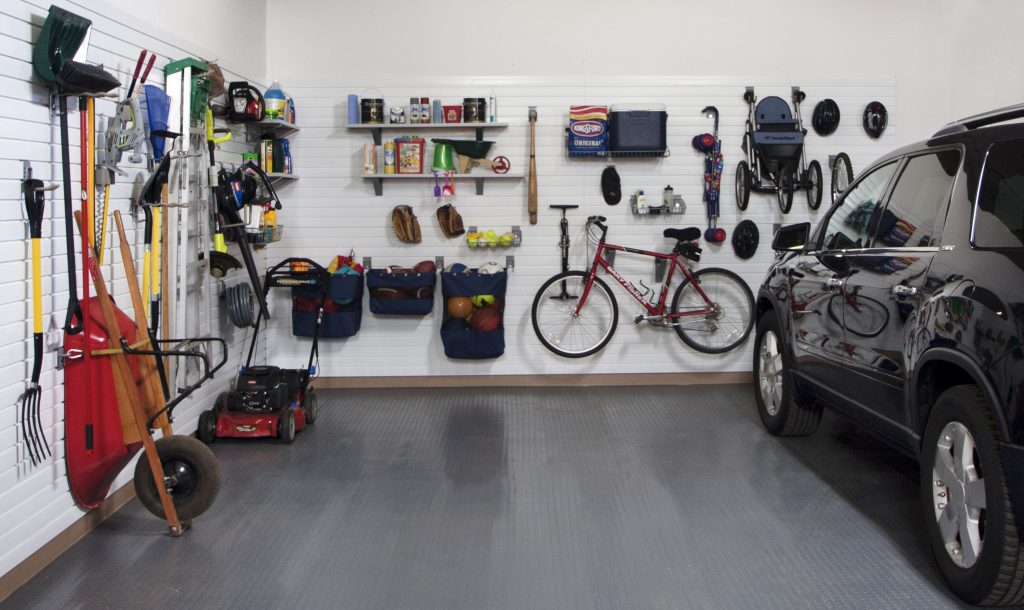
Whether your garage space is small or large using your wall space is important. Most people confuse shelving with maximising use of walls space. Sticking a few shelves on the wall is a start, it’s not the end.
Having open spare wall space in a garage is wasted space. Solutions like StoreWALL give you the ability to use your wall and change its use as needs change. Unlike a shelf which is large and can’t be easily moved around, Garage Wall Storage can change a wall from shelving to holding power tools in a matter of minutes. Accessories are unlocked and moved around as needed.
Use wall storage around shelving, cupboards and other furniture.
Step 7 – Use the height of your room
Use the height of your space to store larger items that you seldom use. It gets them out of the way and the lower easy to access areas are used for more frequent use items. Wall storage allows you to create shelving across the top of your wall.
However there are other garage storage options which create shelving across the ceiling of your garage.
Step 8 – Re-use old furniture
If you have furniture that can be re-used for storage, it makes sense to give it a second life. Why buy another piece of furniture if you can change its look with some paint and move it into the garage. This isn’t always practical but it can work. An old desk in the study can become a useful workbench in the garage.
Step 9 – Labelled Bins & Tubs
We all have them, coloured or clear plastic tubs with lots of stuff in them. They should be organised and clearly labelled. Some clear information on the outside of the tub will save a lot of time sifting through them all looking for that old book.
Ensure your tubs have lids and they are shut tight so that contents don’t collect dust.
Step 10 – By the Door
Keep your frequently used items by the garage door. This is the main garage door you use.
In my garage, the frequently used items are my tools, food and my gym equipment. They are all by the back door to the garage.
Step 11 – It’s not a once off
Just like any other room in your garage, it may take you a few goes to get it right. Over this time you will likely throw more stuff out and learn more about how you want to use the space you have.
Your version of “the organised garage” doesn’t need to look like what is in some of pretty staged pictures of garages. It needs to work for you, your stuff and the room you have.
If in 6 mths your needs or items may change, so should your garage.