Access an Additional $20 Off All 2438mm Wall Panels!
CALL US

0411 280 646

Categories
garage design Garage Ideas garage makeover Garage Walls

Planning Your Garage Layout: Australian Dimensions, Storage Zones and Wall Systems

Planning Your Garage Layout: Australian Dimensions, Storage Zones and Wall Systems

A well-planned garage does more than park a car. With the right layout, it becomes a functional workshop, a sports equipment hub, a tool room, and a storage solution all in one. But most Australian homeowners start fitting out their garage without a plan — and end up with a cluttered space that frustrates them every time they open the door. This guide walks you through standard Australian garage dimensions, how to think about zones, and how to choose a wall storage system that grows with you.

Standard Australian Garage Dimensions

Before you plan anything, you need to know what you’re working with.

Single Garage

  • Standard size: approximately 3.0m wide x 5.5m deep (minimum)
  • Recommended: 3.5m x 6.0m to allow comfortable door opening and storage along walls
  • Typical wall storage area: one or two walls depending on access door position

Double Garage (2-Car)

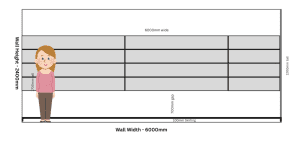
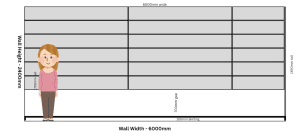
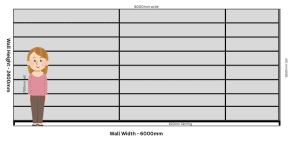
  • Standard size: approximately 5.4m–6.0m wide x 5.5m–6.0m deep
  • This is the most common size for Australian homes built since the 1990s
  • Key consideration: width determines whether you have a usable wall down the centre dividing the two bays
  • Wall storage potential: significantly higher — typically 3–4 walls available

Triple Garage (3-Car)

  • Standard size: approximately 8.4m–9.0m wide x 6.0m deep
  • Less common but increasingly popular in new builds
  • Wall storage across 3+ walls is achievable

Basement Garages

  • Common in newer townhouses and apartments
  • Usually tighter dimensions — 2.7m–3.0m wide per bay
  • Height restrictions sometimes limit overhead storage
  • Wall storage becomes even more important as floor space is at a premium

Before You Plan — Four Questions to Answer First

This section guides the reader through self-assessment before diving into layout.

How many cars need to fit?

The car footprint defines everything else. A standard car needs approximately 2.4m wide x 4.8m long of floor space, plus clearance. Plan this first, then work around it.

What else do you need the garage to do?

List everything: bikes, tools, garden equipment, sports gear, a workbench, a second fridge, seasonal items. Most Australian garages need to serve 4–6 functions simultaneously. Writing this list before planning prevents the most common mistake — designing for the car and forgetting everything else.

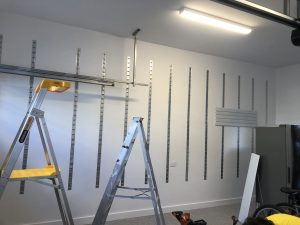
What are your walls made of?

  • Brick or block — requires battening before slatwall installation (link to battening article)
  • Plasterboard over timber frame — direct installation possible
  • Metal shed frame — requires specific fixing approach
  • Concrete block — similar to brick

Wall type determines your installation approach and should be understood before choosing a storage system.

Where are your fixed elements?

Power points, windows, the door from the house, the garage door mechanism — all of these constrain your layout. Mark them on a rough sketch before planning anything.

Dividing Your Garage Into Zones

Intro: The most functional garages treat wall space and floor space as separate planning problems. The walls handle storage. The floor handles activity and access.

The Car Zone

Define your car footprint first. Mark it on the floor with tape if it helps. Everything else in your planning works around this.

The Wall Storage Zone

Every wall that doesn’t have a window, door or garage door mechanism is a storage opportunity. In a standard double garage, this typically gives you:

  • Full rear wall (most valuable — widest and most accessible)
  • One full side wall
  • Portions of the other side wall
  • Sometimes above the garage door on the front wall

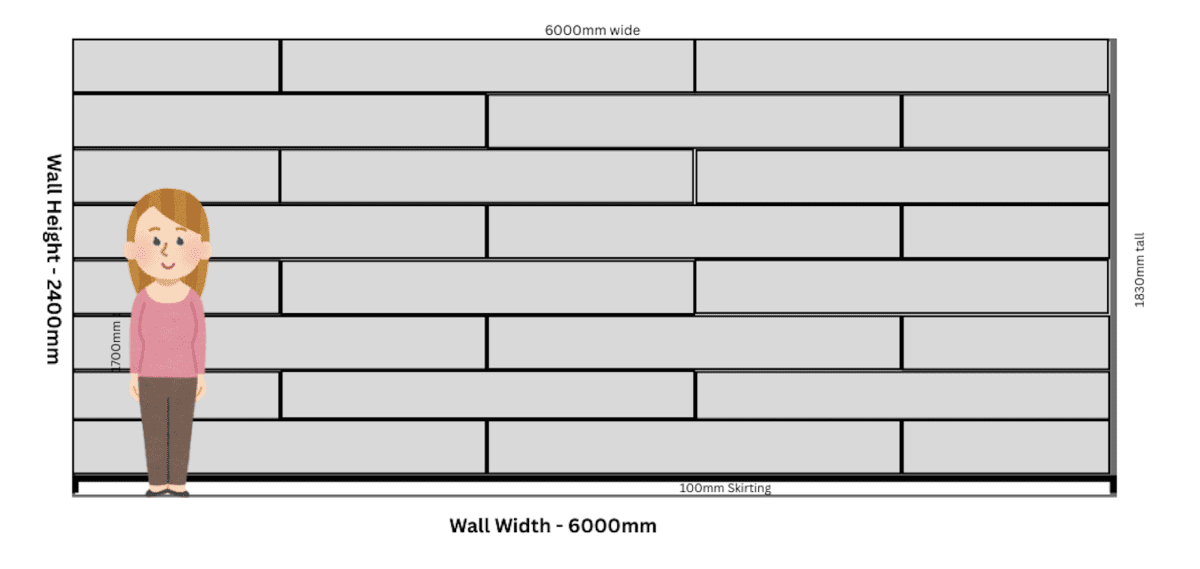
A slatwall system installed across these walls gives you continuous, configurable storage from floor to approximately 2.1m height — the practical reach limit for most adults.

The Workbench Zone

If you need a workbench, plan it along one wall — ideally under a window for natural light, or with dedicated lighting above. A slatwall system above the bench keeps tools within arm’s reach and off the bench surface.
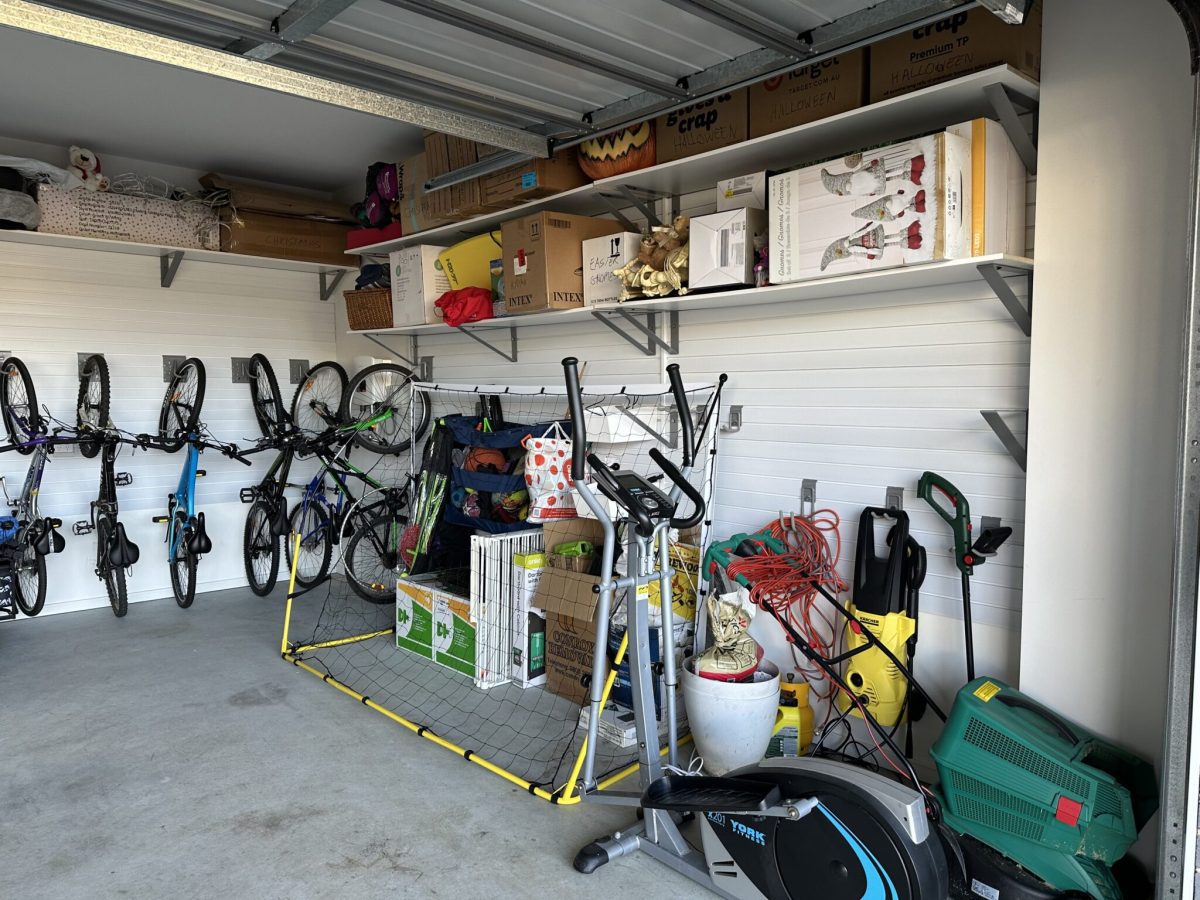
The Overhead Zone

Ceiling space is often wasted in Australian garages. Overhead storage platforms or ceiling-mounted racks work well for seasonal items — Christmas decorations, camping gear, sports equipment used only occasionally. Keep regularly accessed items on walls and rarely accessed items overhead.

The Floor Zone

Anything that needs to stay on the floor — bins, freestanding tools, the car — should be defined and protected. If your wall storage is doing its job, your floor zone should be largely clear.

Choosing Your Wall Storage System

Once you know your zones, you need to choose a wall storage system that can serve all of them. There are three main options for Australian homeowners.

Pegboard

The traditional option. Inexpensive to buy, but hooks fall out constantly, weight limits are low (typically 5–10kg per hook), and MDF versions deteriorate with moisture. Suitable for light tool storage only.

Wire Track Systems (like StorEase from Bunnings)

More durable than pegboard, with a proprietary track and hook system. Limited accessory range compared to slatwall. Weight ratings are lower and the channel spacing is fixed, limiting configuration flexibility.

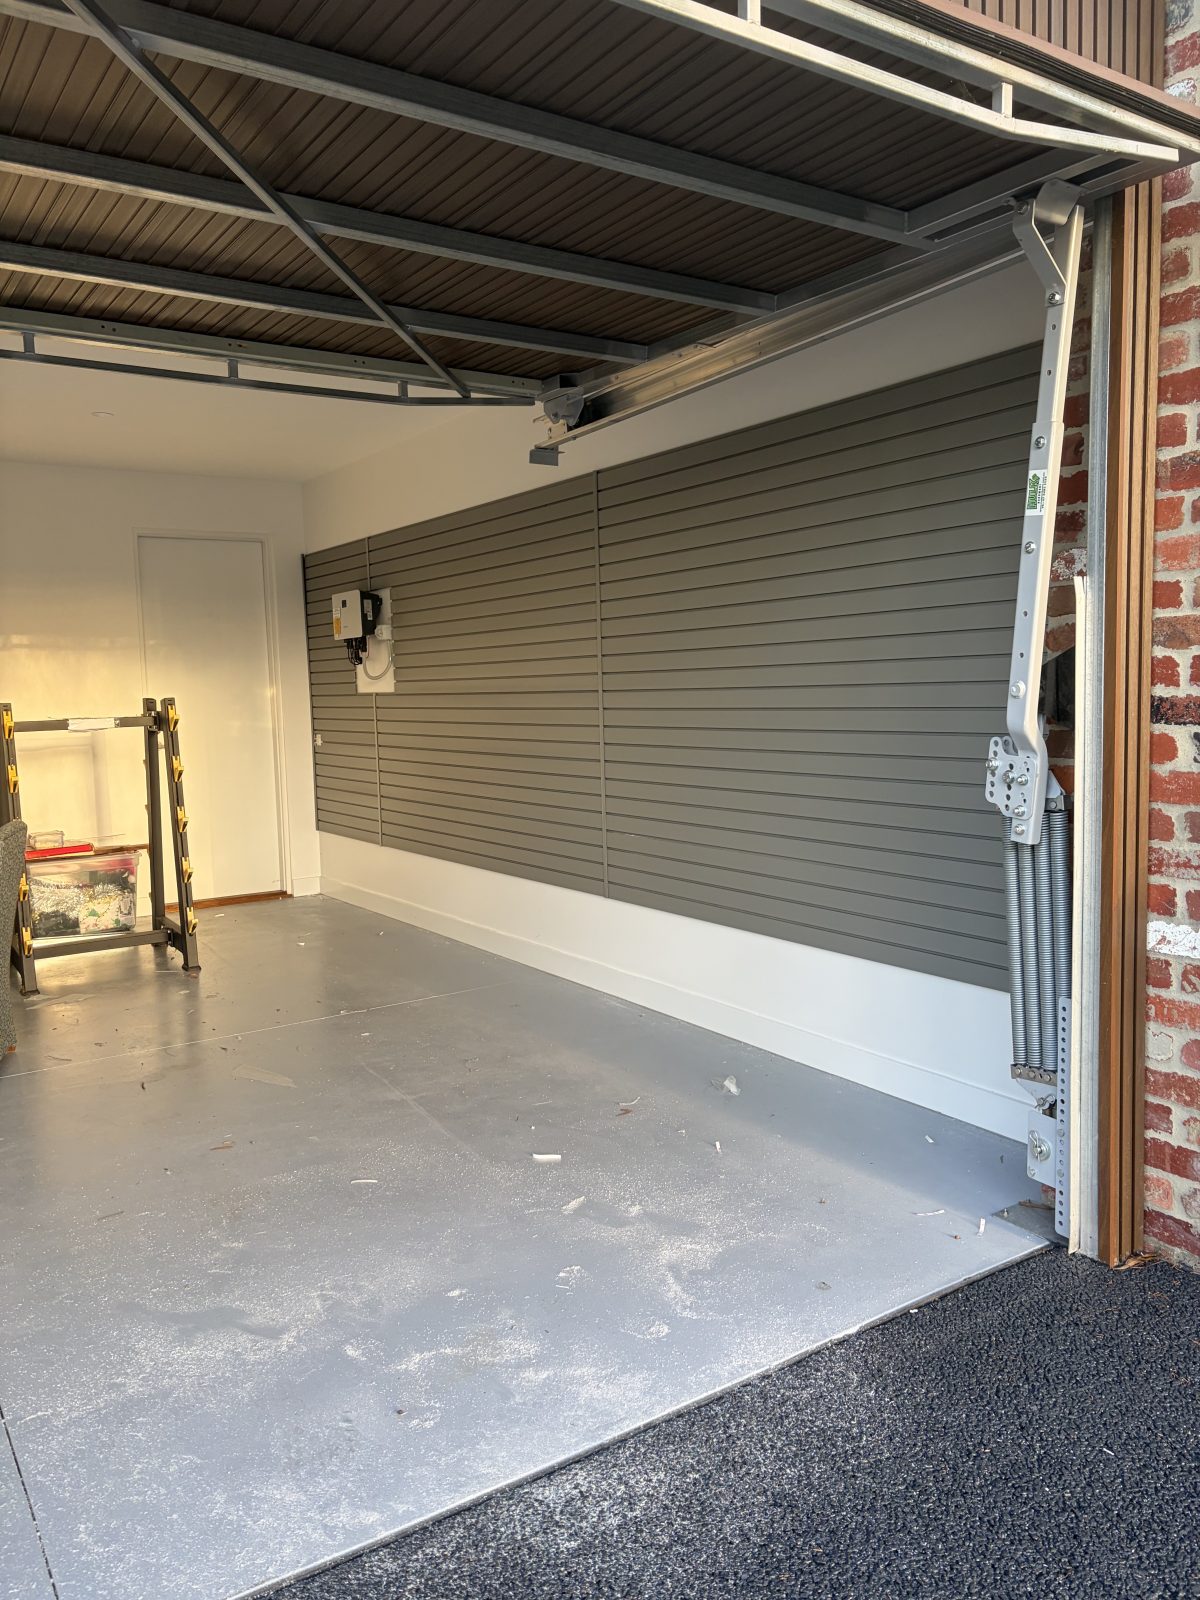
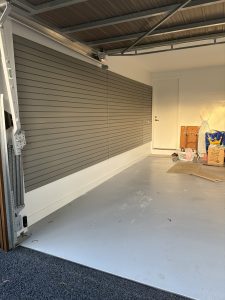
PVC Slatwall (like StoreWALL)

The premium option for Australian garages. Key advantages:

  • Weight rating up to 75kg per panel
  • 200+ compatible hooks, shelves, baskets and accessories
  • Waterproof — no swelling or warping in humid or wet garage environments
  • Fully configurable — accessories slide and reposition without tools
  • Colour options to suit different garage aesthetics
  • CamLok locking mechanism keeps accessories secure even under heavy loads


How Much Wall Storage Do You Need?

A common mistake is underestimating how much wall coverage you need. Here’s a practical way to work it out.

Step 1: Count the number of items you need to store off the floor or bench. Be specific — not “tools” but “drill, jigsaw, circular saw, sander”.

Step 2: Group them by category — power tools, hand tools, garden equipment, sports gear, seasonal items.

Step 3: Assign wall space by category. Power tools near the workbench. Bikes near the garage door. Garden tools near the side door.

Step 4: Use the StoreWALL Wall Panel Estimator to calculate panel coverage for each wall section.

Use the Wall Panel Estimator

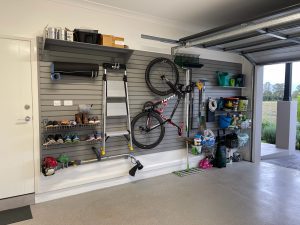
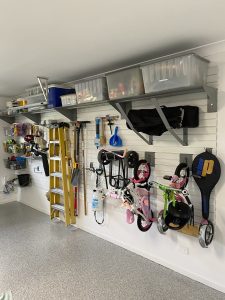
A Practical Example — Planning a Standard Double Garage

Walk through a realistic example with a sketch or diagram if possible.

Scenario: 5.8m x 6.0m double garage, two cars, bikes, garden tools, power tools, seasonal storage.

  • Rear wall (5.8m): Full slatwall installation, bike hooks on the left section, power tool storage above bench on the right section
  • Left side wall (6.0m): Full slatwall, garden tools (rakes, shovels, hose reel) and kayak bracket
  • Right side wall: Partial slatwall above workbench, shelves for parts and bins
  • Overhead: Platform for camping gear and seasonal boxes

This configuration removes virtually everything from the floor while keeping all items accessible.

Getting Started

Planning a garage layout takes an hour of thinking but saves years of frustration. Start with dimensions, define your zones, choose a wall system rated for what you need to store, and work category by category. The most important principle: design for what you actually own, not a theoretical tidy version of it. If you have six bikes, plan for six bikes. If you have a large tool collection, plan wall space for it from the start.

Request a StoreWALL quote / Use the wall panel estimator / Shop wall panels.

Categories
garage design Garage Hooks Garage Ideas garage makeover Garage Walls Sports Ball Storage Sports Equipment StoreWALL Workbench

How to Organise a New Garage

How to Organise a New Garage

7 Things to Do Before You Move In

Moving into a new home is one of the few times in life you get to start from scratch. Every room is clean. Every wall is bare. The garage, especially, is a blank canvas — and it won’t stay that way for long.

Most people wait until after moving in to think about garage storage. By then, bikes are already propped against the wall, tools are in a pile on the floor, and there’s a cardboard box graveyard in the corner that no one wants to deal with. The garage becomes a dumping ground because there was no system in place before the dumping started.

The solution is simple: plan your garage storage before moving day. It takes a few hours, costs nothing extra if you buy the right system from the start, and it’s the single best thing you can do to keep your new home organised for years to come.

Here’s exactly what to do — in order.

“Every hook, shelf, and bin in a slatwall system slides in without tools. You can rearrange the entire wall in an afternoon as your life changes.”

How to Organise a New Garage

MEASURE YOUR WALLS BEFORE YOU BUY ANYTHING

Grab a tape measure and spend fifteen minutes in the empty garage. Write down the usable wall width on every wall — accounting for the garage door track, any windows, and the internal door. In a standard double garage, you’ll usually have 5–6 metres of usable wall space. A single garage gives you roughly 2.5–3.5 metres.

Also measure the wall height from floor to ceiling, and note the position of power points and lights. This tells you how many panel rows you can fit and where your working zone sits (typically 1–2 metres off the floor for tools and bikes).

DECIDE WHAT YOU’RE STORING — BEFORE CHOOSING ACCESSORIES

This sounds obvious, but most people skip it. They buy a bundle of hooks and figure it out later. The result is a wall full of accessories that don’t quite match what they need.

Instead, write a quick list of every category of item that will live in the garage: bikes, power tools, garden tools, sports gear, camping equipment, cleaning supplies, the lawn mower. Then sort the list into two groups: daily use (goes at eye level, easy to grab) and occasional use (can go up high or in a corner).

That list is your accessory shopping list. Work from it, not from what looks good in a photo.

ASK YOUR BUILDER TO ENSURE STUDS ARE CENTERED 450MM APART.

If your new home is still under construction, this is a tip that takes thirty seconds to ask for and delivers a sturdier and stronger garage wall on which to install any garage storage solution.

450mm gap between studs which is standard inside the home ensure more installstrips per wall panel and therefore a more robust garage wall storage solution.

INSTALL YOUR WALL PANELS BEFORE THE FIRST BOX ARRIVES

A StoreWALL installation on a single wall takes two to three hours for two people. You need a impact driver (drill), a spirit level, a stud finder, and the right fixing screws for your wall type. The panels go up one row at a time — perfectly level, anchored to studs or masonry, clipped together at the joints.

Once the panels are up, every hook, shelf, bin, and bracket slides onto the rails without any additional drilling. That means you can change the layout as many times as you want without touching a drill again.

The key is to get the panels up before your garage fills up. Working in an empty garage is significantly easier than trying to measure and drill around bikes, tools, and boxes.

How to organise a new garage

START WITH BIKES — THEY’RE THE HARDEST THING TO STORE ON THE FLOOR

Bikes take up more floor space per item than almost anything else in a garage. Two adult bikes leaning against a wall can block a third of a single garage’s floor space. Getting them on the wall immediately changes how usable the garage is.

For a double garage with two or more bikes, rotating bike hooks are the most space-efficient option — they fold the bike horizontal to the wall, staggering front and back wheels so two bikes can hang in the space of one. A J hook is ideal for a single bike or a child’s bike at a lower height.

CREATE ONE DEDICATED TOOL ZONE

New homeowners often make the mistake of spreading tools all over the wall — a hook here, a bin there, a shelf in a random spot. A year later, you can’t find anything and the wall looks chaotic.

Instead, dedicate a single zone (usually the centre section of the back wall, around 1–1.5m wide) to your tool setup. A shelf at workbench height holds items you use while standing. Hooks below keep drills, saws, and hand tools visible and reachable. Bins above hold bits, fasteners, batteries, and small accessories.

Keeping everything in one zone means you always know where to look, and you build a mental map of the wall quickly.

LEAVE ROOM TO GROW — DON’T FILL EVERY SLOT IMMEDIATELY

When you install a new garage storage system, the temptation is to fill every available inch immediately. Resist this. Your storage needs will change — a new baby means a pram and a balance bike. A new hobby means camping gear or surfboards or craft supplies. A new car might need its own space.

A slatwall system’s great advantage is that it grows with you. Leave a section of your panels empty for six months and you’ll quickly discover exactly what needs to live there. Accessories slide in and out in seconds — there’s no wrong answer, and no permanent commitment.

The only rule: get the panels on the wall now, while the garage is empty. Everything else is flexible.

“The garage you set up in week one becomes the garage you have for the next five years. It takes a weekend to get right — and it’s worth every hour.”

THE BOTTOM LINE

A new home garage is a rare opportunity. You have a blank wall, no existing clutter, and a fresh start. Spending a few hours before moving day — measuring, planning, and installing a wall panel system — sets you up for a garage that stays organised as your family grows and your storage needs change.

Most new homeowners spend money on furniture, appliances, and garden plants in the first month. The garage comes last. But the garage is where you make most of your mess — and where the right system makes daily life genuinely easier.

Start with the panels. Get the bikes up. Build the tool zone. Leave room to grow. That’s it.

Categories
Best Garage Storage Solutions for 2024 garage design Garage Hooks Garage Ideas Garage lighting ideas garage makeover

How Much Space Do You Need to Park a Car in Your Garage?

If you’ve ever opened your car door and gently “kissed” a garage wall… you already know this matters.

Whether you’re building a new home, renovating, or trying to optimise your existing space, understanding how much garage space you need to comfortably park your car is critical. It affects safety, convenience, resale value, and even how much storage you can realistically install.

This guide breaks down:

  • Standard garage dimensions in Australia
  • Different car sizes and what they require
  • How much clearance you need to open doors
  • Space for internal access doors
  • How storage impacts parking space
  • Practical layout recommendations

Let’s get into it.

Standard Garage Sizes in Australia

Most new homes in Australia include one of the following:

Single Garage (Common Size)

  • Width: 3.0m – 3.5m
  • Depth: 5.4m – 6.0m
  • Door width: 2.4m – 2.7m

Double Garage (Common Size)

  • Width: 5.5m – 6.0m
  • Depth: 5.4m – 6.0m
  • Door width: 4.8m – 5.4m

In many volume-built homes, garages are designed to technically fit cars — but not necessarily to open doors comfortably or allow for storage.

That’s where problems begin.

Step 1: Understand Your Car’s Actual Size

Here’s a quick breakdown of typical vehicle sizes in Australia:

Small Hatchback (e.g. Toyota Corolla)

  • Length: ~4.3m
  • Width (mirrors folded): ~1.8m
  • Width (mirrors out): ~2.0m

Medium SUV (e.g. Mazda CX-5)

  • Length: ~4.6m
  • Width (mirrors folded): ~1.85m
  • Width (mirrors out): ~2.1m

Large SUV / Dual Cab Ute (e.g. Ford Ranger)

  • Length: ~5.3m
  • Width (mirrors folded): ~1.9m
  • Width (mirrors out): ~2.2m

You can see immediately: a 5.4m deep garage barely fits a modern dual cab ute.

australian vehicle dimensionsStep 2: Allow Space for Opening Doors

This is the biggest oversight in garage planning.

To open a car door comfortably, you typically need:

  • 600mm–750mm clearance per side for comfortable entry/exit
  • Minimum 450mm per side for tight entry

So if your car is 1.9m wide:

1.9m car

  • 0.6m left clearance
  • 0.6m right clearance
    = 3.1m minimum usable width

That means:

  • A 3.0m wide garage is technically tight
  • A 3.5m wide garage is far more practical

For a double garage, the issue becomes spacing between vehicles. You ideally want 800mm between cars if both drivers need regular access.

Step 3: Consider Garage Depth

Depth matters for:

  • Walking in front of the car
  • Accessing storage at the rear
  • Closing the garage door safely
  • Internal access doors

Recommended Depths

Vehicle Type Recommended Garage Depth
Small Car 5.5m
Medium SUV 5.8m
Dual Cab Ute 6.2m+

If your garage is only 5.4m deep and you drive a 5.3m ute, you’ll barely clear the roller door.

That means no rear storage.

Step 4: Internal Access Door Considerations

In most Australian homes, you enter the house via an internal garage door — not the main garage door.

This means:

  • You don’t rely on natural light
  • You need clear walking space
  • You need safe lighting
  • You shouldn’t block this door with storage

Plan for at least 900mm walkway clearance between your parked car and the internal door.

If your car door swings into that space, you’ll feel it daily.

Step 5: Storage vs Parking Space

Garages are rarely just for cars anymore.

They store:

  • Tools
  • Bicycles
  • Sporting gear
  • Christmas decorations
  • Lawn equipment
  • Shelving
  • Wall storage systems

The biggest mistake homeowners make is installing bulky floor shelving.

Floor storage eats into your parking clearance.

Smart Solution: Use Wall Space

Vertical wall storage systems (like slatwall or panel systems) allow you to:

  • Keep floor space clear
  • Maintain door opening clearance
  • Store items above bonnet height
  • Keep rear wall usable

If your garage is tight, wall-mounted storage becomes essential, not optional.

How Steep Driveways & Entry Angles Affect Parking Space

If you’re in a new estate or have a basement garage, driveway gradient matters.

Most passenger vehicles can comfortably manage:

  • 12–15% driveway gradient

However, low-profile vehicles may scrape if:

  • The transition angle is sharp
  • The driveway meets the slab abruptly

Inside the garage, this can impact:

  • Clearance under shelving
  • Ramp entry positioning
  • Door swing angle

If your driveway slopes down, allow extra depth so you’re not parking nose-to-wall.

Ideal Garage Dimensions (Future-Proofed)

If you are building new:

Single Garage (Comfortable Standard)

  • 3.5m wide
  • 6.0m deep

Double Garage (Comfortable Standard)

  • 6.0m wide
  • 6.0m deep

Premium / Large Vehicle Friendly

  • 6.2m–6.5m deep
  • 6.2m wide

This gives room for:

How to Measure Your Garage Properly

  1. Measure wall-to-wall internal width
  2. Measure slab depth from rear wall to inside of door
  3. Account for:
    • Storage depth (usually 300mm–500mm)
    • Internal doors
    • Hot water systems
    • Switchboards

Then compare against your vehicle dimensions plus clearance allowances.

Quick Formula: Do I Have Enough Garage Space?

Garage Width Needed
= Car Width + 1.2m clearance

Garage Depth Needed
= Car Length + 600mm rear clearance

If you don’t meet those numbers, expect tight access.

Why This Matters for Resale

Buyers now commonly drive:

  • SUVs
  • Dual cabs
  • Larger family vehicles

If a garage cannot comfortably fit modern vehicles, it becomes:

  • A storage shed
  • A negotiation point
  • A perceived design flaw

Spacious garages are a selling feature.

Final Thoughts: Plan for Comfort, Not Just Fit

There’s a big difference between:

  • “The car fits”
  • “The garage works”

If you’re building, plan larger than you think you need.
If you’re renovating, prioritise vertical storage to reclaim space.

A well-planned garage:

  • Protects your vehicle
  • Improves daily convenience
  • Increases property appeal
  • Reduces clutter

And most importantly…
You’ll stop apologising to your car doors.

Categories
Basement Garages garage design Garage Ideas Garage lighting ideas garage makeover Garage Walls

Garage Lighting Guide


Traditional vs Modern, Best Options for Today

A garage is often one of the most neglected spaces in the home — yet it’s where we park cars, work on hobbies, store tools and gear, and access the house via internal doors. Because most garages lack natural light until the door is open, appropriate interior lighting isn’t a luxury — it’s essential for safety, visibility and functionality.

In this comprehensive guide, we’ll cover:

  • How garage lighting has evolved
  • Traditional vs modern lighting types
  • Why specific lighting is recommended today
  • How much lighting most Australian garages need
  • Where lights should be placed
  • Practical tips for workshop zones, storage areas and ambient tasks

Whether you’re building a new home or upgrading your existing garage, this article shows you how to make your space safe, bright, and functional.

Why Garage Lighting Matters

Unlike living spaces that benefit from windows and skylights, garages are typically:

  • Fully enclosed from natural light
  • Accessed via the garage door or internal house door
  • Used for diverse activities (parking, workshops, storage, laundry)
  • Potentially dangerous with tools, vehicles, and equipment

Without adequate light, everyday tasks — especially detailed ones like DIY projects, car maintenance or finding stored items — become harder and less safe.

Garage Lighting — Traditional Types vs Modern Solutions

1. Traditional Lighting (Fluorescent Tubes)

In older garages, lighting usually consisted of:

  • Single or dual fluorescent tube fixtures
  • Cool white light
  • Basic on/off operation

Pros:
✔ Inexpensive
✔ Reasonably bright

Cons:
✘ Flicker and slow start
✘ Lower longevity (~10,000 hours)
✘ Poor colour rendering
✘ Bulky fixtures

In summary: adequate for basic parking but not ideal for detailed tasks or modern garage uses.

2. Modern Lighting (LED Fixtures)

Today, the recommended lighting standard is LED garage lighting.

LED is:

  • Brighter and more consistent
  • Longer lasting (50,000+ hours)
  • Energy efficient
  • Low heat output
  • Available in different colour temperatures

LED has become the de facto standard for modern garages because it solves the key limitations of older lighting types.

What Type of Garage Lighting Should You Use?

When choosing lighting, consider:

1. Brightness (Lumens)

Lumens measure light output.

  • A typical garage requires 3,000–6,000 lumens per bay
  • Bright workshop zones may require 7,000+ lumens

2. Colour Temperature (Kelvin)

  • Warm white (2700K–3000K) = cozier but not ideal
  • Neutral white (3500K–4000K) = balanced
  • Cool white daylight (5000K–6500K) = best for garages
    Recommended: 4000K–6000K for clarity and contrast

3. Colour Rendering Index (CRI)

  • CRI measures how accurately colours appear under a light
  • Aim for CRI 80+ (90+ ideal for detail work)

How Much Lighting Does an Average Garage Need?

In Australia, the typical double garage is ~36m² (6m x 6m).

Recommended Lighting Levels

Area Minimum Lumens Best Practice Lighting
Parking zone 3000–4000 lm LED overhead panels
Workshop or workbench 5000–8000 lm Task lights + strip LEDs
Storage shelving zones 2000–4000 lm Under-shelf or wall lights

Total Target: 10,000–15,000 lumens total for a standard double garage.

Recommended Lighting Types for Garages

1. LED Shop Lights / Strip Lights

  • Ideal for general illumination
  • Even light spread
  • Easy to install
  • Energy efficient

Where to place: centre ceiling line, parallel to garage door

garage lighting ideas
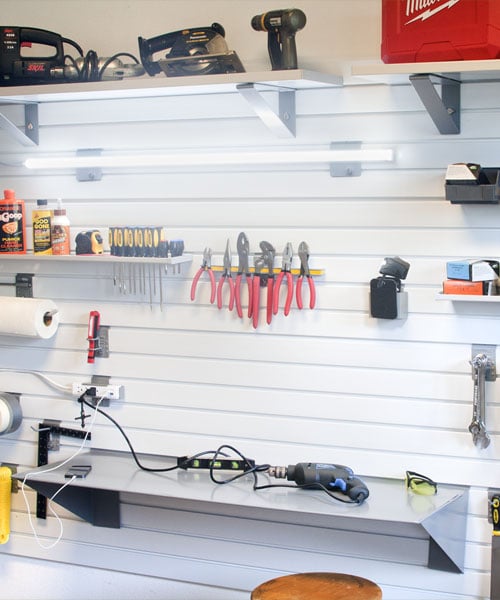
2. Task Lighting (Workbench Areas)

  • Important for hobbyists, mechanics, DIYers
  • Adjustable arm lamps
  • LED bars above workbench
  • Under-cabinet lighting

3. Motion Sensor Lights

  • Enhances safety & convenience
  • Lights turn on automatically on entry
  • Reduces energy use

Best near: internal doors, entry points, tool zones

4. Wall-Mounted or Under-Shelving LEDs

  • Great for storage zones where tools or bins are stored
  • Helps locate items quickly
  • Reduces shadows in shelving areas

5. Smart Lighting with Dimmers

  • Adds control and flexibility
  • Dimming for different use cases
  • App or voice control (if integrated)

Where Lights Should Be Installed

Proper placement matters as much as the type of light.

Ceiling Lights

  • Even lighting across the floor
  • Should be placed evenly across the ceiling
  • Avoid placing only near the garage door

Task / Workbench Lighting

  • Direct lighting over work surfaces
  • Adjustable or angled to reduce shadows

Wall / Storage Fixtures

Practical Tips for Garage Lighting Success

Maximise Light Reflection

  • Choose light coloured walls and ceilings
  • Use reflective paint or finishes

Avoid Shadows Around Work Areas

  • Use multiple light sources
  • Avoid a single centre light only

Consider Daylight Sensors

  • Open garage door? Lights adjust automatically

Zone Your Lighting

This lets you turn on only what you need

Safety & Energy Efficiency

LED lighting not only improves visibility but also reduces energy costs and requires less maintenance. Longer lifespan means fewer bulb changes — important in high ceilings or hard-to-reach fixtures.

Conclusion — Best Lighting for Modern Garages

LED lighting is the best choice for today’s garages because:

  • Brighter and more energy efficient
  • Longer lifespan than fluorescent
  • Better colour rendering
  • Lower heat output
  • Customisable lighting zones
  • Works with motion sensors and smart controls

A well-lit garage is safer, more functional and more enjoyable — whether you’re parking a vehicle, working on projects or finding items in storage.

Categories
Basement Garages Garage Ideas

Basement Garages in New Homes

Features, Advantages & Challenges Explained

Basement garages have become a popular design choice in modern residential construction across Australia, particularly in urban and high-density areas. With land becoming more valuable and lot sizes shrinking, building a garage below a home offers space-saving benefits, enhanced security, and potential cost efficiencies. But they come with their own set of design considerations — from driveway steepness to ventilation and waterproofing.

In this guide, we’ll explore:

  • What basement garages are
  • Their key features
  • Advantages and disadvantages
  • Access and driveway considerations
  • How cars manage steep driveways
  • Tips for managing common challenges

basement garagesWhat Is a Basement Garage?

A basement garage is a parking area built below the main living level of a home. Unlike traditional front-facing garages, basement garages are typically accessed via a ramped driveway that leads below ground level.

Depending on the site and design, they can be:

  • Fully underground
  • Partially subterranean
  • Integrated into multilevel homes

Basement garages may be attached or detached and are often paired with clever storage solutions like overhead racks, wall-mounted systems or integrated shelving.

Key Features of Basement Garages

1. Below-Ground Design

Most basement garages are located beneath the main home structure — maximising building footprint on compact lots.

2. Ramped Driveway Access

Access is usually via a sloping driveway that descends from street level to below ground.

3. Enhanced Security

Being enclosed and less visible from the street, basement garages provide improved security for cars and stored items.

4. Integrated Storage

Basement garages often include smart storage setups such as:

  • Wall panels and hooks
  • Overhead storage racks
  • Cabinets and shelving

These help reduce clutter and make the most of vertical space.

5. Lighting & Ventilation

Because they are partially or fully below ground, good lighting and ventilation are essential for comfort and safety.

Advantages of Basement Garages

Space Optimisation

Basement garages allow living areas to sit above valuable ground-level space — ideal for smaller or narrower lots.

Security & Protection

Vehicles and belongings are shielded from weather, theft and vandalism better than street-facing garages.

Improved Street Aesthetics

Since they’re mostly hidden, basement garages preserve the visual appeal of the street frontage.

Potential for Additional Storage

Basement garages can double as storage zones for tools, equipment, bikes, gyms and outdoor gear — especially with modern wall and ceiling organisation systems.

Climate Protection

Vehicles stored underground are cooler in summer and less exposed to sun, rain and hail damage.

Disadvantages & Challenges of Basement Garages

While they offer benefits, basement garages also present challenges:

1. Cost

Building below ground can increase construction costs due to excavation, waterproofing and reinforcement.

2. Water Proofing & Drainage

Basement garages require effective water drainage solutions to prevent flooding and dampness.

3. Driveway Steepness

Access ramps may be steep, presenting challenges for some vehicles and drivers (more on this below).

4. Ventilation Requirements

Good airflow is crucial — especially if the garage is fully enclosed — to manage car emissions and moisture.

5. Lighting Needs

Basement spaces can be dim — integrated lighting and smart design are essential.

Access to a Basement Garage — What It’s Like

Access to a basement garage is generally via a sloping driveway, which may vary in steepness depending on the site and local council requirements.

Key considerations include:

  • Driveway gradient
  • Turning radius
  • Headroom clearance
  • Drainage at the base
  • Surface finish (concrete, pavers, etc.)

Most modern homes are designed to meet local council slope and safety guidelines, ensuring comfortable access for cars and pedestrians.

Driveway Steepness — How Cars Manage It

One of the most common questions about basement garages is: “Will my car handle the slope?”

Understanding Driveway Gradients

Driveway gradients are typically expressed as a ratio (e.g., 1:6) or as a percentage.

  • Gentle slope: Easier for most vehicles
  • Steeper slope: May challenge long vehicles with low clearance

Most residential vehicles can manage slopes between 10–20% gradient without issue, but several factors affect drivability:

Key Factors That Affect Car Performance on Slopes

  • Vehicle clearance: Low sports cars must proceed carefully
  • Wheelbase: Longer vehicles may scrape on steep transitions
  • Suspension: Softer suspension helps avoid bottoming out
  • Speed: Slow and controlled descent is essential
  • Surface traction: Smooth, non-slippery surfaces improve safety

Designers often include transition curves — slight vertical curves where the driveway meets the road — to reduce scraping risk.

Managing Basement Garage Challenges

Here are practical strategies for common issues:

1. Waterproofing & Drainage Solutions

  • Install drainage channels and sump pumps
  • Ensure driveway slopes direct water away from the entry
  • Use waterproof membranes and sealants

2. Lighting & Ventilation

  • Include natural light where possible
  • Use quality LED lighting systems
  • Consider mechanical vents if enclosed

3. Storage & Organisation

Basement garages tend to accumulate clutter — especially with tools, bikes, sports gear, garden equipment and seasonal storage.

Organisational upgrades include:

These maximise floor space and keep the area functional.

Design Tips for Basement Garages

  • Plan for future storage needs
  • Ensure slopes meet local building codes
  • Provide adequate lighting and ventilation
  • Select non-slip driveway finishes
  • Use durable wall systems for organisation

Well-designed basement garages can be highly functional, secure and visually clean — especially when integrated with smart storage solutions.

Conclusion: Are Basement Garages Worth It?

Basement garages are a smart solution for modern homes with limited ground-level space. They deliver:

  • Secure, weather-protected parking
  • Increased usable space above ground
  • Enhanced property aesthetics
  • High storage potential

While they come with additional design and construction considerations, careful planning — especially around access, drainage, ventilation and organisation — ensures they remain one of the most versatile features of contemporary homes.

Categories
Brick Walls Dot & Dab Wall Fixings garage design Garage Ideas garage makeover Garage Walls

How to Use Heavy Duty Dot & Dab Wall Fixings

When working with dot and dab walls — also known as drylined or plasterboard walls fixed to masonry with adhesive — finding the right method to securely mount heavy items can be tricky. Standard wall plugs or plasterboard fixings often aren’t enough to hold significant weight, which is where Heavy Duty Dot & Dab Wall Fixings come in.

These specialised fixings are designed to bridge the gap between the plasterboard and the solid wall behind it, ensuring your shelves, cabinets, slatwall panels, or other heavy items are securely anchored.

Heavy Duty Dot & Dab Wall Fixings

Understanding Dot & Dab Walls

A dot and dab wall is constructed by applying adhesive “dots” or “dabs” to a solid wall, then pressing plasterboard sheets onto it. This leaves small cavities between the plasterboard and the masonry surface.
While this method is quick and efficient for building, it presents challenges for securing heavy loads because:

  • The plasterboard alone cannot hold significant weight.
  • Standard wall plugs may spin or loosen due to the gap behind the plasterboard.

Why Use Heavy Duty Dot & Dab Wall Fixings?

Heavy Duty Dot & Dab Wall Fixings are specifically engineered to overcome these issues. They:

  • Span the gap between the plasterboard and masonry.
  • Expand or grip firmly in the solid wall behind.
  • Support much heavier loads than regular plasterboard fixings.
  • Provide a flush, neat finish once installed.

Typical uses include:

  • Kitchen wall cabinets
  • Slatwall or garage wall panels
  • Heavy shelving
  • Large mirrors or TVs
  • Tool racks and garage storage systems

Tools and Materials You’ll Need

Before you start, gather:

  • Heavy Duty Dot & Dab Wall Fixings (with the correct length to bridge your gap)
  • Masonry drill bits
  • Hammer drill
  • Screwdriver or impact driver
  • Measuring tape
  • Pencil for marking
  • Spirit level
The Strongest Dot & Dab Fixing - Corefix, Fischer DDF or Rigifix?

Step-by-Step Guide to Using Heavy Duty Dot & Dab Wall Fixings

Measure the Gap

Use a thin probe or measure the plasterboard thickness plus the adhesive gap to the solid wall. This ensures you select fixings of the right length.

Mark Your Fixing Points

Use a pencil and spirit level to mark exactly where each fixing will go. For heavy loads, use multiple fixings spaced evenly.

Drill Through the Plasterboard

Using the correct-sized drill bit (as per the fixing instructions), drill through the plasterboard until you reach the solid wall behind.

Drill Into the Masonry

Switch to a masonry drill bit and continue drilling into the solid wall to the depth recommended for your fixing type.

Insert the Fixing

Push or tap the Heavy Duty Dot & Dab Wall Fixing through the plasterboard until it reaches the solid wall. Some designs use a sleeve or spacer to bridge the gap.

Secure the Screw

Drive the screw into the fixing. The fixing will expand or grip into the solid wall behind, locking everything tightly in place.

Mount Your Item

Once all fixings are secure, you can mount your shelf, panel, or other item with confidence.

Safety and Weight Limits

  • Always check the manufacturer’s maximum load ratings for your specific fixings.
  • Distribute weight evenly across multiple fixings where possible.
  • For very heavy installations (like garage slatwall systems), ensure fixings are into masonry at multiple points.

Final Thoughts

Installing on a dot and dab wall doesn’t have to be a headache. Heavy Duty Dot & Dab Wall Fixings give you the strength and reliability needed for secure, long-lasting installations. Whether you’re hanging garage storage panels, shelving, or other heavy equipment, the right fixing will make all the difference in safety and durability.

Categories
garage design Garage Ideas garage makeover

Garage Wall Panel Layout

One of the more challenging aspects of renovating and transforming your garage using slatwall panels is deciding on the most effect garage wall panel layout.

Below we have prepared some of the more common garage wall storage layouts used by our customers. Each layout is based on 1, 2 or more cartons of wall panels. Panels are laid out in various ways, focused on height and width to demonstrate the options available to you when you are transforming your garage.

Standard Duty – 1 carton of 4 x 2438mm Panels

Each Standard Duty 2438mm Panel has the following dimensions: 2438mm width x 304.8mm height. Each carton holds 4 such panels. Below are displayed 2 options. The first has 4 panels stacked one on top of the other. Panels start approx 800mm (including the 100mm skirting) from the ground, and reach a height of approx 1900mm from the ground. Total wall panel dimensions are 1.2m x 2.4m.

Obviously, the distance from the ground and the positioning on the wall is a personal choice. However, raising the bottom panel from the ground allows you to hang most items with clearance from the ground and at around your waist height. It also means that the top panel is only slightly higher than the average person’s head.

garage wall panel layout

The second options spreads the 4 panels into 2 columns. Each column is two panels heigh (ie 610mm). Butting 2 panels together we have a width of 4876mm.

garage wall layout

Standard Duty – 2 cartons of 4 x 2438mm Panels

Each Standard Duty 2438mm Panel has the following dimensions: 2438mm width x 304.8mm height. Each carton holds 4 such panels. In this next example we have 2 cartons or 8 x 2438mm panels in our garage wall panel layout.

Continuing from our earlier example above, we now add a second column of 4 panels, laying them side by side in 2 columns. Panels start approx 800mm (including the 100mm skirting) from the ground, and reach a height of approx 1900mm from the ground. Total wall panel dimensions are 1.2m x 4.8m.

Obviously, the distance from the ground and the positioning on the wall is a personal choice.

Between the two joining columns we can either rely on a plain join or utilise a joining trim to smooth over the join. We offer two such trims, a H Trim or an L Trim. Both serve the purpose of covering both or one side of the join.

garage wall layout

Standard Duty – 2 cartons of 2438mm Panels + 1 carton of 1219mm Panels

Each Standard Duty 2438mm Panel has the following dimensions: 2438mm width x 304.8mm height. Each carton holds 4 such panels. In this next example we have 2 cartons of 2438mm panels as well as 1 carton of the smaller 1219mm panels. These panels have the exact same height but are half the width.

Continuing from our earlier example above, we now add a 3rd column of 4 panels to completely cover the 6m width of the wall. In this case, we have joining 2 x 2438mm panels with a smaller 1124mm piece cut from a 1219mm panel. Our garage wall panel layout now as the following dimensions: 1.2m x 6m.

Obviously, the distance from the ground is a personal choice.

garage wall layout

Standard Duty – 3 cartons of 2438mm Panels + 3 cartons of 1219mm Panels

Continuing from our earlier example above, we now add panels to all 3 columns in order reach the full height of our wall. Each column has 6 panels (approx 1800mm). These additional panels now provide a total covered area of 1.8m x 6m. In this example we have combined 3 cartons of 2.4m panels, 1 carton of 1.2m panels plus 2 single 1.2m panels (total of 6 x 1.2m).

garage wall layout

Standard Duty – Full Wall Coverage

Continuing from our earlier example above, we now cover the entire wall with panels. Each column has 8 stacked panels to reach approx 2.4m in height. Total required panels is:

  • 16 x 2438mm panels
  • 8 x 1219mm panels cut to 1124mm

Now the total covered area is 2.4m x 6m.

garage wall layout - full wall

If columns isn’t your desired garage wall panel design, you can try a brick wall layout. It offers a slightly different look (and a little more effort to install).

garage wall layout brick work design

Categories
Bike Storage Garage Hooks Garage Ideas Garage Walls Steadyrack

Steadyrack ProFlex on StoreWALL Wall Panels

StoreWALL has been supplying brackets to support the Steadyrack bike bracket range for many years. Recently, Steadyrack launched their latest bike bracket, the ProFlex range. We take a look at how you can now install the Steadyrack Proflex on your StoreWALL wall panels.

Lets take a look at the ProFlex and why you would choose this over the Classic bike bracket.

Steadyrack ProFlex range

The ProFlex allows for seamless bike storage without cluttering your space. Designed to integrate effortlessly with the GearMate storage system and future Steadyrack products, it’s the perfect choice for cyclists who value both efficiency and aesthetics.

The enhanced tyre rest reduces wall scuffs, protecting your walls while ensuring a firm, stable hold. Plus, with SteadySaddle technology, it supports bikes with fenders or mudguards, making it a versatile solution for various bike styles.

The newer design, the ability to add on additional hanging options plus the mudguard support make it a very attractive option for serious bike enthusiasts. The price difference is $99.99 vs $129.99

steadyrack proflex on garage wall panelsStoreWALL Compatibility

Up until recently, the StoreWALL Steadyrack bracket was specifically designed for the Classic range. It featured two plates, one for the top bracket attachment and one for the lower one. Essentially, the StoreWALL plates where first attached to the wall panels. The Steadyrack bike bracket was then attached to these upper and lower plates using two pre-installed horizontally aligned bolts.

The latest StoreWALL Steadyrack plates use vertically aligned bolts that support both the Classic and the new ProFlex range. The StoreWALL plates are the same size and are supported by two CamLoks on each plate. The key difference is that the pre-installed bolts are vertically aligned.

This means that regardless of which Steadyrack bracket you already have or are about to purchase, the latest StoreWALL brackets will be compatible.

Easy to use instructions on how to complete the installation are issued with every StoreWALL Steadyrack bike bracket order.


Categories
garage design Garage Ideas garage makeover Garage Walls PVC vs MDF Slatwall Shelving Slatwall

Understanding Slatwall Weight Capacity

When selecting a wall storage system, understanding slatwall weight capacity is crucial to ensuring your setup is both functional and safe. StoreWALL panels are designed for strength and durability, but the weight they can hold depends on several factors, including panel type, installation method, and load distribution. In this guide, we’ll break down the weight capacities of StoreWALL’s Standard Duty and Heavy Duty panels to help you make an informed choice.

Why Weight Capacity Matters

Every storage solution must be designed to handle the weight of the items it holds. Whether you’re storing tools, sports equipment, or heavy-duty garage items, knowing how much weight your wall panels can support will help you avoid overloading and potential damage.

StoreWALL panels are tested to ensure they provide reliable, long-term support, and their capacity varies based on the panel type and installation method used.

Standard Duty vs. Heavy Duty Panels

StoreWALL offers two main types of wall panels: Standard Duty and Heavy Duty. Each has different weight capacities depending on its size and installation method.

Standard Duty Wall Panel weight capacity
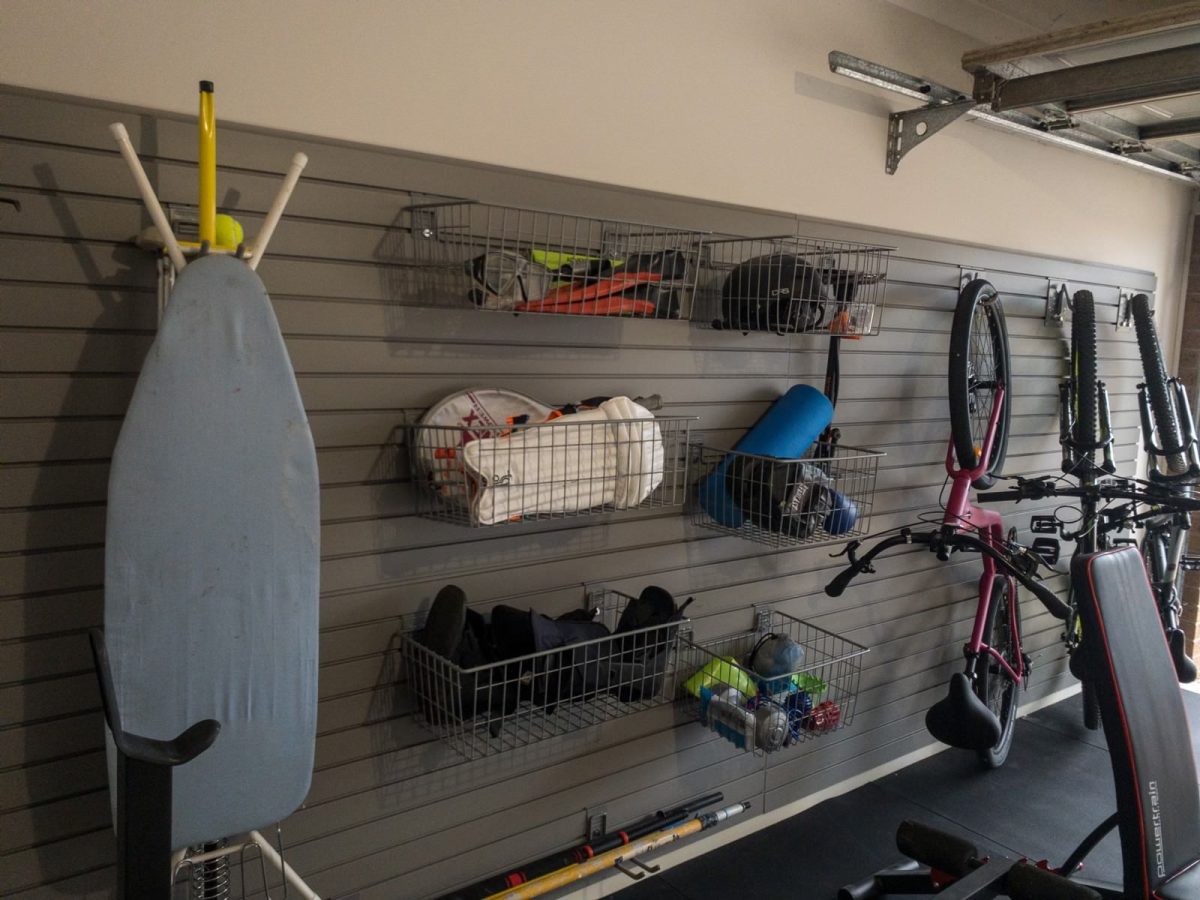
Standard Duty Wall Panels

These are the most popular choice for general storage needs, offering a balance of strength and versatility.

1219mm panel

  • 56kg at Panel Surface
  • 26kg at 10cm from Panel Surface
  • 22kg at 15cm from Panel Surface

Capacity assumes installation with InstallStrips.

2438mm panel

  • 113kg at Panel Surface
  • 52kg at 10cm from Panel Surface
  • 45kg at 15cm from Panel Surface

Capacity assumes installation with InstallStrips.

The 2438mm panel can handle double the 1219mm panel because it is twice the length. In both cases, total weight capacity assumes weight is distributed evenly across the panel. It also assumes the accessory you are using can support the weight of the item it is holding. All StoreWALL accessories are also rated for weight capacity.

Heavy Duty Wall Panels

Designed for more demanding storage applications, Heavy Duty panels provide greater weight capacity. These panels are thicker (about 1mm) and the installstrips used to install them are wider.

Heavy Duty Wall Panel Weight Capacity

1219mm panel

  • 68kg at Panel Surface
  • 37kg at 10cm from Panel Surface
  • 31kg at 15cm from Panel Surface

Capacity assumes installation with InstallStrips.

How Installation Method Affects Weight Capacity

InstallStrips vs. Screw Installation

StoreWALL panels can be installed using either InstallStrips or direct screw installation. While both methods provide a strong hold, InstallStrips significantly increase weight capacity by evenly distributing weight across the panel.

For example:

  • Screw installation at 10cm from the panel surface supports only 17kg per panel, compared to 26kg or more when using InstallStrips.
  • InstallStrips allow for higher load-bearing capacity and greater long-term durability. They are made from galvanised steel and provide greater support for the weight being stored than just a screw does. The support is spread along the length of the installstrip, rather than being concentrating directly on the screw.
garage wall panel weight capacity

Distributing Weight for Optimal Performance

Regardless of which panel type or installation method you choose, it’s essential to distribute weight evenly across the wall storage system. Concentrating too much weight on a single hook or accessory can reduce stability and affect performance.

Key Recommendations:

  • Use multiple accessories to spread the weight evenly.
  • Place heavier items closer to the panel surface for maximum support. Some (ie heavy ladders) might also be better to also be touching the ground for best support.
  • Secure installation is key – always follow the recommended installation guidelines for optimal load-bearing performance.

Making the Right Choice for Your Storage Needs

When choosing your StoreWALL panel, consider:

  • What you’re storing – Heavy tools? Sports gear? General household items?
  • Installation method – Using InstallStrips will maximize strength and durability.
  • Weight distribution – Plan your storage layout to evenly distribute loads.

By selecting the right panel and installation method, you’ll ensure a long-lasting, secure, and efficient storage system that meets your needs while maintaining safety and durability.

Final Thoughts

StoreWALL panels are engineered for strength, reliability, and versatility, making them an excellent investment for any storage space. By understanding slatwall weight capacity and proper installation techniques, you can maximize their performance and longevity.

Ready to upgrade your storage? Explore StoreWALL’s Standard Duty and Heavy Duty panels today and find the perfect solution for your space!

Categories
Garage Ideas garage makeover Shelving StoreWALL

How to Manage Weight on Your Shelves

When installing shelves, it’s essential to understand how to manage the weight they will hold to prevent damage or accidents. Here’s a guide on how to effectively manage weight on your shelves and how brackets contribute to their stability.

Understanding Shelf Load Capacity

The load capacity of a shelf refers to the maximum weight it can safely support without bowing, sagging, or breaking. This capacity depends on factors such as the material that the floating shelf is made of, its thickness, length, and the quality of the brackets used for support. Overloading a shelf can cause it to warp, detach from the wall, or collapse entirely, posing safety risks and potential damage to your belongings.

How to Manage Weight on Your Shelves

Distributing Weight Evenly

To maximize the shelf’s durability, distribute weight evenly across its surface. Place heavier items closer to the wall or directly above the brackets, where the shelf is strongest. Lighter items should be positioned toward the front or on the ends. This approach minimizes stress on the shelf and prevents it from tipping or sagging.

The Importance of Brackets in Shelf Support

Brackets play a critical role in supporting a shelf’s weight. They are the primary means of transferring the load from the shelf to the wall. The number, size, and spacing of brackets directly affect how much weight a shelf can handle:

  • Number of Brackets: The longer the shelf, the more brackets it will need. For example, a shelf up to 1.2 meters typically requires two brackets, while a 1.8-meter shelf requires three. Adding more brackets reduces the span of unsupported shelf length, thereby increasing the weight it can bear.
  • Bracket Size and Material: Larger, sturdier brackets provide better support and can hold more weight. Choose brackets that match the depth of your shelf and are made of strong materials, such as metal, to ensure durability.
  • Spacing Between Brackets: Brackets should be spaced evenly to distribute weight efficiently. For heavier loads, reduce the spacing between brackets to increase support. A good rule of thumb is to place brackets no more than 60 cm apart.
How to Manage Weight on Your Shelves

Recognizing Signs of Overloading

Signs that your shelf may be overloaded include bowing or sagging in the middle, the shelf pulling away from the wall, or cracking sounds from the brackets or shelf material. If you notice any of these signs, reduce the load immediately and consider adding more brackets for reinforcement.

How to Manage Weight on Your ShelvesExamples of incorrect spacing, 2 or 3 brackets over 2.4m

Choosing the Right Wall Anchors

The effectiveness of your brackets also depends on the wall anchors used. Anchors should be appropriate for the wall type (drywall, plaster, brick, etc.) and strong enough to handle the combined weight of the shelf and its contents. Heavy-duty anchors, such as toggle bolts or molly bolts, are recommended for heavier loads.

Regular Maintenance and Safety Checks

Periodically check your shelves and brackets for signs of wear, damage, or loosening. Tighten any loose screws, replace damaged brackets, and ensure the shelf remains level and secure. Regular maintenance helps prevent accidents and prolongs the life of your storage solution.

Proper weight management on shelves and the strategic use of brackets is crucial for creating safe and functional storage spaces. By understanding load capacity, distributing weight evenly, and choosing the right brackets and anchors, you can maximize the utility of your shelves while ensuring they remain secure and stable.