Access an Additional $20 Off All 2438mm Wall Panels!
CALL US

0411 280 646

Categories
Bike Storage

How to Store Multiple Bikes in a Garage

How to Store Multiple Bikes in a Garage (Without Losing Your Floor Space)

One bike in a garage is manageable. Two is where it starts to get complicated. Three or more, and suddenly the bikes are stacked against the wall, leaning on each other, getting scratched, blocking the car, and falling over at inopportune moments.

The good news is that a well-planned wall storage system can comfortably hold four or more bikes in the same footprint that two bikes take up on the floor — and make every single one easier to get in and out. Here’s how to plan it.

Looking for our full bike storage range? See our Garage Bike Storage page

Step 1 — Know Your Bikes

Before you think about hooks or panels, take stock of what you’re actually storing. The answers shape every decision that follows.

  • How many bikes? Count them all — include the ones currently in the backyard or laneway.
  • What type? Road bikes, mountain bikes, kids bikes, and e-bikes all have different weights, tyre widths, and handling requirements.
  • Who’s accessing them? Adults can manage a lift to shoulder height. Kids generally can’t — which affects hook height and the type of hook you choose.
  • Are they ridden regularly? Daily-use bikes need quick on-and-off access. Weekend bikes can be stored with slightly more effort involved.
  • Do you have accessories to store too? Helmets, pumps, shoes, lights, and bags all need homes on the wall alongside the bikes.

Step 2 — Understand the Space Each Method Takes

This is where most people get stuck — they don’t realise that different storage methods use wall space and floor depth very differently. Here are the four main options and their real-world space requirements:

Perpendicular (J Hook) — most popular for 1–2 bikes
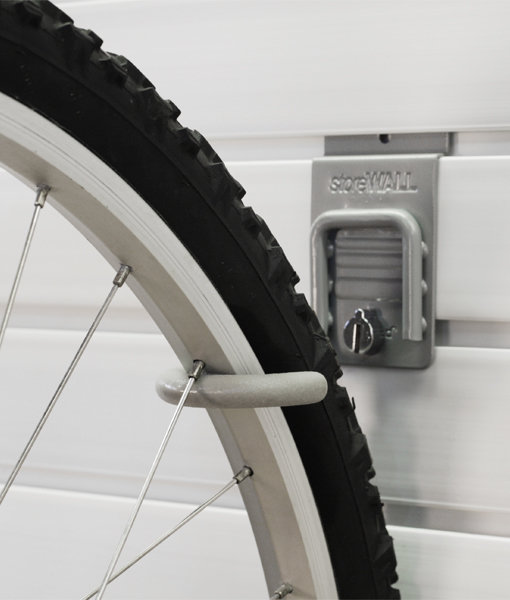
bike hookThe bike hangs front wheel on the hook, rear wheel on or near the floor, bike pointing out from the wall. Requires approximately 1m of floor depth in front of the wall and about up to 2m of wall height per bike (accounting for the length of the bike when standing upright). Easy on-and-off for adults.

Rotating Hook — best for 3+ bikes
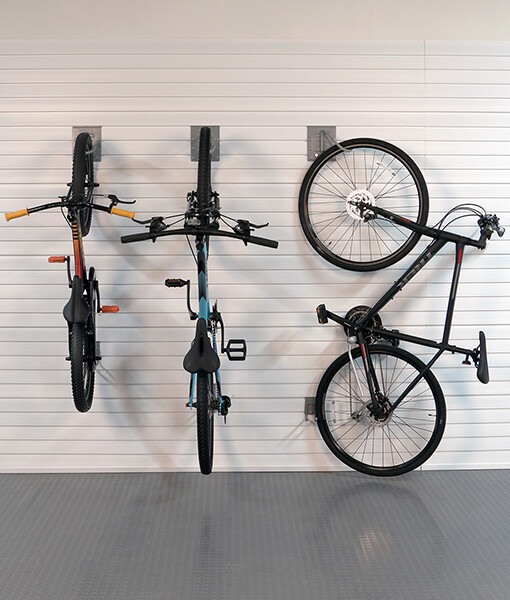
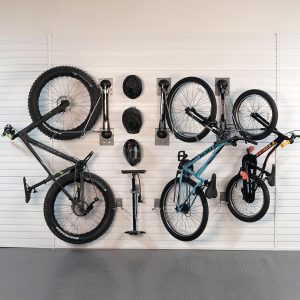
rotating bike hookWorks like the J Hook (bikes standing upright) but the bike can swing flat against the wall once hung, so it runs parallel to the panel rather than pointing out. In the flat position the floor space is minimal and usuallly determined by the outer width of your bike (ie pedal to pedal which is about 60-80cm max). This is the single most space-efficient method for multiple bikes and why it’s our best-selling bike hook. The trade-off is that you need to swing each bike out before you can easily access the ones behind it. Bikes can be staggered at different heights to pack them tighter together.

SteadyRack Brackets — best for kids or no-lift households
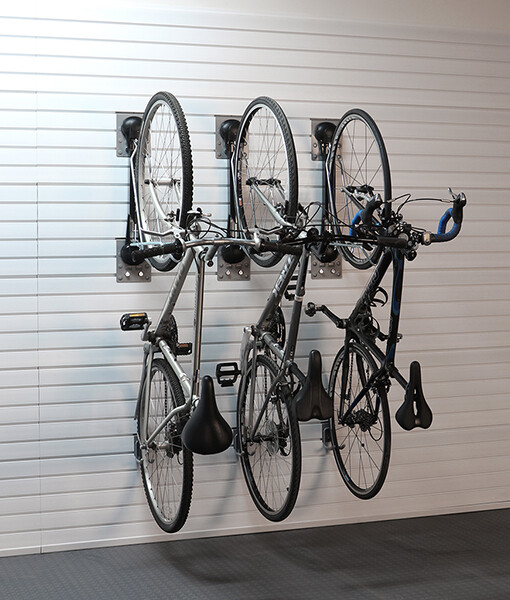
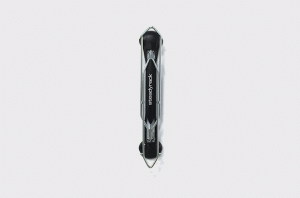
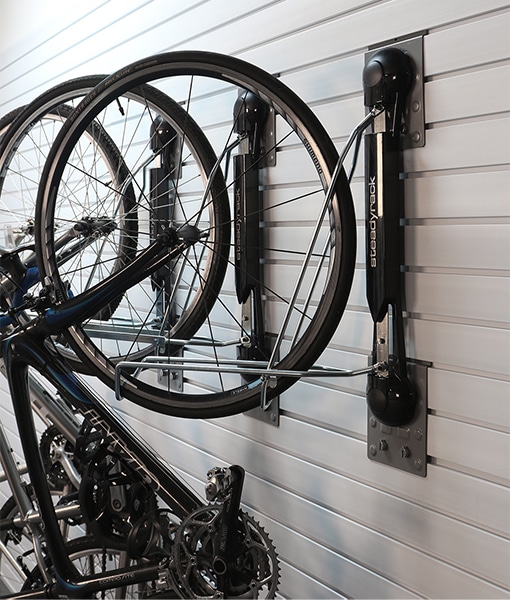
steadyrack bike bracketsThe SteadyRack rolls in rather than lifts — you roll the front wheel onto the bracket and it pivots up at an angle. SteadyRack brackets will also rotate left of right and allow you to have the upright bike stand flat against the wall. The amount of floor space used is the same at above (Rotating Bike Hook), ie about 60-80cm. No lifting required, which makes it the most accessible option for children and older riders. Can be staggered at different heights to pack bikes tighter together.

Horizontal brackets — best for aesthetics or tight depth
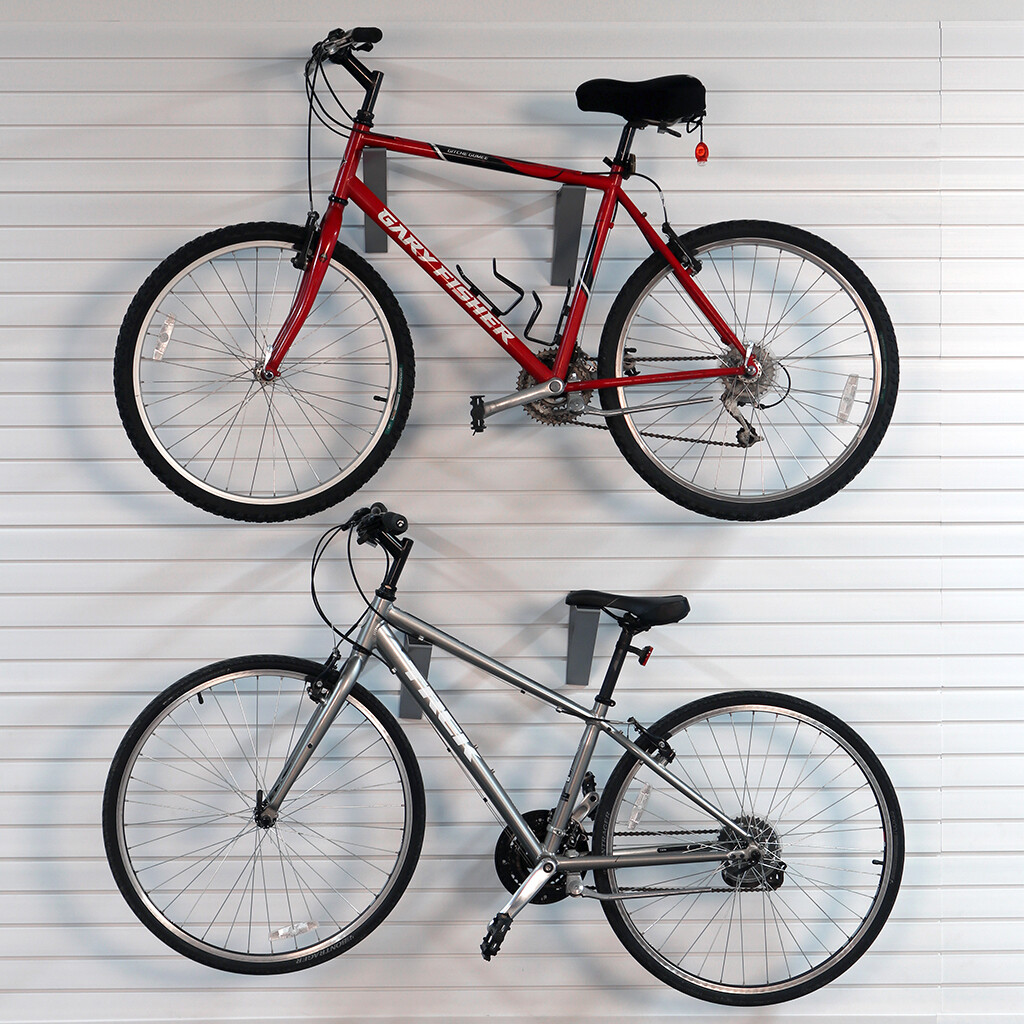
Horizontal bike bracketsThe bike lies flat on the wall, hung by both wheels on 381mm brackets. Uses about 170cm of wall width per bike but only about 40cm of depth (pedal to pedal). The cleanest-looking option, it however takes up the most about of space. Works well where the garage depth is limited but the wall is wide.

A similar solution but with the bike being hung from the front tyre flat on the wall uses our Heavy Duty Universal Hook. Ideal if you only have 1 or 2 bikes and plenty of wall space to use.

Step 3 — Plan the Wall Layout

Now that you know your bikes and your preferred method, it’s time to map out the actual wall. Here’s a practical process:

  • Measure the usable wall width — subtract any door frames, windows, shelving units, or electrical panels from the total width.
  • Decide on hook type — for most families with 3+ bikes, the Rotating Hook will give you the most bikes in the least space. It is also the most cost effective solution we offer.
  • Sketch the bike positions — mark each bike’s width on the wall with tape. Stand back and check the spacing feels workable.
  • Add the accessories — allow space for a few baskets to hold your helmets and bike pumps. These are small but they matter for day-to-day usability.
  • Work out panel coverage — your bikes and accessories determine how many panels you need. A rough guide: one 2.4m Standard Duty panel can support three hanging bikes using the Rotating Bike Hook. However if you want to also include baskets for accessories, more of the wall will need to be covered.

Step 4 — Real Example: A Family of Four with 5 Bikes

Here’s a real-world example based on a customer in Melbourne — a family of four with two adult road bikes, two kids mountain bikes, and an e-bike that didn’t have a permanent home.

Their garage wall measured 6m wide with a height of 2.4m. They chose Rotating Bike Hooks for the adult bikes and the e-bike (so they could swing flat and keep access clear) and two SteadyRack Classic brackets for the kids bikes (easier for the kids to use independently).

This client chose to panel 6m x 2.1m of the wall surface area. They could however have limited the wall paneling to only the top half of the wall, say 1.2m of height.

In addition to the bike hooks, they also inlcuded 2 Heavy Duty Deep Baskets for the helmets and bike pumps, and some smaller bins for the gloves and lights. All five bikes off the floor, all accessories in one place.

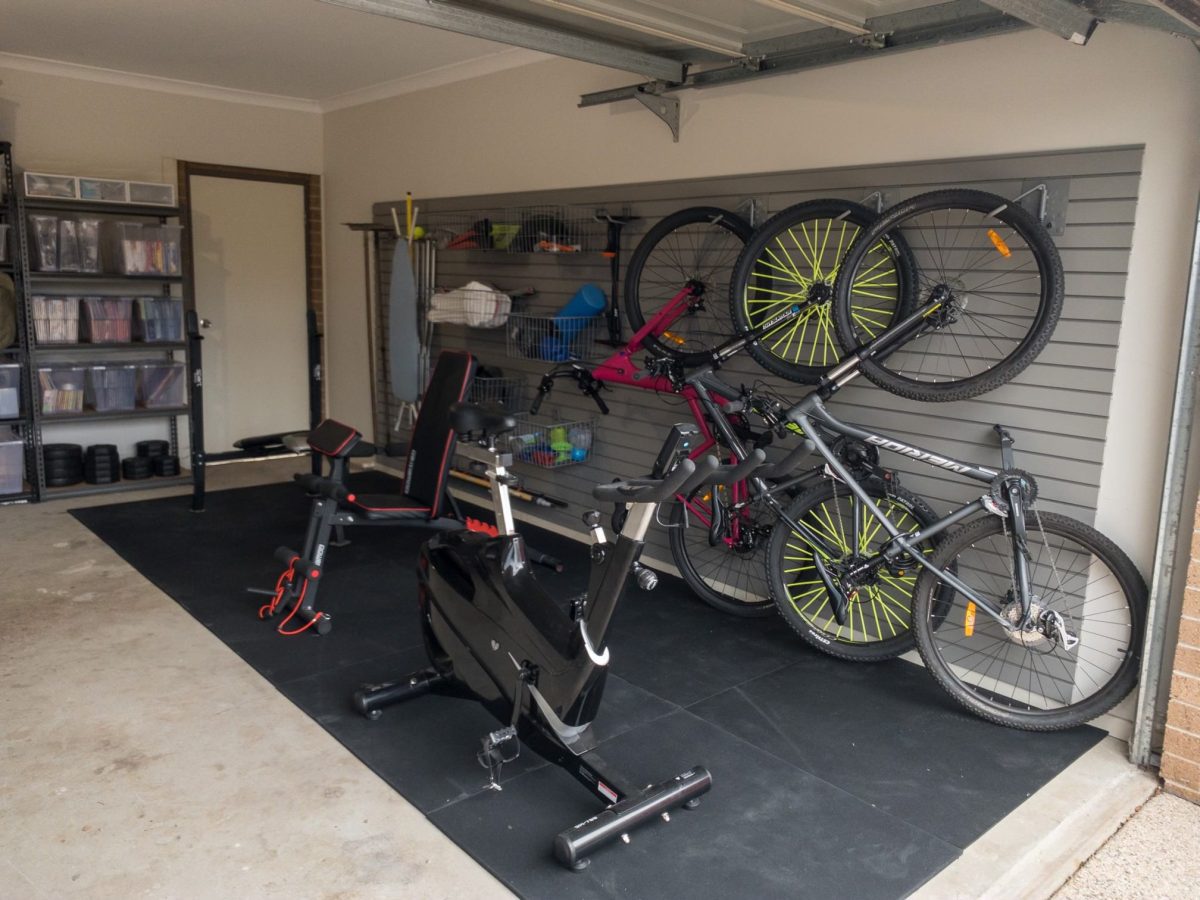
Before the install, the bikes took up the equivalent of about 6 square metres of floor space. After, they used very limited floor space and the family could fit both cars in the garage again.

Step 5 — Heights and Clearances

A few practical numbers that save a lot of frustration:

  • Adult bike hook height: the hook centre should be at approximately shoulder height (140–160cm from the floor) for easiest on-and-off access
  • Kids bike hook height: 80–100cm from the floor — kids can manage a small lift but shouldn’t have to reach above their head
  • SteadyRack height: follow the manufacturer’s guide which is based on your specific bike’s wheel size
  • Rotating Bike Hook: because the bike swings flat, adjacent hooks need at least 10cm clearance between bikes in the flat position. You can also stagger the heights slightly allowing you to squeeze them in.
  • Helmet hook: 10–20cm above the bike hook so helmet is easy to grab as you take the bike off the wall

Panel Quantity Guide

Use our Panel Calculator on the website to enter your exact wall dimensions and get a precise recommendation.

Frequently Asked Questions

Can I mix different bike hook types on the same wall?

Absolutely. It’s actually common to mix Rotating Hooks for adult bikes and SteadyRack brackets for kids bikes on the same panel — the panel accepts any accessory regardless of what else is on it. The most important thing is leaving enough space between each bike so they don’t clash when being loaded or removed.

What if my garage wall isn’t wide enough?

If wall width is the limiting factor, the Rotating Bike Hook will be your best option with bikes rotating left or right and possibly staggered in height to fit them into the wall space you have.

Can I store an e-bike on a standard bike hook?

Yes, but e-bikes are heavier — typically 20–30kg — so the hook and panel setup needs to match the weight. The Rotating Bike Hook and the SteadyRack Brackets are supported by 2 x CamLoks giving your bike more support. I would also recommend have the lower tyre rest on the ground rather than floating. Contact us if you’re unsure — we’re happy to recommend the right setup for your specific bike.

My garage wall is brick. Does that affect installation?

Not significantly. StoreWALL panels can be installed on brick walls using InstallStrips with masonry anchors. The InstallStrips distribute the load across multiple anchor points, which is actually more secure on brick than a single screwed-through approach. We have an installation guide specifically for brick walls on the website.

Need more information? Read our latest post comparing rotating vs vertical options.
Categories
Bike Storage

Steadyrack Bike Bracket: A Space-Saving Solution for Your Home or Garage

If you’re an avid cyclist or even a casual rider, you’re likely familiar with the ongoing challenge of storing your bike. It’s often difficult to find a storage solution that’s not only secure but also space-efficient. That’s where the Steadyrack Bike Bracket comes in, offering an innovative way to store your bikes without sacrificing valuable floor space. In this blog post, we’ll explore what makes the Steadyrack Bike Bracket a standout choice for bike storage, and how it can simplify your life.

What is the Steadyrack Bike Bracket?

The Steadyrack Bike Bracket is a wall-mounted bike rack that allows you to store your bike vertically. It’s unique because it pivots from side to side, letting you swing the bike to the left or right to save even more space. The design of the Steadyrack ensures that your bike is securely stored without the need to lift it—a significant advantage for those who struggle with heavy lifting or lack the physical space for traditional bike stands.

Key Features of the Steadyrack Bike Bracket

Swivelling Design

  • One of the standout features of the Steadyrack is its 180-degree pivoting mechanism. Once the bike is mounted, you can swivel it to either side, keeping it flat against the wall. This is especially useful in tight spaces like small garages or apartments where every inch counts.

Easy Loading and Unloading

  • Unlike traditional vertical bike racks that require you to lift the entire bike, the Steadyrack allows you to simply roll your bike in and out of the rack. This makes it ideal for heavier bikes, such as e-bikes, mountain bikes, or anyone who prefers not to lift their bike.

Universal Fit for Most Bike Types

  • The Steadyrack is designed to accommodate a wide variety of bikes. Whether you ride a road bike, mountain bike, or commuter bike, there’s likely a Steadyrack model that fits your needs. The standard model fits bikes with tires between 20″ and 29″ and widths up to 2.4″.

Space-Saving Efficiency

  • Because the Steadyrack allows you to store your bike flat against the wall and pivot it to the side, it dramatically reduces the amount of floor space required. This makes it a top choice for people looking to maximize their garage, shed, or apartment storage.

Durability and Quality

  • Made from high-quality steel and UV-treated plastic, the Steadyrack is built to last. It can handle up to 35kg (77 lbs), making it strong enough to hold most bikes on the market. The materials are designed to withstand everyday wear and tear, whether you’re storing your bike indoors or outdoors.

Protects Your Bike

  • The rack is designed to minimize contact with the bike’s frame, which reduces the risk of damage. It cradles the wheels of your bike, ensuring that the frame, pedals, and handlebars don’t come into contact with the wall or the rack itself.

Minimal Wall Damage

  • Installed over the StoreWALL Wall Panels, the Steady Rack Bike Bracket can be moved around on your wall really easily. There is no additional drilling as StoreWALL’s SteadyRack brackets are used to mount onto the StoreWALL panels. The SteadyRack Bike Bracket is then mounted onto these brackets.

steadyrack bike bracket

Step-by-Step Installation Guide for the Steadyrack Bike Bracket

One of the reasons the Steadyrack is so popular is because of its simple installation process. Here’s a detailed step-by-step guide to help you set it up correctly:

Tools You’ll Need:

  • None, you just need one pair of the StoreWALL SteadyRack Bike Brackets.

Installation Steps:

  1. Choose the Mounting Location
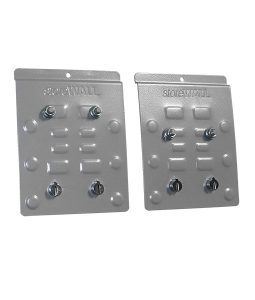
    StoreWALL’s SteadyRack Brackets come in two pieces. One bracket fits the top mount, the second the lower mount. These brackets are fitted to your StoreWALL panels and are locked in using CamLok. Once in place, you can then screw the actual SteadyRack Bike Bracket onto these.
  2. Install the Bracket
    By using the StoreWALL brackets first, there is no messy drilling. Not holes in your wall. Everything simply fits onto your StoreWALL wall panels.
  3. Test the Rack with Your Bike
    Once the rack is mounted, gently roll your bike into the rack to ensure it fits correctly. Try pivoting the bike to either side to see how much space you save. Make any adjustments to the angle of the pivot if necessary.

steadyrack bike bracket

Installation Tips:

  • Mounting Height: If you plan to install multiple racks for different bikes, make sure to stagger the heights to avoid overlapping handlebars or pedals.
  • Spacing Between Racks: For garages or spaces where multiple bikes will be stored, allow at least 60–70 cm (24–28 inches) between racks to accommodate the pivoting movement.

Why Choose Steadyrack Over Other Bike Storage Solutions?

There are many bike storage options on the market, but the Steadyrack stands out for several key reasons:

  1. No Lifting Required: This feature alone makes Steadyrack a go-to choice for cyclists who have heavy bikes or those who simply want a more convenient storage solution.
  2. More Space-Efficient Than Floor Stands: Traditional floor stands take up valuable space, but the Steadyrack mounts on the wall, freeing up the floor for other uses.
  3. High-Quality Build: With a robust design made from steel and durable plastic, Steadyrack is built to last. Unlike cheaper bike racks, it won’t rust, bend, or lose its ability to hold your bike securely over time.
  4. Perfect for Multiple Bikes: If you have more than one bike, the pivoting feature becomes even more beneficial. You can easily store multiple bikes side-by-side without them taking up a lot of horizontal space.
  5. Low Profile Design: When not in use, the Steadyrack folds flat against the wall, making it an unobtrusive solution for bike storage.

steady rack bike bracket

Steadyrack Models Available

Steadyrack offers several models to accommodate different types of bikes:

  • Classic Steadyrack: Ideal for road bikes and hybrid bikes with narrower tires.
  • Mountain Bike Rack: Designed to accommodate wider tires typically found on mountain bikes.
  • Fat Rack: A version built for bikes with extra-wide tires, such as fat bikes.
  • Fender Rack: Perfect for bikes with fenders or mudguards.

Each model is designed with the same space-saving and durability features, ensuring that no matter what type of bike you ride, there’s a Steadyrack for you.

Make the Most of Your Space with Steadyrack

Whether you’re looking to organize a cluttered garage, free up space in your apartment, or simply find a better way to store your bike, the Steadyrack Bike Bracket is an excellent solution. With its easy installation, space-saving pivot feature, and heavy-duty construction, Steadyrack is the ideal choice for cyclists who want both convenience and security.

Categories
Bike Storage Steadyrack

Steadyrack Bike Bracket

A Space-Saving Solution for Your Home or Garage

If you’re an avid cyclist or even a casual rider, you’re likely familiar with the ongoing challenge of storing your bike. It’s often difficult to find a storage solution that’s not only secure but also space-efficient. That’s where the Steadyrack Bike Bracket comes in, offering an innovative way to store your bikes without sacrificing valuable floor space. In this blog post, we’ll explore what makes the Steadyrack Bike Bracket a standout choice for bike storage, and how it can simplify your life.

What is the Steadyrack Bike Bracket?

The Steadyrack Bike Bracket is a wall-mounted bike rack that allows you to store your bike vertically. It’s unique because it pivots from side to side, letting you swing the bike to the left or right to save even more space. The design of the Steadyrack ensures that your bike is securely stored without the need to lift it—a significant advantage for those who struggle with heavy lifting or lack the physical space for traditional bike stands.

Key Features of the Steadyrack Bike Bracket

Swiveling Design

  • One of the standout features of the Steadyrack is its 180-degree pivoting mechanism. Once the bike is mounted, you can swivel it to either side, keeping it flat against the wall. This is especially useful in tight spaces like small garages or apartments where every inch counts.

Easy Loading and Unloading

  • Unlike traditional vertical bike racks that require you to lift the entire bike, the Steadyrack allows you to simply roll your bike in and out of the rack. This makes it ideal for heavier bikes, such as e-bikes, mountain bikes, or anyone who prefers not to lift their bike.

Universal Fit for Most Bike Types

  • The Steadyrack is designed to accommodate a wide variety of bikes. Whether you ride a road bike, mountain bike, or commuter bike, there’s likely a Steadyrack model that fits your needs. The standard model fits bikes with tires between 20″ and 29″ and widths up to 2.4″.

Space-Saving Efficiency

  • Because the Steadyrack allows you to store your bike flat against the wall and pivot it to the side, it dramatically reduces the amount of floor space required. This makes it a top choice for people looking to maximize their garage, shed, or apartment storage.

Durability and Quality

  • Made from high-quality steel and UV-treated plastic, the Steadyrack is built to last. It can handle up to 35kg (77 lbs), making it strong enough to hold most bikes on the market. The materials are designed to withstand everyday wear and tear, whether you’re storing your bike indoors or outdoors.

Protects Your Bike

  • The rack is designed to minimize contact with the bike’s frame, which reduces the risk of damage. It cradles the wheels of your bike, ensuring that the frame, pedals, and handlebars don’t come into contact with the wall or the rack itself.

Minimal Wall Damage

  • Installed over the StoreWALL Wall Panels, the Steady Rack Bike Bracket can be moved around on your wall really easily. There is no additional drilling as StoreWALL’s SteadyRack brackets are used to mount onto the StoreWALL panels. The SteadyRack Bike Bracket is then mounted onto these brackets.

Step-by-Step Installation Guide for the Steadyrack Bike Bracket

One of the reasons the Steadyrack is so popular is because of its simple installation process. Here’s a detailed step-by-step guide to help you set it up correctly:

Tools You’ll Need:

  • None, you just need one pair of the StoreWALL SteadyRack Bike Brackets.

Installation Steps:

  1. Choose the Mounting Location
    StoreWALL’s SteadyRack Brackets come in two pieces. One bracket fits the top mount, the second the lower mount. These brackets are fitted to your StoreWALL panels and are locked in using CamLok. Once in place, you can then screw the actual SteadyRack Bike Bracket onto these.
  2. Install the Bracket
    By using the StoreWALL brackets first, there is no messy drilling. Not holes in your wall. Everything simply fits onto your StoreWALL wall panels.
  3. Test the Rack with Your Bike
    Once the rack is mounted, gently roll your bike into the rack to ensure it fits correctly. Try pivoting the bike to either side to see how much space you save. Make any adjustments to the angle of the pivot if necessary.
steadyrack bike bracket

Installation Tips:

  • Mounting Height: If you plan to install multiple racks for different bikes, make sure to stagger the heights to avoid overlapping handlebars or pedals.
  • Spacing Between Racks: For garages or spaces where multiple bikes will be stored, allow at least 60–70 cm (24–28 inches) between racks to accommodate the pivoting movement.

Why Choose Steadyrack Over Other Bike Storage Solutions?

There are many bike storage options on the market, but the Steadyrack stands out for several key reasons:

  1. No Lifting Required: This feature alone makes Steadyrack a go-to choice for cyclists who have heavy bikes or those who simply want a more convenient storage solution.
  2. More Space-Efficient Than Floor Stands: Traditional floor stands take up valuable space, but the Steadyrack mounts on the wall, freeing up the floor for other uses.
  3. High-Quality Build: With a robust design made from steel and durable plastic, Steadyrack is built to last. Unlike cheaper bike racks, it won’t rust, bend, or lose its ability to hold your bike securely over time.
  4. Perfect for Multiple Bikes: If you have more than one bike, the pivoting feature becomes even more beneficial. You can easily store multiple bikes side-by-side without them taking up a lot of horizontal space.
  5. Low Profile Design: When not in use, the Steadyrack folds flat against the wall, making it an unobtrusive solution for bike storage.

Steadyrack Models Available

Steadyrack offers several models to accommodate different types of bikes:

  • Classic Steadyrack: Ideal for road bikes and hybrid bikes with narrower tires.
  • Mountain Bike Rack: Designed to accommodate wider tires typically found on mountain bikes.
  • Fat Rack: A version built for bikes with extra-wide tires, such as fat bikes.
  • Fender Rack: Perfect for bikes with fenders or mudguards.

Each model is designed with the same space-saving and durability features, ensuring that no matter what type of bike you ride, there’s a Steadyrack for you.

Make the Most of Your Space with Steadyrack

Whether you’re looking to organize a cluttered garage, free up space in your apartment, or simply find a better way to store your bike, the Steadyrack Bike Bracket is an excellent solution. With its easy installation, space-saving pivot feature, and heavy-duty construction, Steadyrack is the ideal choice for cyclists who want both convenience and security.