
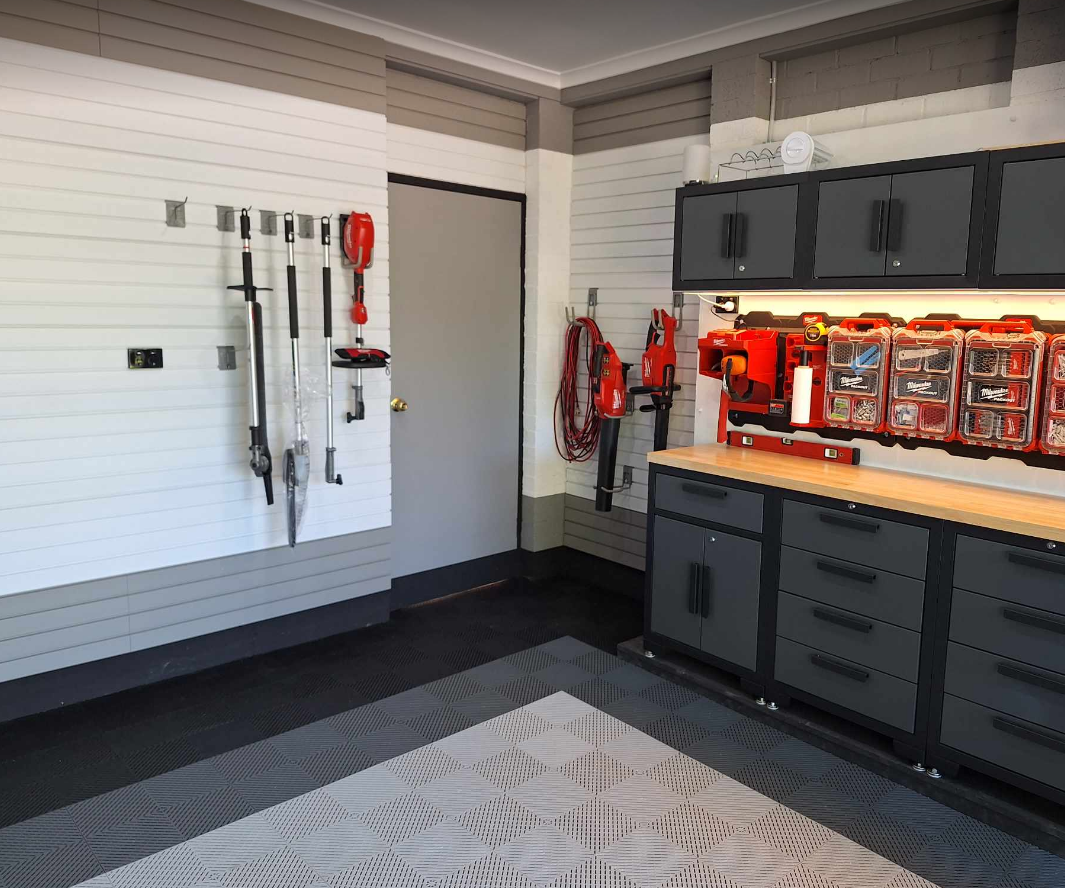
How to Set Up a Workshop Wall Storage System — From Blank Wall to Finished
A tool wall changes how you work. Not just how the garage looks — how you actually work. When every tool is visible and accessible in one move, you stop wasting time searching. You stop using the wrong tool because you can’t find the right one. You get more done.
This guide walks through the full process — from choosing panels to loading the last hook — for anyone planning a garage or workshop storage wall for the first time.
Step 1 — Decide What You’re Storing Before You Buy Anything
The biggest mistake people make is buying panels first and figuring out accessories later. Do it the other way around. Start with a list of everything you want off the floor:
- Power tools: drills, impact drivers, circular saw, jigsaw, angle grinder
- Garden tools: leaf blower, hedge trimmer, string trimmer, shovel, rake, broom
- Hand tools: screwdrivers, spanners, pliers, hex keys, files
- Extension leads, hoses, cords
- Ladders
- Anything else that currently lives on the floor or a shelf
This list tells you how much wall you need and which accessories to include. A wall loaded with garden tools and ladders needs heavy-duty hooks and deep panels. A workbench-height hand tool zone needs a magnetic bar and small hooks. Knowing this upfront means you order everything once.
Step 2 — Choose Your Panel Type
StoreWALL offers two panel grades for residential garages:
- Standard Duty (304.8mm H, 1.2m or 2.4m length): the right choice for the vast majority of home garages and workshops. Handles hooks rated to 56–100kg with InstallStrips. Seven colours. Available in both 1.2m and 2.4m lengths to minimise joins.
- Heavy Duty (381mm H, 1.2m only): for setups storing very heavy equipment — kayaks, surfboards, ladders with serious loads, or commercial-grade tools. Fewer colour options, larger panel height means fewer rows needed to cover a full wall.
For most Australians setting up a home workshop: Standard Duty in Weathered Grey or Brite White, in a mix of 1.2m and 2.4m lengths to fit the wall cleanly.
Step 3 — Calculate How Many Panels and InstallStrips You Need
Panels are sold in cartons. Each 1.2m carton covers 1.48sqm (0.37sqm per panel, 4 panels per carton). Each 2.4m carton covers 2.96sqm.
Formula: wall width × desired panel height in metres = total sqm. Divide by carton coverage and round up.
Example: a 5.4m wide wall to a height of 2.1m = 11.34sqm. Divide by 1.48sqm (1.2m carton) = 7.7 cartons — order 8 cartons. Or mix with 2.4m cartons to reduce the number of joins.
InstallStrips: order 1 per 1.2m panel (i.e. 1 per panel in a 1.2m carton = 4 per carton), or 2 per 2.4m panel. Standard Duty InstallStrips for SD panels, Heavy Duty InstallStrips for HD panels — they are not interchangeable.
Step 4 — Installation: InstallStrips First, Panels Second
The installation sequence is: mark studs → fix InstallStrips to studs → click panels onto InstallStrips. This is what gives StoreWALL panels their rated load capacity and their clean, screw-free appearance.
| Step | What to do | Products involved |
| 1 | Choose your panel type | Standard Duty for most garages. Heavy Duty for more weight capacity. |
| 2 | Measure and order panels | Width × height in metres ÷ 1.48 (per 1.2m carton) = cartons needed. Order 1 InstallStrip per 1.2m panel. |
| 3 | Install InstallStrips | Mark studs. Fix InstallStrips to every stud using 7g × 40mm screws. Brick/concrete: use mushroom nail anchors. |
| 4 | Click panels onto strips | Panels hook onto InstallStrip claws from the top. No visible screws. Start from the bottom row and work up. |
| 5 | Plan your accessory layout before mounting anything | Group by tool type: power tools at eye level, garden tools beside the door, hand tools near the workbench. Lay accessories on the floor first to test spacing. |
| 6 | Mount accessories — start with the heaviest | HD Tool Hook, HD Universal Hook, Vertical Tool Hook. Mount at comfortable reach height. CamLok: slot in, quarter-turn to lock. |
| 7 | Mount shelves and racks | Power Tool Storage Rack — lip installation (no CamLok). Wire Shelves with cord holders — CamLok. Position below eye level so tools are easy to see and reach. |
| 8 | Add the Magnetic Bar and Slot Bins | Magnetic Bar at workbench height for spanners, drill bits, hex keys. Slot Bins below for batteries and chargers. |
| 9 | Add trims to finish | Wide Corner Trim on exposed ends — Velcro-fixed, no adhesive. Division Trim between panel joins. |
| 10 | Load your tools and adjust | CamLok allows any hook or shelf to be moved at any time — no tools needed. Adjust layout after a week of use. The wall changes as your toolkit does. |
InstallStrips fix to timber studs using 7g × 40mm screws. For brick or concrete walls, use mushroom nail anchors of the appropriate size. The panel hangs on the InstallStrip’s claws — no screws through the panel face, no visible fixings.
The full installation guide with video is at storewall.com.au/installing-storewall — refer to it for wall-specific guidance (brick, concrete, metal stud, bare stud).
Step 5 — Layout Planning: Group by Tool Type
Before mounting a single hook, plan the layout on the floor. The most common mistake is placing hooks wherever they fit rather than where the tools will be used.
A functional layout groups tools by how they’re used and how often:
- Power tools at eye level, near the workbench — you reach for these most often
- Garden tools on the wall closest to the garage door — you grab them on the way out, return them coming in
- Ladders on a side wall or end wall — they’re used infrequently, so they don’t need prime position
- Hand tools and magnetic bar at workbench height — within easy reach while working
- Slot bins and small shelves below the main hook zone — batteries, chargers, and small accessories at waist level
Leave gaps between tool groups — they get used together, not as a single mass of accessories on a wall. The magnetic bar typically works best at 1.2–1.5m from the floor. The Power Tool Rack works best at eye level where you can see which tool is which without crouching.
Step 6 — Install Accessories and Load Your Tools
CamLok installation: slot the hook’s L-shaped backplate into the panel groove, then rotate the CamLok dial a quarter-turn. That’s it — locked. To reposition, reverse. No tools, no screws, no holes left in the panel.
The Power Tool Storage Rack and the 812mm Metal Ledge Shelf use a lip rather than CamLok — they slide into the groove and rest there under the weight of the tool. Stable for moderate loads, but don’t load them beyond their rated capacity.
Start with the heavy items — ladders, garden tools, heavy hooks. Confirm positions and lock them with CamLok. Then add power tools, then hand tools, then the magnetic bar and small accessories. It’s easier to adjust once the heavy things are fixed.
What the Finished Wall Looks Like
A complete tool wall for a standard double garage might look like this, working left to right:
- Left zone: garden tools — HD Tool Hook × 2, Vertical Tool Hook × 1, HD Universal Hook for hose and extension lead
- Centre zone: power tools — Power Tool Storage Rack at eye level, Wire Shelves with Cord Holders below for circular saw and jigsaw, Power Tool Hook × 2 for spare drills
- Right zone: hand tools — 609mm Magnetic Bar at workbench height, Tool Organiser × 1 for screwdrivers, Slot Bins × 2 for batteries and chargers
- Side wall: ladder on 2 × HD Utility Hooks
The whole setup takes a weekend to install and typically costs less than a comparable set of tool cabinets — with the added benefit that every tool is visible and the layout changes whenever your toolkit does.
Ready to Plan Your Tool Wall?
Start with the Garage Tool Storage hub page — it has a quick-find table matching every tool type to the right accessory, with links to each product. For questions, call Arthur on 0411 280 646 or email [email protected].