Access an Additional $20 Off All 2438mm Wall Panels!
CALL US

0411 280 646

Categories
Bike Storage

Rotating Bike Hook vs Vertical Storage

Rotating Bike Hook vs Vertical Storage — Which Is Right for Your Garage?

If you’ve been looking at garage bike storage options, you’ve probably come across a few different hook styles and wondered which one actually makes sense for your space. The short answer is that it depends on your garage dimensions, how many bikes you’re storing, and who needs to access them. This post walks through the main options clearly so you can make a decision without second-guessing.

See our full Garage Bike Storage range.

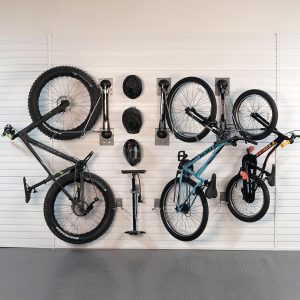
We’ll focus on the three most popular wall-mounted options: the J Hook (perpendicular storage), the Rotating Bike Hook (perpendicular + swivel to wall), and vertical hanging (front wheel up, bike hanging straight down).

The J Hook — Classic Perpendicular Storage

How it works

vertical bike hookThe J Hook — StoreWALL’s Bike Hook — holds the front wheel of the bike in the hook, with the bike hanging perpendicular to the wall. One wheel is typically on or near the floor. The bike points out into the garage at roughly 90 degrees to the wall.

Space it uses

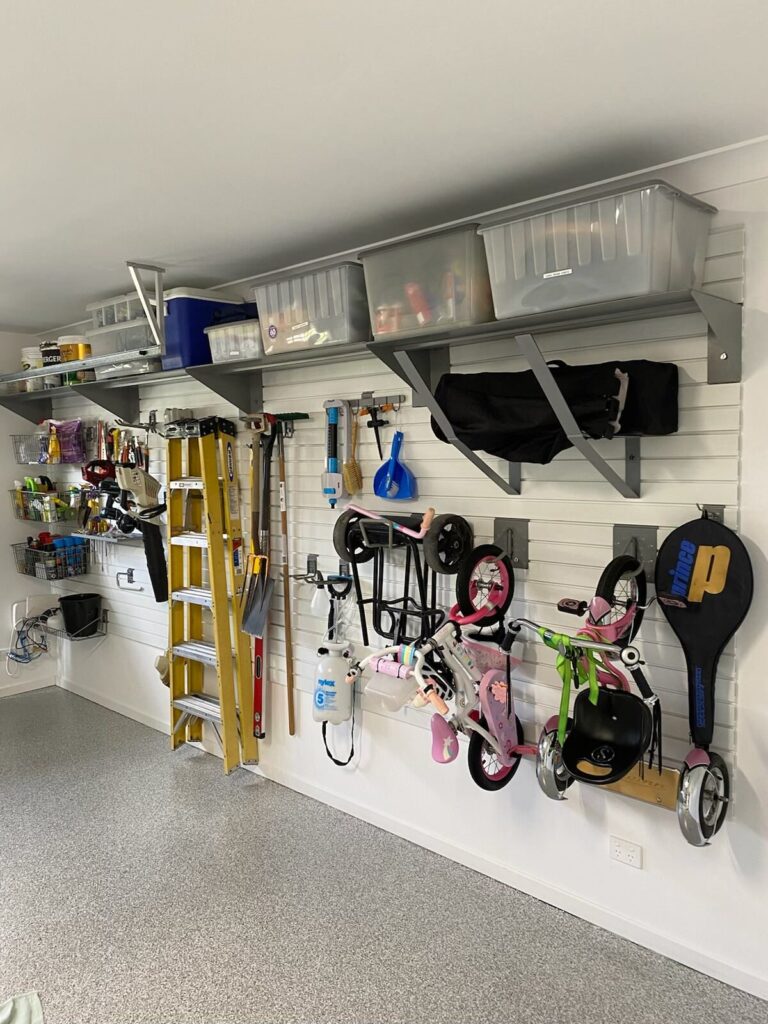
The bike projects about 1m out from the wall (the full height of the bike). Handlebar width is typically 60–70cm, so each bike needs roughly that much wall width as a minimum. If you have two bikes next to each other, plan for a little extra clearance between handlebars. This can be done by slightly adjusting the positioning of the hook on the wall. 1 bike will consume roughly .7sqm (1m x .7m) of floor space.

Who it suits

The J Hook is the simplest, most affordable single-bike hook in the range. It’s a good choice for one or two bikes where floor depth isn’t a concern, and where you’re not constantly shuffling bikes in and out. Taking the bike on and off requires lifting the front wheel to hook height — straightforward for an adult, less ideal for younger kids.

The CamLok advantage

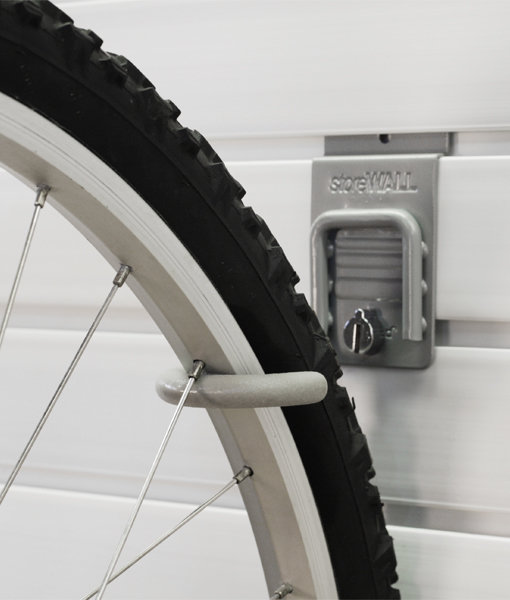
What separates the StoreWALL J Hook from generic bike hooks is CamLok. The hook stays locked to the panel while you put the bike on and take it off — so you’re not fighting the hook while also managing the bike. It also means you can reposition the hook anywhere on the panel without tools.

The Rotating Bike Hook — The Upgrade

rotating bike hookHow it works

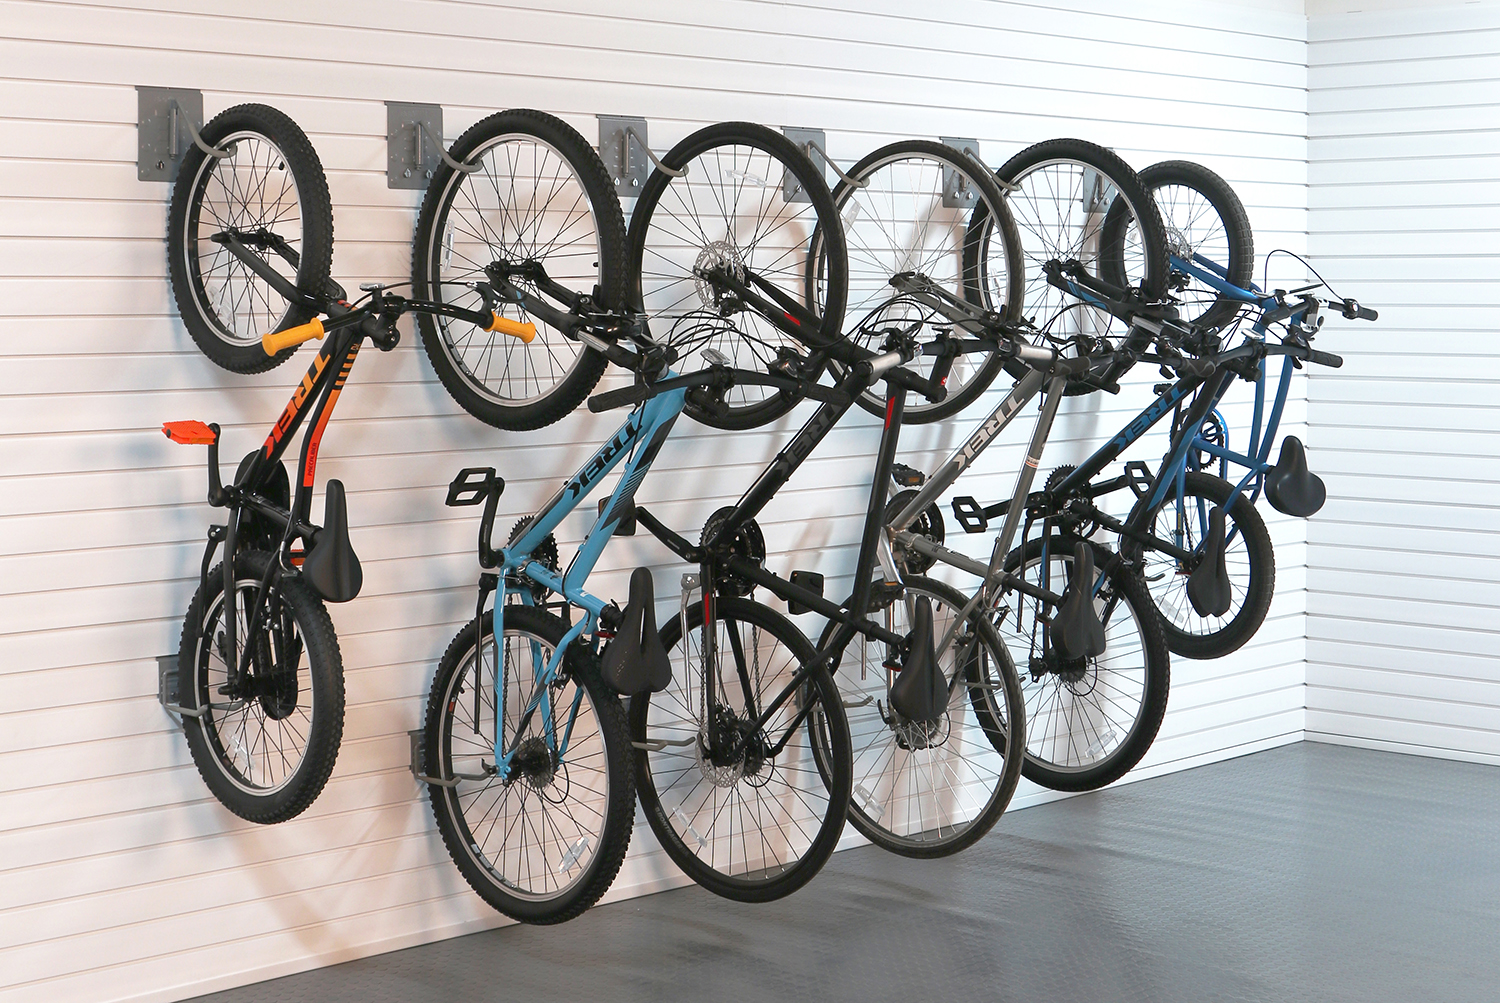
The Rotating Bike Hook works just like the J Hook but adds one important feature: it rotates. Once your bike is on the hook, you can swing the entire assembly — bike and all — so the bike runs flat along the wall rather than pointing out into the garage. It rotates freely. The Rotating Bike Hook is supported by a large plate on which 2 CamLoks are fitted. The bike can be stored swung left, right or perpendicular to the wall if this is required.

Space it uses

In the perpendicular position: identical to the J Hook — 170–180cm of floor depth per bike. In the flat (rotated) position: the bike sits parallel to the wall and uses almost no floor depth. Wall height per bike in the flat position is roughly 170cm (the bike’s length). Wall width is the height of the bike (flat on the wall).

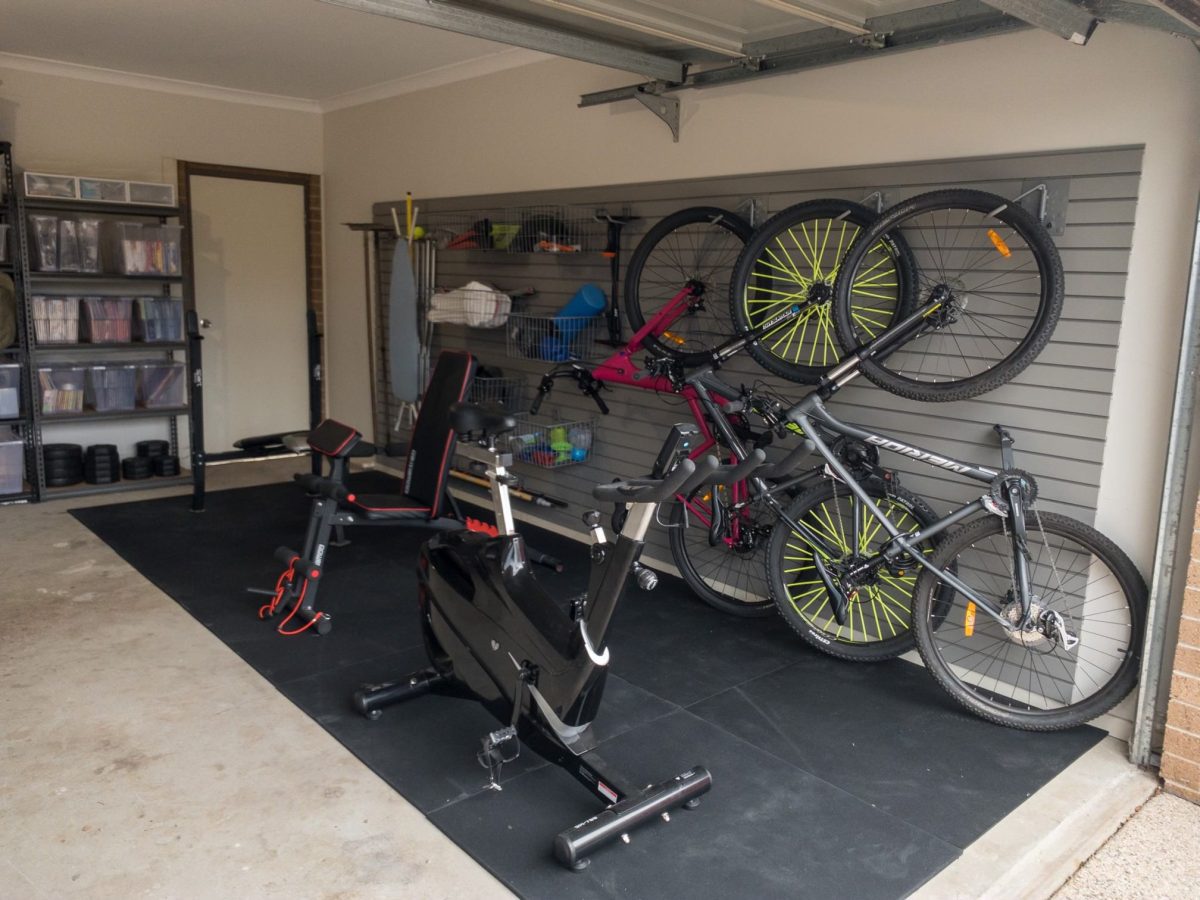
This is why the Rotating Hook is such a significant upgrade for garages with more than one bike: in the flat position, two bikes hung side by side on Rotating Hooks use roughly 1.5 – 2m of wall width (they overlap each other when rotated) and roughly .5m of floor depth. In terms of square meters this is (1.5 x .5 = .75sqm). Compare that to two bikes on J Hooks pointing straight out — .7sqm x 2 = 1.4sqm.

Who it suits

The Rotating Hook is the best choice for most households with two or more bikes. It’s also well suited to narrower garages where you want to reclaim floor space, and any situation where you want the flexibility to swing a bike out for access then flat when done.

It’s also a good option for a single bike in a tight garage — the ability to push the bike flat against the wall when the car needs to fit means you’re not choosing between the car and the bike.

The trade-off

The Rotating Hook costs more than the J Hook (2.5 times more). It also has a small amount of swing resistance — the hook doesn’t spin freely like a lazy susan, it moves with deliberate effort. This is intentional: It is supported by a large plate and 2 x CamLoks to support whatever angle you set it so it doesn’t drift.

Vertical Hanging — HD Universal Hook or Cradle Hook

How it works

bike storage solutions
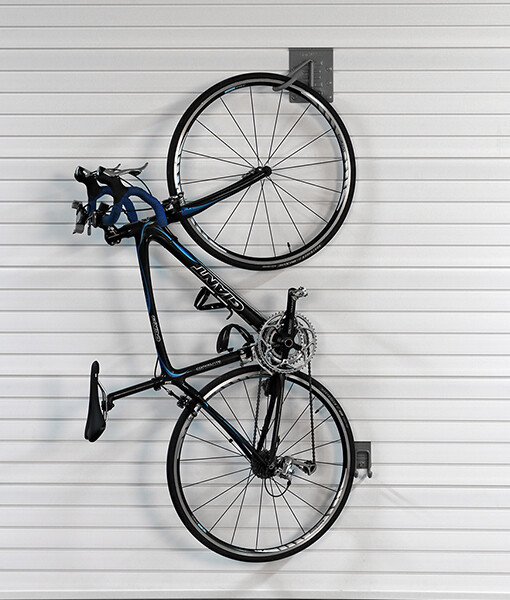
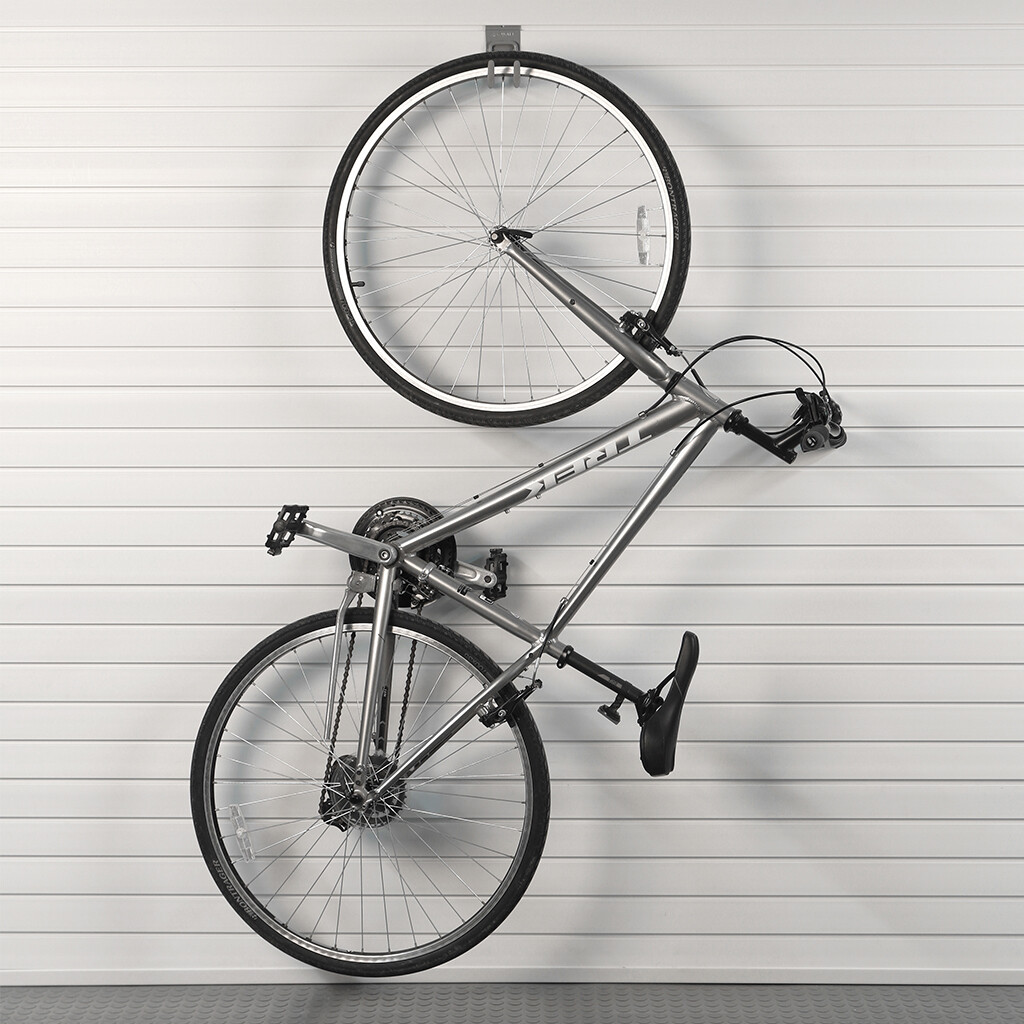
Vertical hanging means the bike is stored straight up and down — front wheel in the hook at the top, the rest of the bike hanging below. The hook grips the front wheel rim and the bike’s full weight is suspended from the wall.

Space it uses

This is the most wall-space-efficient method when measured by floor depth — the bike projects minimally from the wall (roughly 40–50cm for the handlebar width). Wall width per bike is about 70cm – 1m. However, the vertical height requirement is significant — a standard adult bike hanging vertically from the front wheel needs around 200–230cm of wall height clearance.

Who it suits

Vertical storage suits garages with high ceilings and limited wall depth — for example, a long narrow garage wall where you want to stack multiple bikes side by side. The HD Universal Hook rated to 45kg per hook (with InstallStrips) handles any standard adult bike including lighter e-bikes.

The trade-off

Getting the bike up into vertical position requires lifting the front wheel to shoulder height or higher — which is fine for a fit adult but not practical for kids, older riders, or heavier bikes. It’s also harder to load in a hurry. If convenience of access matters to you, this is the least user-friendly of the three options.

Side-by-Side Comparison

  • J Hook: Floor depth 1m | Wall width 60–70cm | Ease of use: Easy for adults | Best for: 1–2 bikes, standard garage
  • Rotating Hook: Floor depth up to 50cm (flat) / 170cm (up) | Wall width 1m (flat) | Ease of use: Easy for adults | Best for: 2+ bikes, tight garages, maximum flexibility
  • Vertical (HD Hook): Floor depth 50cm | Wall width 1m | Wall height – up to 2m. Ease of use: Requires lifting | Best for: High ceilings, narrow wall space, heavier single bikes

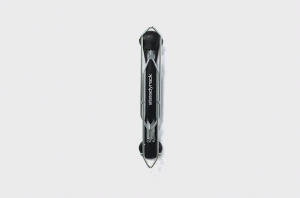
What About the SteadyRack?

The SteadyRack is a different category altogether — it’s a proprietary pivot bracket rather than a simple hook. It deserves its own mention here because it solves a specific problem: no-lift loading. The SteadyRack rolls in (you push the front wheel onto the bracket) and the bike pivots up at an angle automatically. No lifting required.

steadyrack bike storageIf ease of access is your primary concern — particularly for kids, older riders, or frequent daily use — the SteadyRack is worth considering alongside the hooks above. StoreWALL’s CamLok mounting plates let you install SteadyRack brackets onto your panels and reposition them without drilling into the wall.

Note however, that when combining the StoreWALL plates and the SteadyRack bracket, the price per bike doubles compared to the Rotating Bike Hook.

Which Should You Choose?

Here’s our honest recommendation based on the most common garage setups:

  • One adult bike, decent floor depth: J Hook. Simple, secure, affordable.
  • Two or more bikes in a standard double garage: Rotating Bike Hook for each. The single best all-round option for most Australian households.
  • Family with young kids: SteadyRack brackets for kids bikes (no lifting), Rotating Hooks for adult bikes. Mix and match on the same panel.
  • E-bike or heavy bike: HD Universal Hook with Heavy Duty panels + InstallStrips. Prioritise load capacity over convenience of method.
  • Tight garage, maximum floor space recovery: Rotating Hooks in the flat position are your best bet. In the flat position they’re barely wider than the panel itself.

If you’re still unsure, send us a photo of your garage wall with the dimensions noted and we’ll give you a specific recommendation. We’ve seen enough garages to know what works.

Frequently Asked Questions

Can I upgrade from a J Hook to a Rotating Hook later without replacing my panels?

Yes. Both hooks use CamLok and attach to the same slatwall panel grooves. Swapping a J Hook for a Rotating Hook is a two-minute job — unclip one, clip in the other. There’s no modification to the panel required.

Does the Rotating Hook work for heavier mountain bikes?

Yes. The Rotating Bike Hook is made from heavy-gauge steel with a powder-coated finish and is rated for standard adult bikes including heavier mountain bikes. The StoreWALL plate is supported by 2 x CamLoks. For e-bikes (typically 20–30kg), we recommend checking the specific weight rating and using Heavy Duty panels with InstallStrips.

I have purchased my garage wall panels from another supplier, will your Rotating Bike Hook still work on my garage wall panels?

Yes. If the groove spacing of your garage wall panels is 74-76mm, then all StoreWALL and MKE accessories are compatible and will fit your garage setup.

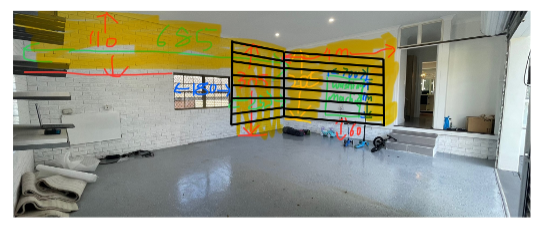
How many Rotating Bike Hooks can I fit on a 2.4m panel?

In the flat position (bikes running parallel to the wall), you can typically fit 3–4 adult bikes on a single 2.4m panel depending on bike frame width. In the perpendicular position, the limiting factor is floor depth rather than wall width. Most customers with 3–4 bikes use two 2.4m panels side by side.

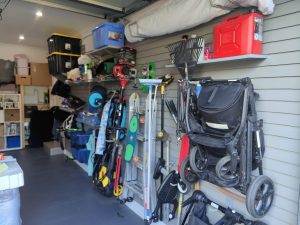
For further reading visit – How to store multiple bikes

Categories
Bike Storage

How to Store Multiple Bikes in a Garage

How to Store Multiple Bikes in a Garage (Without Losing Your Floor Space)

One bike in a garage is manageable. Two is where it starts to get complicated. Three or more, and suddenly the bikes are stacked against the wall, leaning on each other, getting scratched, blocking the car, and falling over at inopportune moments.

The good news is that a well-planned wall storage system can comfortably hold four or more bikes in the same footprint that two bikes take up on the floor — and make every single one easier to get in and out. Here’s how to plan it.

Looking for our full bike storage range? See our Garage Bike Storage page

Step 1 — Know Your Bikes

Before you think about hooks or panels, take stock of what you’re actually storing. The answers shape every decision that follows.

  • How many bikes? Count them all — include the ones currently in the backyard or laneway.
  • What type? Road bikes, mountain bikes, kids bikes, and e-bikes all have different weights, tyre widths, and handling requirements.
  • Who’s accessing them? Adults can manage a lift to shoulder height. Kids generally can’t — which affects hook height and the type of hook you choose.
  • Are they ridden regularly? Daily-use bikes need quick on-and-off access. Weekend bikes can be stored with slightly more effort involved.
  • Do you have accessories to store too? Helmets, pumps, shoes, lights, and bags all need homes on the wall alongside the bikes.

Step 2 — Understand the Space Each Method Takes

This is where most people get stuck — they don’t realise that different storage methods use wall space and floor depth very differently. Here are the four main options and their real-world space requirements:

Perpendicular (J Hook) — most popular for 1–2 bikes

bike hookThe bike hangs front wheel on the hook, rear wheel on or near the floor, bike pointing out from the wall. Requires approximately 1m of floor depth in front of the wall and about up to 2m of wall height per bike (accounting for the length of the bike when standing upright). Easy on-and-off for adults.

Rotating Hook — best for 3+ bikes

rotating bike hook
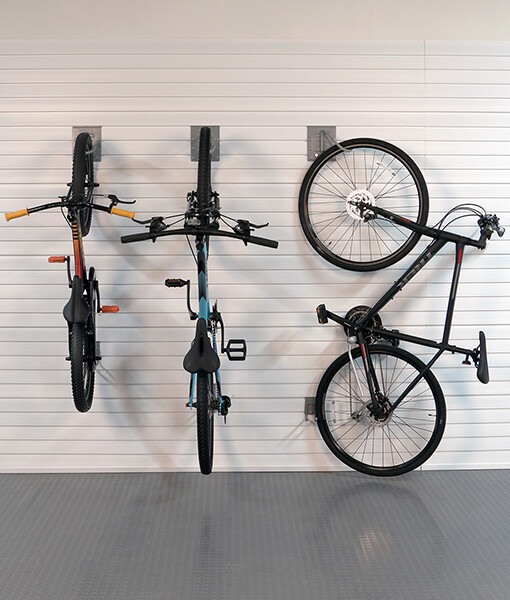
Works like the J Hook (bikes standing upright) but the bike can swing flat against the wall once hung, so it runs parallel to the panel rather than pointing out. In the flat position the floor space is minimal and usuallly determined by the outer width of your bike (ie pedal to pedal which is about 60-80cm max). This is the single most space-efficient method for multiple bikes and why it’s our best-selling bike hook. The trade-off is that you need to swing each bike out before you can easily access the ones behind it. Bikes can be staggered at different heights to pack them tighter together.

SteadyRack Brackets — best for kids or no-lift households

steadyrack bike brackets
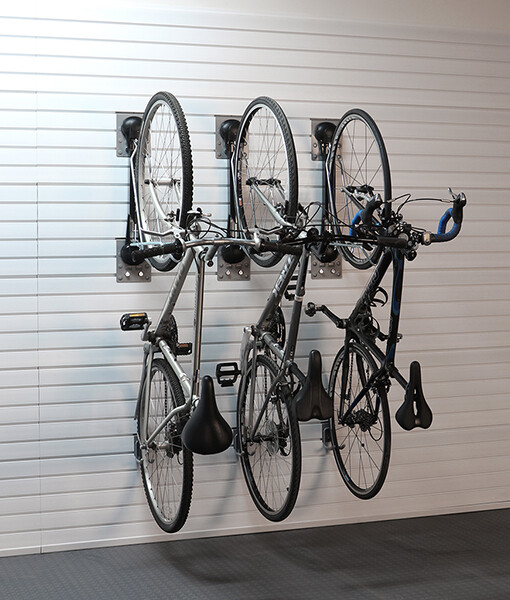
The SteadyRack rolls in rather than lifts — you roll the front wheel onto the bracket and it pivots up at an angle. SteadyRack brackets will also rotate left of right and allow you to have the upright bike stand flat against the wall. The amount of floor space used is the same at above (Rotating Bike Hook), ie about 60-80cm. No lifting required, which makes it the most accessible option for children and older riders. Can be staggered at different heights to pack bikes tighter together.

Horizontal brackets — best for aesthetics or tight depth

Horizontal bike brackets
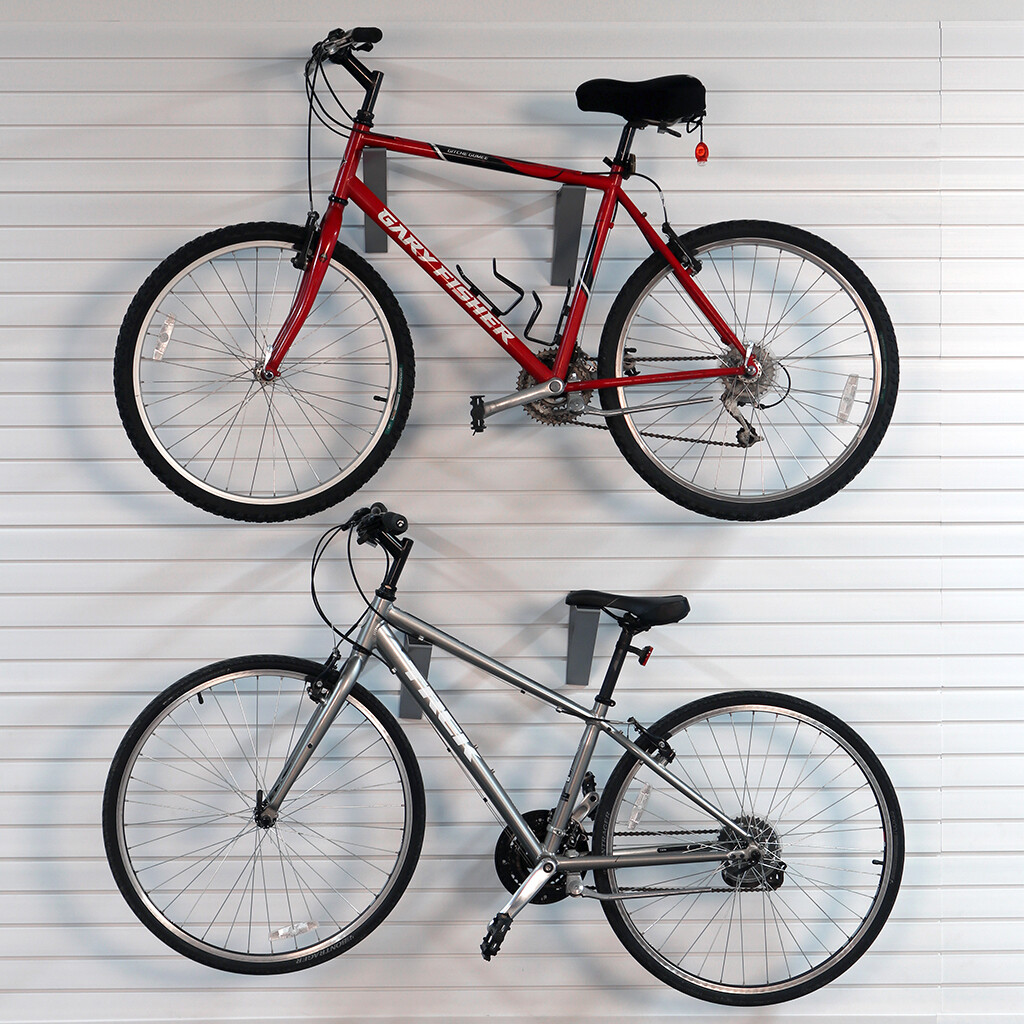
The bike lies flat on the wall, hung by both wheels on 381mm brackets. Uses about 170cm of wall width per bike but only about 40cm of depth (pedal to pedal). The cleanest-looking option, it however takes up the most about of space. Works well where the garage depth is limited but the wall is wide.

A similar solution but with the bike being hung from the front tyre flat on the wall uses our Heavy Duty Universal Hook. Ideal if you only have 1 or 2 bikes and plenty of wall space to use.

Step 3 — Plan the Wall Layout

Now that you know your bikes and your preferred method, it’s time to map out the actual wall. Here’s a practical process:

  • Measure the usable wall width — subtract any door frames, windows, shelving units, or electrical panels from the total width.
  • Decide on hook type — for most families with 3+ bikes, the Rotating Hook will give you the most bikes in the least space. It is also the most cost effective solution we offer.
  • Sketch the bike positions — mark each bike’s width on the wall with tape. Stand back and check the spacing feels workable.
  • Add the accessories — allow space for a few baskets to hold your helmets and bike pumps. These are small but they matter for day-to-day usability.
  • Work out panel coverage — your bikes and accessories determine how many panels you need. A rough guide: one 2.4m Standard Duty panel can support three hanging bikes using the Rotating Bike Hook. However if you want to also include baskets for accessories, more of the wall will need to be covered.

Step 4 — Real Example: A Family of Four with 5 Bikes

Here’s a real-world example based on a customer in Melbourne — a family of four with two adult road bikes, two kids mountain bikes, and an e-bike that didn’t have a permanent home.

Their garage wall measured 6m wide with a height of 2.4m. They chose Rotating Bike Hooks for the adult bikes and the e-bike (so they could swing flat and keep access clear) and two SteadyRack Classic brackets for the kids bikes (easier for the kids to use independently).

This client chose to panel 6m x 2.1m of the wall surface area. They could however have limited the wall paneling to only the top half of the wall, say 1.2m of height.

In addition to the bike hooks, they also inlcuded 2 Heavy Duty Deep Baskets for the helmets and bike pumps, and some smaller bins for the gloves and lights. All five bikes off the floor, all accessories in one place.

Before the install, the bikes took up the equivalent of about 6 square metres of floor space. After, they used very limited floor space and the family could fit both cars in the garage again.

Step 5 — Heights and Clearances

A few practical numbers that save a lot of frustration:

  • Adult bike hook height: the hook centre should be at approximately shoulder height (140–160cm from the floor) for easiest on-and-off access
  • Kids bike hook height: 80–100cm from the floor — kids can manage a small lift but shouldn’t have to reach above their head
  • SteadyRack height: follow the manufacturer’s guide which is based on your specific bike’s wheel size
  • Rotating Bike Hook: because the bike swings flat, adjacent hooks need at least 10cm clearance between bikes in the flat position. You can also stagger the heights slightly allowing you to squeeze them in.
  • Helmet hook: 10–20cm above the bike hook so helmet is easy to grab as you take the bike off the wall

Panel Quantity Guide

Use our Panel Calculator on the website to enter your exact wall dimensions and get a precise recommendation.

Frequently Asked Questions

Can I mix different bike hook types on the same wall?

Absolutely. It’s actually common to mix Rotating Hooks for adult bikes and SteadyRack brackets for kids bikes on the same panel — the panel accepts any accessory regardless of what else is on it. The most important thing is leaving enough space between each bike so they don’t clash when being loaded or removed.

What if my garage wall isn’t wide enough?

If wall width is the limiting factor, the Rotating Bike Hook will be your best option with bikes rotating left or right and possibly staggered in height to fit them into the wall space you have.

Can I store an e-bike on a standard bike hook?

Yes, but e-bikes are heavier — typically 20–30kg — so the hook and panel setup needs to match the weight. The Rotating Bike Hook and the SteadyRack Brackets are supported by 2 x CamLoks giving your bike more support. I would also recommend have the lower tyre rest on the ground rather than floating. Contact us if you’re unsure — we’re happy to recommend the right setup for your specific bike.

My garage wall is brick. Does that affect installation?

Not significantly. StoreWALL panels can be installed on brick walls using InstallStrips with masonry anchors. The InstallStrips distribute the load across multiple anchor points, which is actually more secure on brick than a single screwed-through approach. We have an installation guide specifically for brick walls on the website.

Need more information? Read our latest post comparing rotating vs vertical options.

Categories
Bike Storage Garage Hooks Garage Ideas Garage Walls Steadyrack

Steadyrack ProFlex on StoreWALL Wall Panels

StoreWALL has been supplying brackets to support the Steadyrack bike bracket range for many years. Recently, Steadyrack launched their latest bike bracket, the ProFlex range. We take a look at how you can now install the Steadyrack Proflex on your StoreWALL wall panels.

Lets take a look at the ProFlex and why you would choose this over the Classic bike bracket.

Steadyrack ProFlex range

The ProFlex allows for seamless bike storage without cluttering your space. Designed to integrate effortlessly with the GearMate storage system and future Steadyrack products, it’s the perfect choice for cyclists who value both efficiency and aesthetics.

The enhanced tyre rest reduces wall scuffs, protecting your walls while ensuring a firm, stable hold. Plus, with SteadySaddle technology, it supports bikes with fenders or mudguards, making it a versatile solution for various bike styles.

The newer design, the ability to add on additional hanging options plus the mudguard support make it a very attractive option for serious bike enthusiasts. The price difference is $99.99 vs $129.99

steadyrack proflex on garage wall panels
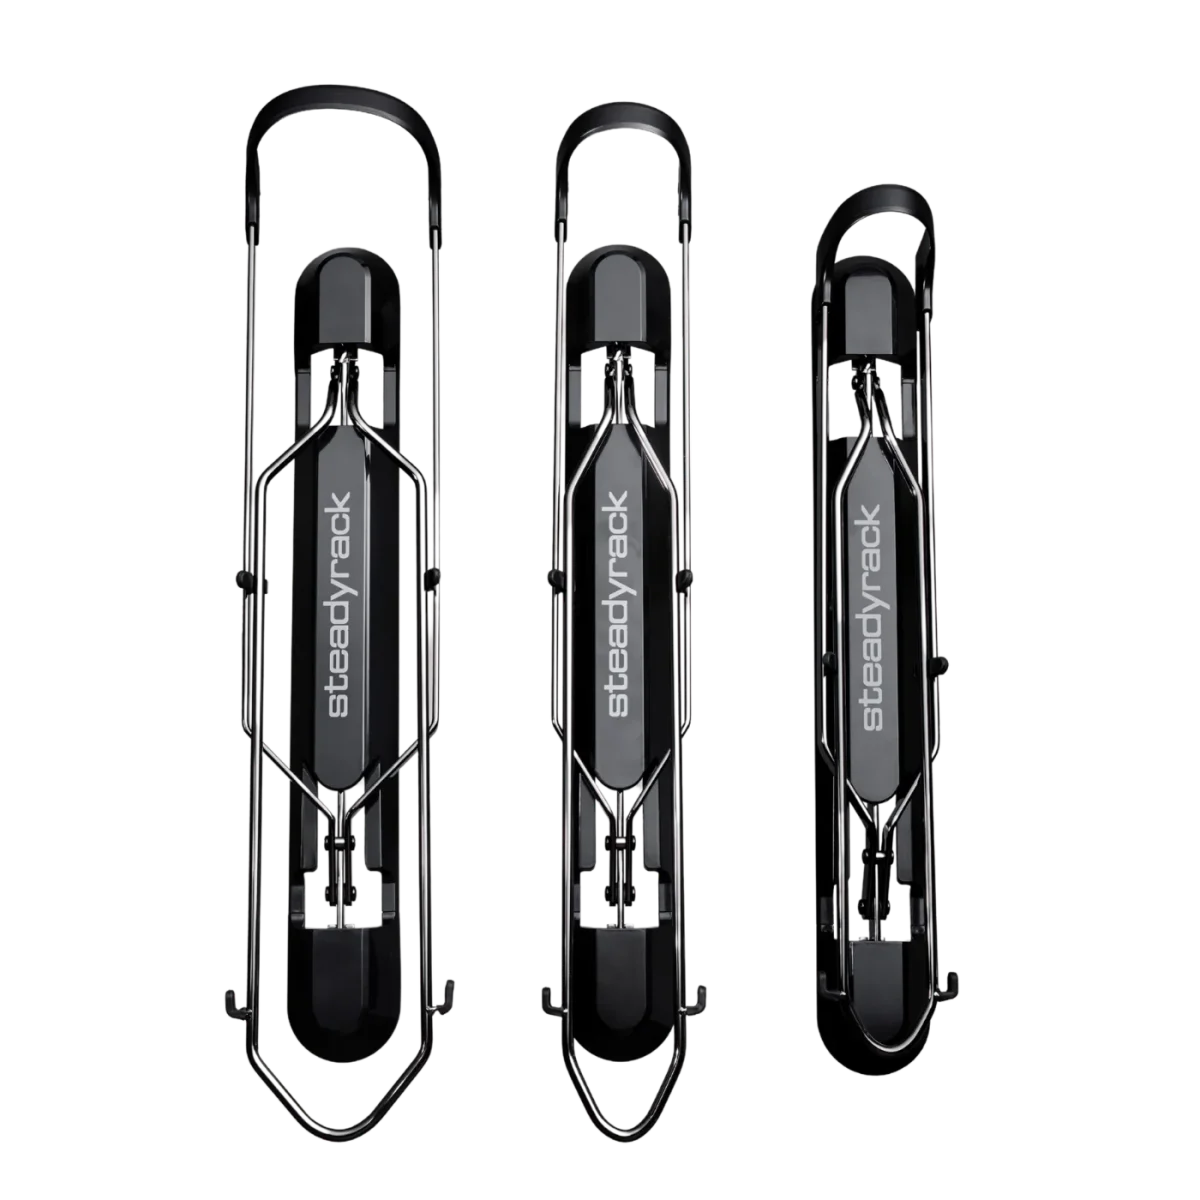
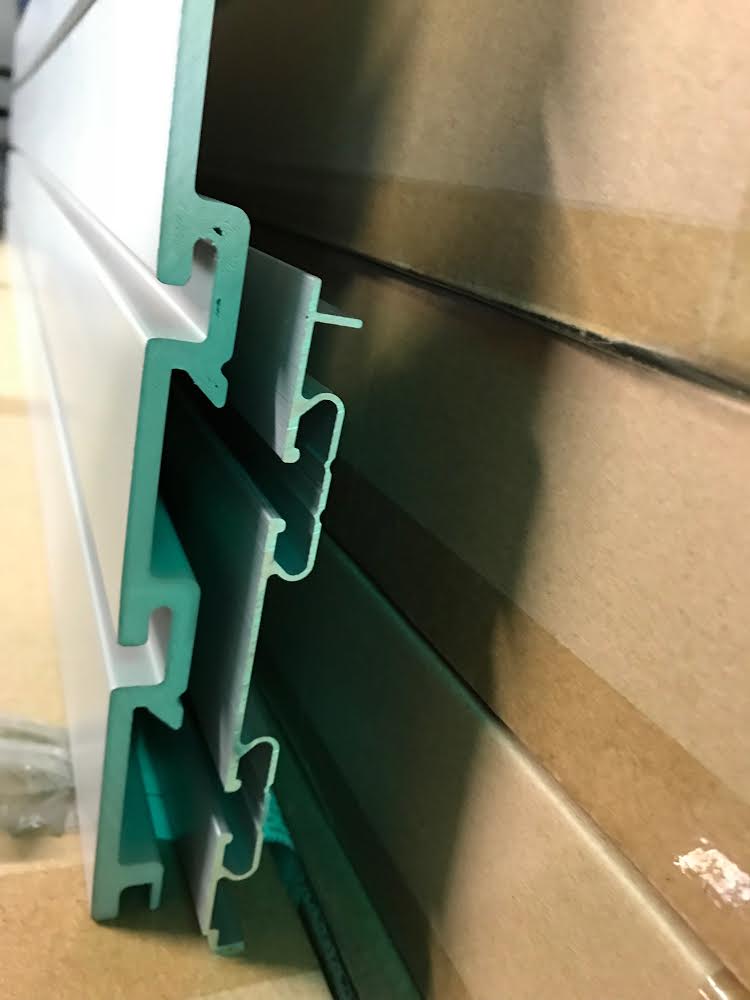
StoreWALL Compatibility

Up until recently, the StoreWALL Steadyrack bracket was specifically designed for the Classic range. It featured two plates, one for the top bracket attachment and one for the lower one. Essentially, the StoreWALL plates where first attached to the wall panels. The Steadyrack bike bracket was then attached to these upper and lower plates using two pre-installed horizontally aligned bolts.

The latest StoreWALL Steadyrack plates use vertically aligned bolts that support both the Classic and the new ProFlex range. The StoreWALL plates are the same size and are supported by two CamLoks on each plate. The key difference is that the pre-installed bolts are vertically aligned.

This means that regardless of which Steadyrack bracket you already have or are about to purchase, the latest StoreWALL brackets will be compatible.

Easy to use instructions on how to complete the installation are issued with every StoreWALL Steadyrack bike bracket order.


Categories
Bike Storage

Steadyrack Bike Bracket: A Space-Saving Solution for Your Home or Garage

If you’re an avid cyclist or even a casual rider, you’re likely familiar with the ongoing challenge of storing your bike. It’s often difficult to find a storage solution that’s not only secure but also space-efficient. That’s where the Steadyrack Bike Bracket comes in, offering an innovative way to store your bikes without sacrificing valuable floor space. In this blog post, we’ll explore what makes the Steadyrack Bike Bracket a standout choice for bike storage, and how it can simplify your life.

What is the Steadyrack Bike Bracket?

The Steadyrack Bike Bracket is a wall-mounted bike rack that allows you to store your bike vertically. It’s unique because it pivots from side to side, letting you swing the bike to the left or right to save even more space. The design of the Steadyrack ensures that your bike is securely stored without the need to lift it—a significant advantage for those who struggle with heavy lifting or lack the physical space for traditional bike stands.

Key Features of the Steadyrack Bike Bracket

Swivelling Design

  • One of the standout features of the Steadyrack is its 180-degree pivoting mechanism. Once the bike is mounted, you can swivel it to either side, keeping it flat against the wall. This is especially useful in tight spaces like small garages or apartments where every inch counts.

Easy Loading and Unloading

  • Unlike traditional vertical bike racks that require you to lift the entire bike, the Steadyrack allows you to simply roll your bike in and out of the rack. This makes it ideal for heavier bikes, such as e-bikes, mountain bikes, or anyone who prefers not to lift their bike.

Universal Fit for Most Bike Types

  • The Steadyrack is designed to accommodate a wide variety of bikes. Whether you ride a road bike, mountain bike, or commuter bike, there’s likely a Steadyrack model that fits your needs. The standard model fits bikes with tires between 20″ and 29″ and widths up to 2.4″.

Space-Saving Efficiency

  • Because the Steadyrack allows you to store your bike flat against the wall and pivot it to the side, it dramatically reduces the amount of floor space required. This makes it a top choice for people looking to maximize their garage, shed, or apartment storage.

Durability and Quality

  • Made from high-quality steel and UV-treated plastic, the Steadyrack is built to last. It can handle up to 35kg (77 lbs), making it strong enough to hold most bikes on the market. The materials are designed to withstand everyday wear and tear, whether you’re storing your bike indoors or outdoors.

Protects Your Bike

  • The rack is designed to minimize contact with the bike’s frame, which reduces the risk of damage. It cradles the wheels of your bike, ensuring that the frame, pedals, and handlebars don’t come into contact with the wall or the rack itself.

Minimal Wall Damage

  • Installed over the StoreWALL Wall Panels, the Steady Rack Bike Bracket can be moved around on your wall really easily. There is no additional drilling as StoreWALL’s SteadyRack brackets are used to mount onto the StoreWALL panels. The SteadyRack Bike Bracket is then mounted onto these brackets.

steadyrack bike bracket

Step-by-Step Installation Guide for the Steadyrack Bike Bracket

One of the reasons the Steadyrack is so popular is because of its simple installation process. Here’s a detailed step-by-step guide to help you set it up correctly:

Tools You’ll Need:

  • None, you just need one pair of the StoreWALL SteadyRack Bike Brackets.

Installation Steps:

  1. Choose the Mounting Location
    StoreWALL’s SteadyRack Brackets come in two pieces. One bracket fits the top mount, the second the lower mount. These brackets are fitted to your StoreWALL panels and are locked in using CamLok. Once in place, you can then screw the actual SteadyRack Bike Bracket onto these.
  2. Install the Bracket
    By using the StoreWALL brackets first, there is no messy drilling. Not holes in your wall. Everything simply fits onto your StoreWALL wall panels.
  3. Test the Rack with Your Bike
    Once the rack is mounted, gently roll your bike into the rack to ensure it fits correctly. Try pivoting the bike to either side to see how much space you save. Make any adjustments to the angle of the pivot if necessary.

steadyrack bike bracket

Installation Tips:

  • Mounting Height: If you plan to install multiple racks for different bikes, make sure to stagger the heights to avoid overlapping handlebars or pedals.
  • Spacing Between Racks: For garages or spaces where multiple bikes will be stored, allow at least 60–70 cm (24–28 inches) between racks to accommodate the pivoting movement.

Why Choose Steadyrack Over Other Bike Storage Solutions?

There are many bike storage options on the market, but the Steadyrack stands out for several key reasons:

  1. No Lifting Required: This feature alone makes Steadyrack a go-to choice for cyclists who have heavy bikes or those who simply want a more convenient storage solution.
  2. More Space-Efficient Than Floor Stands: Traditional floor stands take up valuable space, but the Steadyrack mounts on the wall, freeing up the floor for other uses.
  3. High-Quality Build: With a robust design made from steel and durable plastic, Steadyrack is built to last. Unlike cheaper bike racks, it won’t rust, bend, or lose its ability to hold your bike securely over time.
  4. Perfect for Multiple Bikes: If you have more than one bike, the pivoting feature becomes even more beneficial. You can easily store multiple bikes side-by-side without them taking up a lot of horizontal space.
  5. Low Profile Design: When not in use, the Steadyrack folds flat against the wall, making it an unobtrusive solution for bike storage.

steady rack bike bracket

Steadyrack Models Available

Steadyrack offers several models to accommodate different types of bikes:

  • Classic Steadyrack: Ideal for road bikes and hybrid bikes with narrower tires.
  • Mountain Bike Rack: Designed to accommodate wider tires typically found on mountain bikes.
  • Fat Rack: A version built for bikes with extra-wide tires, such as fat bikes.
  • Fender Rack: Perfect for bikes with fenders or mudguards.

Each model is designed with the same space-saving and durability features, ensuring that no matter what type of bike you ride, there’s a Steadyrack for you.

Make the Most of Your Space with Steadyrack

Whether you’re looking to organize a cluttered garage, free up space in your apartment, or simply find a better way to store your bike, the Steadyrack Bike Bracket is an excellent solution. With its easy installation, space-saving pivot feature, and heavy-duty construction, Steadyrack is the ideal choice for cyclists who want both convenience and security.

Categories
Bike Storage Steadyrack

Steadyrack Bike Bracket

A Space-Saving Solution for Your Home or Garage

If you’re an avid cyclist or even a casual rider, you’re likely familiar with the ongoing challenge of storing your bike. It’s often difficult to find a storage solution that’s not only secure but also space-efficient. That’s where the Steadyrack Bike Bracket comes in, offering an innovative way to store your bikes without sacrificing valuable floor space. In this blog post, we’ll explore what makes the Steadyrack Bike Bracket a standout choice for bike storage, and how it can simplify your life.

What is the Steadyrack Bike Bracket?

The Steadyrack Bike Bracket is a wall-mounted bike rack that allows you to store your bike vertically. It’s unique because it pivots from side to side, letting you swing the bike to the left or right to save even more space. The design of the Steadyrack ensures that your bike is securely stored without the need to lift it—a significant advantage for those who struggle with heavy lifting or lack the physical space for traditional bike stands.

Key Features of the Steadyrack Bike Bracket

Swiveling Design

  • One of the standout features of the Steadyrack is its 180-degree pivoting mechanism. Once the bike is mounted, you can swivel it to either side, keeping it flat against the wall. This is especially useful in tight spaces like small garages or apartments where every inch counts.

Easy Loading and Unloading

  • Unlike traditional vertical bike racks that require you to lift the entire bike, the Steadyrack allows you to simply roll your bike in and out of the rack. This makes it ideal for heavier bikes, such as e-bikes, mountain bikes, or anyone who prefers not to lift their bike.

Universal Fit for Most Bike Types

  • The Steadyrack is designed to accommodate a wide variety of bikes. Whether you ride a road bike, mountain bike, or commuter bike, there’s likely a Steadyrack model that fits your needs. The standard model fits bikes with tires between 20″ and 29″ and widths up to 2.4″.

Space-Saving Efficiency

  • Because the Steadyrack allows you to store your bike flat against the wall and pivot it to the side, it dramatically reduces the amount of floor space required. This makes it a top choice for people looking to maximize their garage, shed, or apartment storage.

Durability and Quality

  • Made from high-quality steel and UV-treated plastic, the Steadyrack is built to last. It can handle up to 35kg (77 lbs), making it strong enough to hold most bikes on the market. The materials are designed to withstand everyday wear and tear, whether you’re storing your bike indoors or outdoors.

Protects Your Bike

  • The rack is designed to minimize contact with the bike’s frame, which reduces the risk of damage. It cradles the wheels of your bike, ensuring that the frame, pedals, and handlebars don’t come into contact with the wall or the rack itself.

Minimal Wall Damage

  • Installed over the StoreWALL Wall Panels, the Steady Rack Bike Bracket can be moved around on your wall really easily. There is no additional drilling as StoreWALL’s SteadyRack brackets are used to mount onto the StoreWALL panels. The SteadyRack Bike Bracket is then mounted onto these brackets.

Step-by-Step Installation Guide for the Steadyrack Bike Bracket

One of the reasons the Steadyrack is so popular is because of its simple installation process. Here’s a detailed step-by-step guide to help you set it up correctly:

Tools You’ll Need:

  • None, you just need one pair of the StoreWALL SteadyRack Bike Brackets.

Installation Steps:

  1. Choose the Mounting Location
    StoreWALL’s SteadyRack Brackets come in two pieces. One bracket fits the top mount, the second the lower mount. These brackets are fitted to your StoreWALL panels and are locked in using CamLok. Once in place, you can then screw the actual SteadyRack Bike Bracket onto these.
  2. Install the Bracket
    By using the StoreWALL brackets first, there is no messy drilling. Not holes in your wall. Everything simply fits onto your StoreWALL wall panels.
  3. Test the Rack with Your Bike
    Once the rack is mounted, gently roll your bike into the rack to ensure it fits correctly. Try pivoting the bike to either side to see how much space you save. Make any adjustments to the angle of the pivot if necessary.
steadyrack bike bracket

Installation Tips:

  • Mounting Height: If you plan to install multiple racks for different bikes, make sure to stagger the heights to avoid overlapping handlebars or pedals.
  • Spacing Between Racks: For garages or spaces where multiple bikes will be stored, allow at least 60–70 cm (24–28 inches) between racks to accommodate the pivoting movement.

Why Choose Steadyrack Over Other Bike Storage Solutions?

There are many bike storage options on the market, but the Steadyrack stands out for several key reasons:

  1. No Lifting Required: This feature alone makes Steadyrack a go-to choice for cyclists who have heavy bikes or those who simply want a more convenient storage solution.
  2. More Space-Efficient Than Floor Stands: Traditional floor stands take up valuable space, but the Steadyrack mounts on the wall, freeing up the floor for other uses.
  3. High-Quality Build: With a robust design made from steel and durable plastic, Steadyrack is built to last. Unlike cheaper bike racks, it won’t rust, bend, or lose its ability to hold your bike securely over time.
  4. Perfect for Multiple Bikes: If you have more than one bike, the pivoting feature becomes even more beneficial. You can easily store multiple bikes side-by-side without them taking up a lot of horizontal space.
  5. Low Profile Design: When not in use, the Steadyrack folds flat against the wall, making it an unobtrusive solution for bike storage.

Steadyrack Models Available

Steadyrack offers several models to accommodate different types of bikes:

  • Classic Steadyrack: Ideal for road bikes and hybrid bikes with narrower tires.
  • Mountain Bike Rack: Designed to accommodate wider tires typically found on mountain bikes.
  • Fat Rack: A version built for bikes with extra-wide tires, such as fat bikes.
  • Fender Rack: Perfect for bikes with fenders or mudguards.

Each model is designed with the same space-saving and durability features, ensuring that no matter what type of bike you ride, there’s a Steadyrack for you.

Make the Most of Your Space with Steadyrack

Whether you’re looking to organize a cluttered garage, free up space in your apartment, or simply find a better way to store your bike, the Steadyrack Bike Bracket is an excellent solution. With its easy installation, space-saving pivot feature, and heavy-duty construction, Steadyrack is the ideal choice for cyclists who want both convenience and security.

Categories
Bike Storage Carport Storage Solution garage design Garage Hooks Garage Ideas garage makeover Garage Storage On TV Shelving

The Limitations of Garage Shelving

When it comes to organizing your garage, adding a few shelves might seem like the easiest solution. While shelves certainly have their place, relying on shelving alone for garage storage can leave you with limited flexibility, wasted space, and ongoing organization challenges. In this article, we’ll explore the limitations of garage shelving, and what alternatives or additions you might consider to truly maximize your garage storage.

Limitations of Garage Shelving

Garage shelving provides some utility, but it often falls short in addressing the diverse storage needs of a garage. Here are some of the limitations that can arise:

Wasted Vertical Space

Standard garage shelving typically leaves a significant amount of vertical space unused. This space could otherwise be used for storing tools, equipment, or seasonal items. Without utilizing the full height of your walls, you may find yourself quickly running out of space and struggling to keep everything accessible.

Difficulty Organizing Small and Medium-Sized Items

Shelves are best suited for large, stackable items or bins, but they can make it difficult to store small and medium-sized items efficiently. When stored on open shelves, items like tools, sports equipment, or cleaning supplies can quickly create clutter and become hard to locate when you need them.

Limited Flexibility

Once installed, traditional shelves can be hard to adjust or reorganize, especially if you’re dealing with fixed or heavy-duty shelving units. Garages often require adaptable storage options that can change with your needs, and shelving alone doesn’t always offer this flexibility.

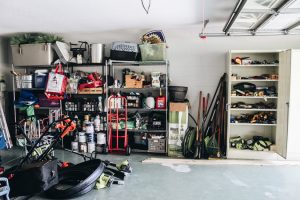
Risk of Clutter and Accessibility Issues

Shelving alone encourages stacking items, which can lead to clutter, making it difficult to access what’s stored in the back. As shelves fill up, it’s easy for items to become piled or hidden, which not only makes organization harder but can also increase the risk of items falling and causing damage.

Underutilized Wall and Ceiling Space

Shelving takes up valuable floor space while leaving the walls and ceiling areas largely unused. This is a missed opportunity, especially in garages where space is at a premium. Ceiling racks, wall panels, or other modular solutions can make better use of these areas and free up floor space for other uses.

Alternative and Complementary Storage Solutions

To make the most of your garage storage, it’s worth exploring other storage options that can work alongside shelving to create a more comprehensive and efficient setup.

Slatwall and Wall Panel Systems

Slatwall systems, like those from StoreWALL, are versatile garage wall storage solutions that allow you to hang hooks, shelves, baskets, and brackets. Unlike traditional shelving, these panels make it easy to store items of varying sizes, such as tools, sporting goods, and gardening supplies. Wall panels allow you to use your walls effectively, keep items accessible, and prevent clutter on shelves.

limitations of garage shelving

Pegboards and Tool Racks

Pegboards and tool racks provide customizable storage for smaller and lighter items. By mounting them on the wall, you keep your tools organized and within reach, while also freeing up valuable shelf space for larger, bulkier items.

Overhead Storage

Overhead racks or ceiling storage solutions are ideal for items that aren’t needed regularly, such as seasonal decor, camping gear, or spare tires. By using the ceiling space, you maximize storage without taking up floor or wall space. Overhead storage keeps these items safe, organized, and out of the way until they’re needed.

limitations of garage shelving

Cabinets and Drawer Units

Cabinets and drawer units offer enclosed storage, which helps reduce dust accumulation and keeps items hidden for a tidier look. Cabinets can house a variety of items that don’t need to be on display, and drawer units work particularly well for storing smaller tools, hardware, or crafting supplies. Additionally, locking cabinets can be useful for securing chemicals, paints, and other hazardous materials safely out of reach.

Bins, Baskets, and Specialized Holders

Adding bins, baskets, and specialized holders (e.g., for sports equipment or gardening tools) can help you organize items that are hard to store on shelves alone. Labelled storage bins allow you to categorize items for easy access, while baskets can hold oddly shaped items like balls, hoses, or extension cords. These can be attached to wall panels or placed on shelves in an organized manner.

Benefits of a Mixed Storage System

Incorporating a variety of storage options in your garage enables you to overcome some of the limitations of garage shelving.

Increased Space Efficiency

By utilizing the walls and ceiling alongside shelving, you can dramatically increase your available storage without sacrificing floor space. Combining shelving with slatwall, overhead storage, and cabinets ensures every inch of the garage is working for you.

Better Organization and Accessibility

A mixed storage system allows you to assign specific places for each type of item, so they’re easy to find and access when needed. You can store frequently used items within reach and keep seldom-used items out of the way.

Improved Safety and Clutter Reduction

A well-organized garage reduces the risk of accidents caused by items falling off overcrowded shelves. Hazardous materials can be safely locked away, and bulky or heavy items can be securely stored on racks or in cabinets, making the space safer for family members.

Enhanced Flexibility for Changing Needs

As your storage needs evolve, a versatile system that includes slatwalls, pegboards, and ceiling storage can adapt with you. You can reconfigure your setup to accommodate new tools, equipment, or seasonal items without a complete overhaul.

Getting Started: Creating a Balanced Storage Plan

To get the most out of your garage, start by assessing your storage needs:

Identify What You Need to Store

  • Make a list of the items you currently store in your garage and those you’d like to add. This helps you determine the types and sizes of storage solutions you’ll need.

Map Out Your Space

  • Measure your garage and sketch a rough layout, marking where you could install shelving, wall panels, ceiling racks, and cabinets. Aim to balance storage across floor, wall, and ceiling areas to avoid overcrowding any one area.

Choose a Combination of Storage Solutions

  • Based on your list and layout, choose a combination of storage options to fit your needs. If you have many small items, prioritize pegboards or slatwall with baskets. For larger items, consider overhead racks or dedicated shelving.

Install and Organize

  • Start by installing the more permanent fixtures, such as slatwall or ceiling racks, before adding smaller storage accessories. Once everything is in place, arrange your items in a logical, accessible way to ensure easy access and organization.

Conclusion – Limitations of Garage Shelving

While garage shelving is a useful storage tool, relying on it alone can limit your options and lead to a cluttered, inefficient space. By combining shelving with wall-mounted systems, ceiling racks, cabinets, and specialized storage accessories, you can create a well-organized and highly efficient garage that meets all your storage needs.

Explore StoreWALL for high-quality slatwall solutions, hooks, baskets, and other accessories that will take your garage organization to the next level. With a thoughtfully designed setup, your garage can become a clean, accessible, and functional space tailored to you.

Categories
Best Garage Storage Solutions for 2024 Bike Storage Brick Walls garage design Garage Ideas garage makeover

How to Solve Your Garage Storage Challenges Without Breaking the Bank

Creating an organised, efficient garage is about more than just clearing clutter—it’s about making a smart investment in your home. A well-designed garage storage solution ensures your belongings are secure, easy to access, and stored in a way that enhances the space, not crowds it. In our latest article we will look a recent case study, where we helped a Sydney customer solve her garage storage challenge.

Garage Storage Isn’t Just About Shelving

If your goal is to simply shove items out of sight, a few basic shelves from your local Bunnings might do the trick—until you need something buried at the back. But when you’re looking for long-term efficiency and flexibility, shelves alone fall short. They often become overcrowded, making it hard to retrieve specific items without moving others.

This is where a garage wall storage system shines.

Once installed, StoreWALL’s wall panels transform your garage walls into customisable storage hubs. Need to hang bikes this year and swap to golf gear and water skis next summer? No problem. With the right slatwall system, you can easily change your layout as your needs evolve—without drilling new holes or installing more shelves.

The Smart Way to Plan Garage Wall Storage

We recently worked with a homeowner in Sydney who had a wide garage with two key usable wall spaces: the rear wall and the right-hand side wall. Their goal? To neatly store plastic tubs, bikes, sports gear, and large items like an ironing board.

Our initial proposal was to install wall panels across the full height of both walls—covering around 18 square metres with 27 StoreWALL Standard Duty panels (2.4m each). The cost to deliver this was approx $4700. While this would have provided complete flexibility and coverage, the quote exceeded their budget. See above picture of what was originally requested.

Smart Savings Without Sacrificing Function

One of the many advantages of the StoreWALL slatwall system is that it can be dialled down by reducing the amount of wall panels used and therefore the overall initial cost of the project. At a later stage, it can also be dialled back up again with additional panels added to expand the solution.

We took another look at the room for the client, this time focusing on how we can continue to make it functional but with a lower initial investment. By reducing the panel height from full-wall to either 1.8m or 2.1m, and limiting the wall coverage to strategic sections, we delivered a far more cost-effective solution that still met their storage goals.

  • Rear wall (right of window): 2.4m wide x 2.1m or 1.8 high
  • Right-hand wall: 3.6m wide x 2.1m or 1.8m high
  • Total coverage: Over 6m of width at 1.8–2.1m height = approx. 12–13sqm of wall coverage
  • Budget of $3100

By reducing the wall coverage by 30%, we also reduced the budget by a similar figure.

This gave them ample room for high shelving to hold plastic tubs, with bikes stored neatly on the rear wall, and sports gear hung along the side wall.

The Result?

A tailored solution that met their needs without over-investing in unnecessary materials. And best of all, they retained flexibility for future changes—something you simply don’t get with fixed shelves.

StoreWALL Garage Wall Panels offer the ultimate in versatility, durability, and long-term value. Whether you’re starting with one wall or upgrading your entire space, we’ll help you maximise every square metre—on your terms and within your budget.

Categories
Bike Storage garage design Garage Hooks Garage Ideas garage makeover

The Most Space-Saving Way to Store a Bike

Storing a bicycle efficiently is a common challenge for homeowners and apartment dwellers alike. Whether you’re short on garage space, sharing a small apartment, or simply want to declutter, choosing the right storage method can make all the difference. In this guide, we’ll explore the most space-saving way to store a bike — with detailed measurements, pros and cons, and practical advice on what works best.

🚴 Why Space Matters

A standard adult bicycle measures:

  • Length: approx. 170–180 cm
  • Handlebar width: approx. 60–70 cm
  • Wheel diameter: 26″–29″ (66–74 cm)
  • Height from ground: 95–110 cm when upright

That means a single bike can occupy over 1.2 square metres when stored on the ground. Multiply that by multiple bikes in a home, and you’re quickly dealing with serious floor space consumption — especially in smaller garages or homes with growing families.


🚲 1. Storing on the Ground

📏 Footprint: ~180cm (L) × 70cm (W)
Rating: ★☆☆☆☆

Pros:

  • Easiest access — no lifting
  • Great for frequent riders
  • Stable if on a rack or kickstand

Cons:

  • Takes up significant floor space
  • Trip hazard
  • Not suitable for compact storage
  • Dirt/oil may contact floors

Best for: Riders who use their bikes daily and have ample garage space

🚲 2. Horizontal on the Wall

(Bike is mounted flat and parallel to the ground)

📏 Wall space: ~180cm (W) × 110cm (H); protrudes 60–80cm
Rating: ★★☆☆☆

Pros:

  • Keeps the bike off the floor
  • Visually appealing (great for displaying bikes)
  • Easy to grab and go

Cons:

  • Takes up large horizontal wall space
  • Protrudes into garage or room
  • Requires strong mounting system

Best for: Wide garage walls or stylish indoor setups (e.g., apartments). Use StoreWALL 381mm Brackets with padding for this option.

🚲 3. Perpendicular to the Wall

(Bike is hung by the front wheel; rear wheel sticks out)

📏 Wall space: 180cm (H), 60cm (W) × 120–150cm (out from the wall)
Rating: ★★★☆☆

Pros:

  • Uses vertical height
  • Saves floor space
  • Quick installation with a simple hook

Cons:

  • Rear wheel projects into usable garage area
  • Not fully flat to the wall
  • Lifting required

Best for: Side garage walls or hallways where depth isn’t an issue. Consider a StoreWALL Rotating Bike Hook which allows for perpendicular hanging but also swings the bike closer to the wall.

🚲 4. Upright Flat on the Wall

(Bike is stored vertically, both wheels flat against the wall)

📏 Wall space: 180cm (H), 60–70cm (W) × 60cm (D)
Rating: ★★★★★

Pros:

  • Most space-saving option
  • Minimal intrusion into the room
  • Great for storing multiple bikes in a row
  • Clean and professional appearance
  • Ideal for garage or apartment walls

Cons:

  • Requires lifting the bike onto hook (lightweight bikes preferred)
  • Best when paired with a wall panel system for weight distribution

Best for: Garages, under stair storage, behind doors, and narrow walls. Consider a StoreWALL Heavy Duty Universal Hook.

🛠 Recommended System: StoreWALL Heavy Duty Universal Hook or a StoreWALL Rotating Bike Hook

At StoreWALL Australia, we recommend pairing our Heady Duty Universal Hook or our Rotating Bike Hook with our StoreWALL Wall Panels. This combination provides:

  • Strong support for heavy bikes
  • Secure locking mechanism to prevent bikes from falling
  • Full customisation — add more hooks, shelves, or baskets later
  • A clean, modular design that grows with your storage needs

For example, in a standard single garage wall (approx. 2.4m high × 3.6m wide), you can easily fit 3–4 bikes vertically using this method — and still have room underneath for bins or tool storage.

The Most Space-Saving Way to Store a Bike

🏁 Final Verdict: Go Vertical

When it comes to saving space and keeping your garage or home organised, storing your bike upright and flat against the wall is the most efficient solution. It maximises vertical space, keeps the floor clear, and offers a safe, secure, and clean look — especially when combined with StoreWALL’s smart storage solutions.

Categories
Bike Storage Home Gym Power Tools Shelving Sports Equipment Workbench

Garage Wall Storage Can Be a Space Maker for Your Home

Clutter in the garage is a universal challenge. Between tools, sports equipment, gardening supplies, seasonal décor, and household overflow, the garage can quickly transform from a useful storage area into a chaotic catch-all.

The good news? Systems like StoreWall and other garage wall storage solutions can reclaim that lost square footage, turning your garage into a streamlined, organized, and highly functional extension of your home.

The Problem with Floor Storage
Most garages are overwhelmed because everything ends up on the floor. Bikes lean against walls, bins are stacked precariously, and power tools are buried under holiday decorations. This not only creates frustration but also wastes valuable space that could be put to better use.

The secret lies in looking up and making use of the vertical space that often goes untouched. By shifting storage to the walls, you clear the floor for cars, workbenches, or open space, instantly making the garage feel larger and more usable.

What Makes StoreWall Different
StoreWall is a premium wall-mounted storage system that uses heavy-duty slatwall panels combined with interchangeable accessories—hooks, baskets, shelves, and bins. Unlike pegboards or basic shelves, StoreWall panels are:

  • Durable and load-bearing – Built to support heavy tools, sports gear, and bulky items.
  • Customizable – Hooks and shelves lock in place and can be moved easily without tools.
  • Moisture- and stain-resistant – Ideal for garages, which are exposed to fluctuating temperatures and occasional spills.
  • Attractive – Available in finishes that blend with your garage or home workspace, elevating the aesthetic instead of looking purely functional.

How Wall Storage Creates Space
By getting bikes, tools, and bins off the ground, you create the room needed to comfortably park your car without squeezing around obstacles.

  • Defined Zones – Wall systems make it easier to dedicate space for specific categories—gardening on one wall, sports equipment on another, and tools by the workbench. This organization reduces wasted time searching for things and prevents duplicate purchases.
  • Seasonal Rotation Made Simple – StoreWall accessories allow you to swap items in and out as seasons change. For example, hang snow shovels and sleds in winter, then easily switch to gardening tools and hoses in spring.
  • Maximizing Vertical Real Estate – Most garages have tall ceilings, and StoreWall panels can run from floor to ceiling, multiplying usable space without expanding the footprint of your garage.
  • A Safer, Cleaner Space – Getting gear off the floor eliminates tripping hazards, keeps items away from moisture, and makes sweeping or hosing down the garage far easier.
  • Beyond the Garage – Although StoreWall and similar systems are often marketed for garages, their applications extend into the laundry room, basement, craft room, or even a home gym. Anywhere clutter tends to pile up, wall storage can transform chaos into order.
  • A Smart Investment in Space and Value – Garage wall storage isn’t just about convenience; it can also add value to your home. A clean, well-organized garage is appealing to future buyers, signaling that the property is well cared for. More importantly, it gives you the freedom to truly use your garage as intended—whether that’s for vehicles, hobbies, or a workshop.

Final Thoughts
StoreWall and other garage wall storage systems aren’t just about tidying up; they’re about making space where none seemed to exist. By moving clutter from the floor to the wall, you gain room, safety, and efficiency. It’s a simple upgrade with a transformative impact on how you use and enjoy your home.

If your garage has become more of a storage unit than a functional space, it might be time to look at your walls—not your floor—for the solution.

Categories
Bike Storage Garage Hooks Garage Ideas garage makeover garage wall panel colours Garage Walls Gladiator Plastic Containers Power Tools

Compare Garage Storage Solutions from Gladiator, StoreWALL, and StorEase

In the realm of garage organization, three major brands stand out: Gladiator, StoreWALL, and StorEase. Each offers unique features and benefits, catering to various needs and preferences. In this article, we compare garage storage solutions focusing on these 3 brands and basing our evaluation on ease of installation, durability, customization options, and cost-effectiveness.

The article below is based on the video I prepared a few years ago in which I compare garage storage solutions from Gladiator, StoreWALL, and StorEase. Note that the Gladiator solution has very limited availability in Australia as the distributor closed their business. You can however find some Gladiator accessories on eBay, Amazon and via this online store. The availability of StoreWALL and StorEase has not changed.

Garage Storage Review

Ease of Installation

Gladiator:

  • Installation Process: Gladiator offers a straightforward installation with its GearTrack and GearWall systems. Panels can be mounted on studs for drywall installations. They can also be mounted onto brick walls.
  • User-Friendly: Comes with easy-to-follow instructions and requires basic tools.

StoreWALL:

  • Installation Process: The video focuses on StoreWALL Basic Duty wall panel which is equivalent to Gladiator and StorEase. StoreWALL however also offers Standard Duty (its most popular range) and Heavy Duty, a premium range of garage wall panels. StoreWALL’s accessories feature a CamLok system, simplifying the attachment of accessories and panels.
  • User-Friendly: The installation is intuitive, with a focus on secure and robust mounting.

StorEase:

  • Installation Process: StorEase provides a simple rail system that is easy to mount and configure.
  • User-Friendly: Designed for DIY enthusiasts, making it accessible for home users with minimal tools.
compare garage storage solutions

Durability

Gladiator:

  • Materials: Accessories are made from high-strength steel. Panels are made from heavy-duty plastic, offering excellent durability.
  • Weather Resistance: Wall panels are resistant to moisture, rust, and corrosion, suitable for various environments.

StoreWALL:

  • Materials: Its full range of wall panels are constructed from industrial-grade PVC, providing exceptional durability and impact resistance. All accessories are made from heavy steel making them super strong and durable for all light and heavy uses in the garage.
  • Weather Resistance: All wall panels are waterproof and resistant to mold and mildew, making them ideal for all conditions.

StorEase:

  • Materials: Made from light aluminum which is strong and durable. Accessories are robust and also made from metal.
  • Weather Resistance: Made from metal, the panels and accessories are weather resistant but not as hard wearing s the heavier PVC panels offered by StoreWALL and Gladiator.

Customization Options

Gladiator:

  • Flexibility: Offers a wide range of hooks, baskets, shelves, and cabinets, allowing for extensive customization.
  • Aesthetics: Available in various finishes and styles to match different garage decors.

StoreWALL:

  • Flexibility: Highly customizable with an array of accessories, including shelves, bins, hooks, and baskets.
  • Aesthetics: Available in multiple colors and textures, providing a polished and professional look.

StorEase:

  • Flexibility: Offers basic customization options with a focus on essential accessories like hooks and shelves.
  • Aesthetics: Functional design with fewer aesthetic choices compared to Gladiator and StoreWALL.

Cost-Effectiveness

Gladiator:

  • Price Range: Mid to high range, reflecting its robust build quality and extensive accessory options.
  • Value for Money: Good balance of cost and quality, making it a solid investment for long-term use.

StoreWALL:

  • Price Range: Higher price point due to premium materials and durability.
  • Value for Money: Offers excellent longevity and resilience, justifying the higher initial cost.

StorEase:

  • Price Range: More affordable compared to Gladiator and StoreWALL.
  • Value for Money: Cost-effective solution for basic storage needs, though with limited customization and durability.

Conclusion – Compare Garage Storage Solutions

Choosing the right garage storage system depends on individual needs and preferences. Availability and budget are key considerations as is the aesthetic look of your garage and the customisation offered by the accessories.

  • Gladiator: Ideal for those seeking a balance of durability, customization, and ease of installation at a moderate price point.
  • StoreWALL: Perfect for users prioritizing high durability, weather resistance, and a polished aesthetic, despite a higher cost.
  • StorEase: Suitable for budget-conscious users looking for straightforward, functional storage solutions with basic customization options.

Each brand offers distinct advantages, making them suitable for different applications and user requirements. By evaluating your specific needs, you can select the most appropriate system to enhance your garage organization.